|
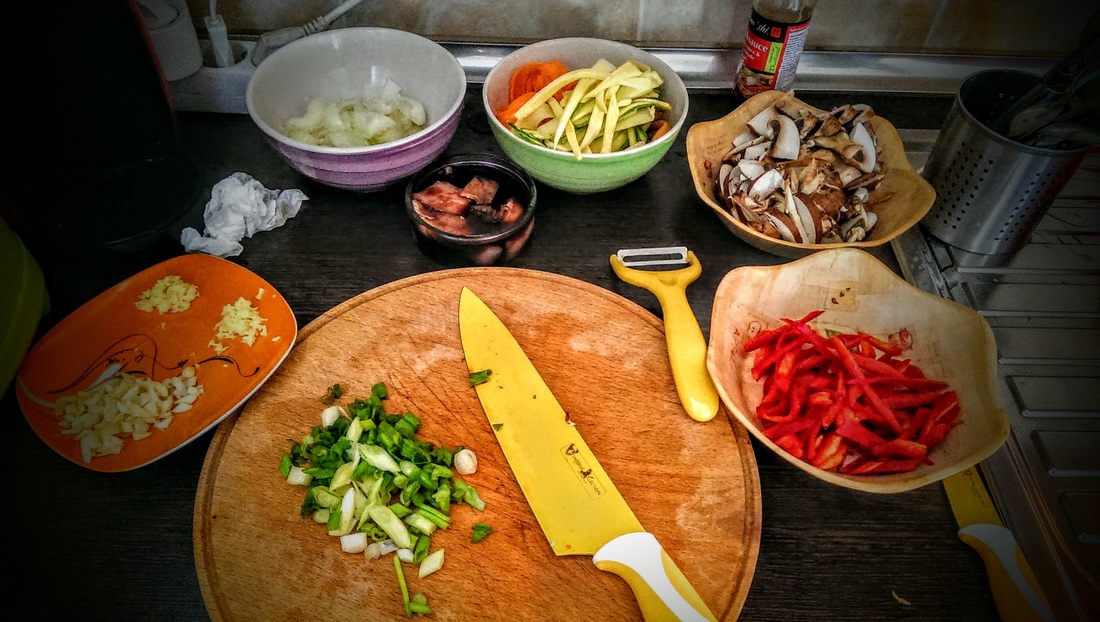
SUMAR: Ce am folosit pentru 2 portii generoase: noodles asiatici cu ou (cei 'sticlosi' de orez sunt grozavi in retete thai, subiectul altei discutii; deocamdata - taitei cu ou) 1 ardei kapia 2 cepe mici Sfanta Treime Asiatica: ceapa verde (2 fire), usturoi (2-3 catei) si ghimbir (cca. 1 cm. radacina razuita) 1 morcov 1 dovlecel 2 ciuperci mari si brune curry, boia de ardei, sos de wok piept de pui Ce-am gresit: Gatitul la wok e o experienta rapida. Si fierbinte :) M-am grabit cu pozele si am omis sa pun ceva seminte de susan, care contribuie si la gust, pe langa aspectul "asiatic". Ce fac mai bun sau mai bine data viitoare: Il pun pe Carnivor sa faca poze si eu ma concentrez la noodles, unde nu mai uit sa pun susan De unde am reteta: 50% inventie, 50% inspiratie oferita de prietenul meu, Gok, de pe paprika tv, din diversele retete de profil ----------------------------------------------------------------------------------------------------- SUMMARY What I used for 2 hungry-guys servings: some egg-based Asian noodles (the 'glassy' rice ones are great in Thai recipes, but that's another conversation; for now, Asian egg noodles) 1 red pepper Asian Holy Trinity: Spring onions (about 2), garlic (2-3 cloves) and ginger (about 1 cm. grated root) 1 carrot 1 zucchini 2 big brown mushrooms curry, paprika, Wok sauce chicken breast What I did wrong: Well, turns out cooking on a wok (or 2 of them) can be quite a hot and 'quick' experience. :) I was so busy taking pictures throughout the cooking stages, that I forgot to add some sesame seeds; they not only improve the taste, but also make the dish look a lot more... "Asian" What I need to do better or tastier the next time: I really need to get my Mr. to take my pics for me, so that I can concentrate on my noodles and not forget to add sesame. How I came across this recipe: This is 50% invention, 50% Gok inspiration from his various recipes on paprika tv  Incepem simplu: lucrez la 2 wok-uri: unul e veggie, unul e cu carne de pui. Punem noodles-ii la fiert in apa cu putina sare, cca. 15 min. sau conform instructiunilor de pe pachet. Special pentru colegul meu de birou, atasez o poza cu taietii pe care ii folosesc eu (achizitionati din Auchan, ca si sosul); ambele tipuri sunt foarte gustoase. Cat timp noodles-ii se fierb, tai carnea oblic si o marinez in sos de wok (un sos gata preparat din comert, o combinatie de sos de soia, sos de peste si diverse mirodenii asiatice, in proportia ideala). Tocam legumele: ceapa - julienne, sau - romaneste - solzisori. Ori cat mai rustic, incat la wok se va topi daca e prea firava. Morcovul - l-am feliat cu curatatorul de cartofi si am procedat la fel si cu dovlecelul. Am feliat ciupercile; am taiat oblic ardeiul si ceapa verde. ----------------------------------------------------------------------------------------------------------- I start off easily: I work with 2 woks - one will be my veggie dish, one will be chicken meat based. I put the noodles in a boiling water with a pinch of salt for about 15 minutes or according to the producer's instructions. Especially for my esteemed co-worker, i attach herewith a pic of my choice for noodles (ready made, of course; I got them at Auchan, as well as my wok sauce); both kids are delish. For as long as the noodles get boiling, I cut chunks of the chicken breast and marinate the pieces in wok sauce (this is a ready made sauce, a great combo of soy sauce, fish sauce and various Asian spices, in ideal proportions). Vegetables get chopped: onions - julienne, or as rustic as you wish, since we need to melt in the high heat wok is cut too finely. I sliced the carrot and zucchini using my potatoes peeler. Mushrooms get sliced, pepper and Spring onions get diagonally chopped.
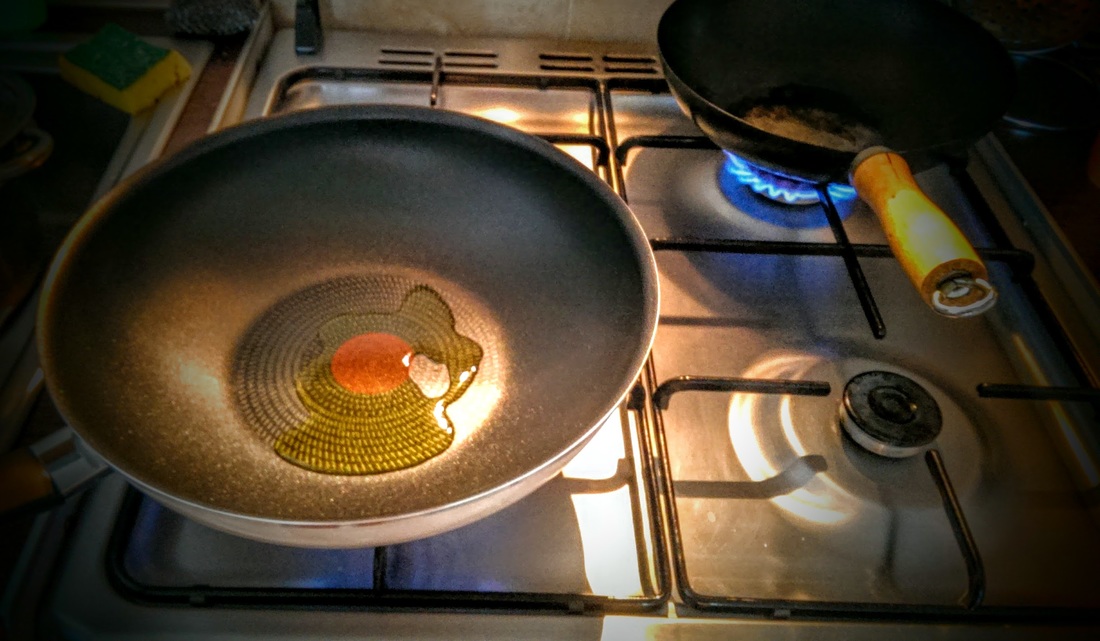
Gatitul la wok presupune flacara intensa si amestecare fara lingura (prin rasucire). Primul aspect e motivul pentru care necesar sa pregatim toate legumele si carnea in avans, pentru ca totul va fi gata in cca. 10 minute de cand punem wok-ul pe foc. Sau, in cazul meu, wok-urile. :) ----------------------------------------------------------------------------------------------------------- Cooking with a wok involves high heat and non-spoon, twist-based mix. The first is the reason why we need to have everything ready prior to get it started, since all cooking will be done in about 10 minutes tops as of the moment we place the wok on the stove. Or, in my case, the woks.
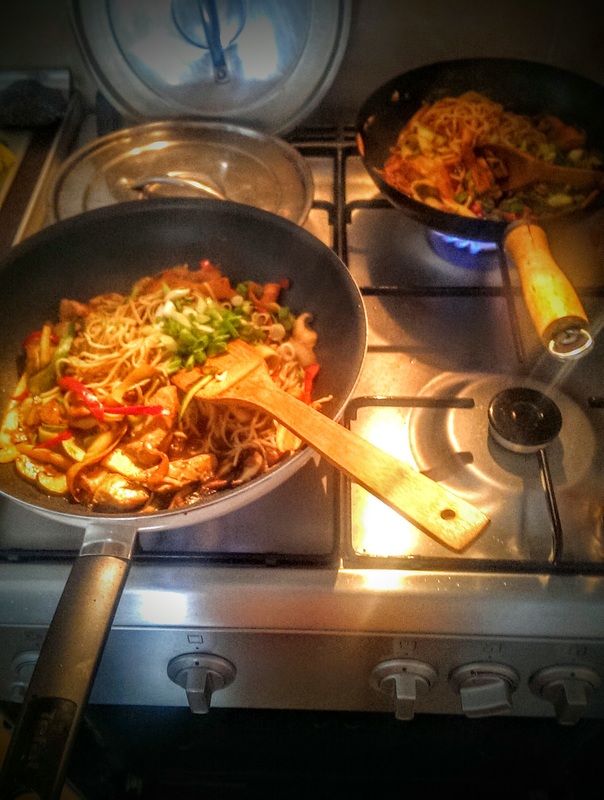
Totul s-a intamplat atat de repede, incat nu am apucat sa fac asa multe poze. Inceputul e clar: am incins putin ulei de masline in wok(-uri), la foc mare. Am adaugat ceapa, putin curry si boia. Dupa ce ceapa a devenit putin sticloasa si repejor, pana nu s-a ars boiaua, am pus puiul marinat scurs (in versiunea non-veggie), iar apoi ardeiul si morcovul. In versiunea veggie, evident, sarim peste pui. Am stropit cu putin sos de wok; gustati-l, este destul de sarat asa ca nu ar trebui sa mai adaugat sare in wok. ----------------------------------------------------------------------------------------------------------- It all happened so fast, I haven't got a chance to take that many pics. The beginning is pretty clear: I got my wok pans on high heat with a dash of olive oil. I then added the onions, a little curry and paprika. After the onion got a bit moist and pretty fast, before the paprika burns, I added my drained marinated chicken (for my non-veggie version) and then added the pepper and carrot. In the veggie version, obviously, we need to skip the chicken stage. I added a splash of wok sauce; give it a taste, since it is pretty salty and you shouldn't add more into your wok.  Intre timp, noodles-ii s-au fiert si i-am scurs; i-am trecut sub un jet de apa rece si i-am abandonat in sita pana a venit vremea lor. Am pastrat putin din apa de la fiert, pentru a o folosi putin mai tarziu. Am rasucit nitel din wok-uri si am continuat adaugand ciupercile, dovlecelul, usturoiul si ghimbirul. ----------------------------------------------------------------------------------------------------------- In the mean time, the noodles are boiled and I drained them; they took a fast cold shower and were abandoned in the sieve until their time came. I saved a little bit of the boiling water in order to use it a little later on. I twisted and turned my woks and carried on adding the mushrooms, zucchini, garlic and ginger.  Cand a venit vremea lor, am adaugat noodles-ii in fiecare wok; i-am rasucit in fel si chip, am stropit generos cu sos de wok; dupa ce taiteii s-au rumenit nitel in wok, am pus putin din apa de la fiert a taiteilor, pentru a nu iesi prea uscati. Apoi, am aruncat ceapa verde, am pus capacul si am oprit focul. Am lasat toata socoteala sa se odihneasca nitel, iar apoi am servit. ----------------------------------------------------------------------------------------------------------- When their time finally came, i added the noodles in each wok; i twisted and turned them around, added a splash of wok sauce; after the noodles got slightly roasted in the wok, i added some of the water they boiled in, so that they don't get too dry. Then, I just dropped off my Spring onions, popped the lid on and turned the fire off. I left it all to rest just a little bit and then I served.
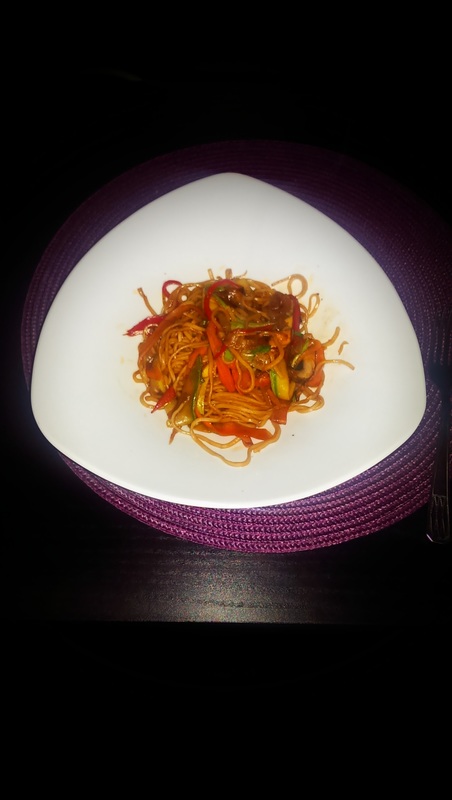
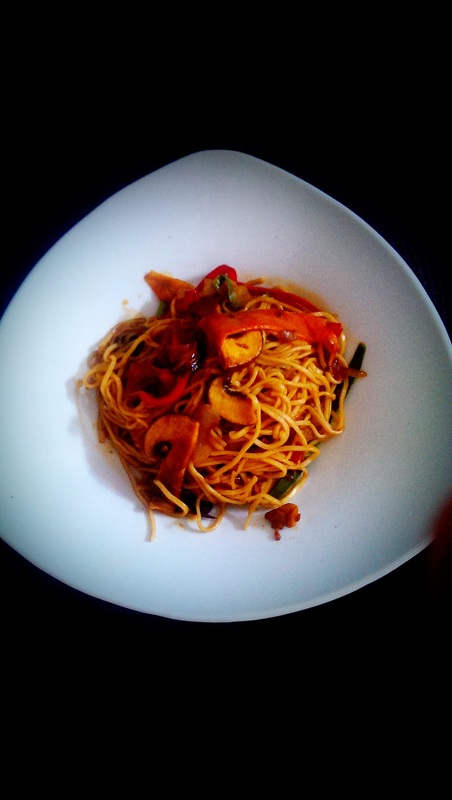
Pozele de mai jos arata cam ce a iesit. Stiu ca nu se prea observa, dar una este veggie, iar alta nu. ----------------------------------------------------------------------------------------------------------- The below pics show what came out of it. I know you cannot really tell, but one is veggie and one is not.
TRYSEXUAL ----------------------------------------------------------------------------------------------------------- I'LL TRY ANY RECIPE (AT LEAST) ONCE
0 Comments
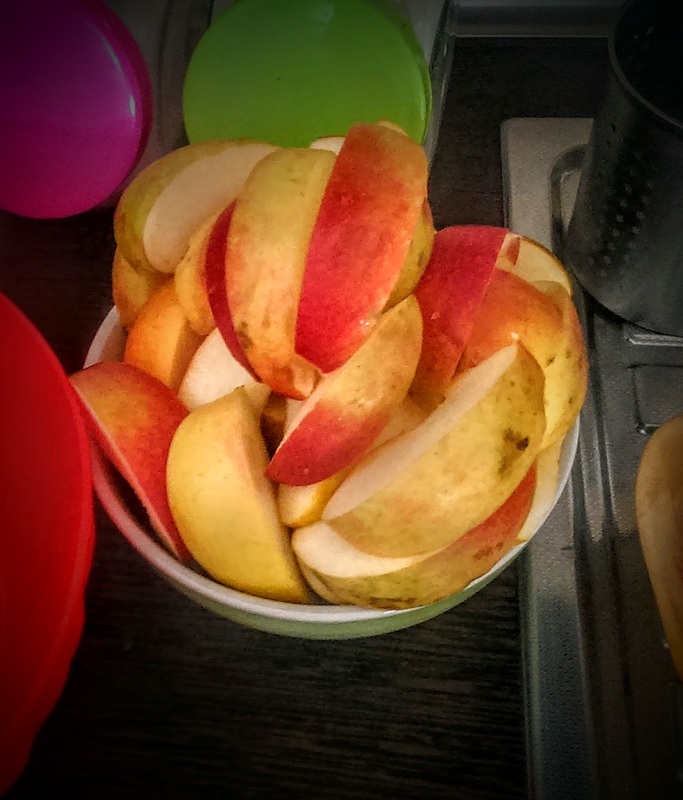
SUMAR: Ce am folosit pentru 1 tarta (min. 8 portii): 6 oua 6 linguri de faina 6 linguri de ulei 6 linguri de zahar alb 6 linguri de zahar brun Demerara unt (cca. 50 g.) 1 pliculet praf de copt (5 g.) 1 pliculet zahar vanilinat 4 mere mari un strop de otet de mere 1 tava antiaderenta care sa poata fi folosita pe aragaz si ulterior in cuptor (eu am una rotunda din tuci, cu 5-10 cm. inaltime si cca. 25 cm. diametru; in orice caz, ar trebui sa fie una antiaderenta, pentru ca tarta sa poata fi rasturnata 'in siguranta') Ce-am gresit: Am servit-o exact asa; desi e foarte buna, gustul poate fi foarte usor imbunatatit cu ceva 'adaugiri' Ce fac mai bun sau mai bine data viitoare: Servesc cu o cupa de inghetata de vanilie sau ceva sos pe baza de coniac. De unde am reteta: Are 145 de ani vechime, am invatat sa o fac prima data pe la 14 ani. Asta poate fi un indiciu pentru cat de simplu e. Jenant de simpla ----------------------------------------------------------------------------------------------------- SUMMARY What I used for 1 tart (min. 8 servings): 6 eggs 6 tbsp. of flour 6 tbsp. of vegetable oil 6 tbsp. of white plain sugar 6 tbsp. of brown Demerara sugar some butter (about 50 gr.) 5 gr. baking powder some Vanilla sugar 4 large apples one splash of apple vinegar 1 tray that can be used on an open flame on the stove and afterwards in the oven (I have a round one with approx. 5-10 cm. height and 25 cm. diameter) What I did wrong: Served it just plain; it's very good, but the taste can easily be improved with some 'side effects' What I need to do better or tastier the next time: Maybe serve with some Vanilla gelato or some kind of a cogniac-based dressing How I came across this recipe: Have it since pretty much forever and first made it when I was about 14 years old; this should give you guys a clue of how simple this is made. Embarrassingly easy.  Am purces, deci si am taiat merele; nu le-am curatat, pentru ca ideal e sa-si pastreze forma. Le-am taiat bucati de minim un deget grosime, din acelasi motiv. ------------------------------------------------------------------------------ So I went right ahead and chopped up my apples; I did not peel them, since I want their shape to be preserved throughout the cooking. I chopped finger thick bits, for the same reason.
Am separat albusurile de galbenusuri; pe primele le-am batut spuma cu mixerul, iar pe celelalte le-am impreunat cu zaharul si zaharul vanilinat si le-am mixat pana cand zaharul s-a topit. Nimic mai clasic, nimic mai simplu. ------------------------------------------------------------------------------ I separated the egg yolks from the egg whites; the egg whites were then mixed until foamy and the egg yolks got mixed with the sugar and vanilla sugar for until all sugar was melted. There you have it, simple and classic.
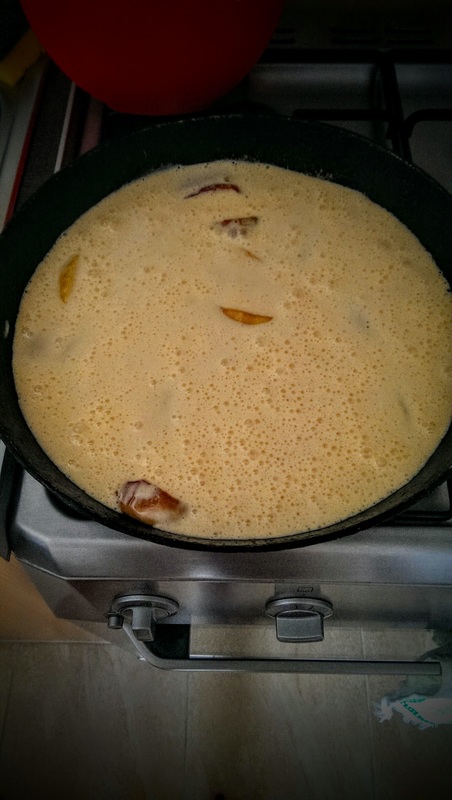
In compozitia cu galbenusuri, am adaugat uleiul si apoi faina si praful de copt. Am amestecat si, dupa ce compozitia a devenit omogena, am incorporat albusurile, fara a amesteca prea 'temeinic', pentru a nu distruge bulele de aer din compozitie - datorita lor, tarta va fi 'pufoasa'. ------------------------------------------------------------------------------ In my egg yolks mix, I added the vegetable oil, then the flour and baking powder. I mixed it all by hand and, after my mixture got smooth, I started adding my egg white foam, without over-mixim them all together, since over mixing destroys all air bubbles that will eventually make the tart nice and airy.
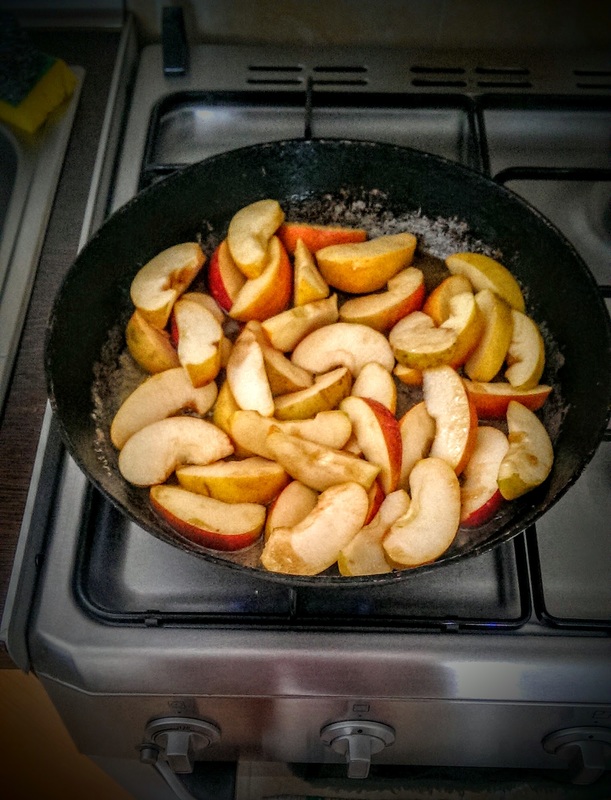
Odata compozitia pregatita, asezam tava pe aragaz, adaugam untul si zaharul brun si le lasam sa se caramelizeze usor, la foc mediu. Adaugam apoi merele si stropim cu putin otet de mere, pentru ca merele sa isi pastreze culoarea. Le caramelizam pana cand devin usor aurii si putin moi. Cand au fost gata, am aranjat feliile de mere, astfel incat sa acopere fundul tavii iar la final am adaugat deasupra compozitia de tarta si am introdus totul la cuptorul incins pentru cca. 15 min la foc mic. SFAT: Atunci cand coacem o compozitie cu praf de copt ca agent de crestere, ideal este sa incingem cuptorul la cea mai mare temperatura inca din timpul pregatirilor, iar cand tava este gata de dat la cuptor, temperatura sa fie coborata la nivelul mic. Un 'soc termic' de acest tip va face compozitia sa se ridice frumos. Desigur, trebuie sa rezistam tentatie de a deschide usa cuptorului, pentru cele mai bune rezultate. P.S.: De asta exista geamul cuptorului. ------------------------------------------------------------------------------ Once your mixture is ready, we need to set our baking tray on the stove, at medium heat; then add butter and brown sugar and let them slightly caramelize. Then add the apples slices and a splash of apple viengar, so that they keep their nice colours. Caramelize the apple slices for until they're slightly golden and soften just a tiny bit. When they're ready, arrange your apple slices so that they cover the entire bottom of the tray and, at the end, just pour your mixture right on top of the apple slices. Pop this in to the pre-heated oven for about 15 minutes at low heat. ADVICE: Whenever baking a mixture based on baking soda, ideally, we should set the oven at highest temperature and let it get really heated while still making all needed preparation for baking. When the tray is ready to go into the oven, lower the temperature to lowest level. A thermic shock of this kind will make your batter rise nicely. And sure, you absolutely need to resist all temptation to open up your oven door while baking, for achieving the very best results. P.S.: That's why there's a window on your oven.
Dupa ce am scos-o din cuptor, o lasam sa se raceasca putin, cat sa putem atinge marginile tavii, iar apoi o rasturnam pe un platou generos. Sau direct pe un blat de bucatarie, daca sunteti la fel de indecise/indecisi ca mine, si nu va puteti hotari ce platou sa va alegeti. ------------------------------------------------------------------------------ After it's out of the oven, we need to let it cool just a tiny bit, so that we can touch the edges of the tray, and then we need to switch it up on a nice platter or just a plain chopping board, if you're anything like me and cannot decide on which platter to buy if it saved your life.  Asta a iesit, vreo 30 min mai tarziu. Stanjenitor de simplu.
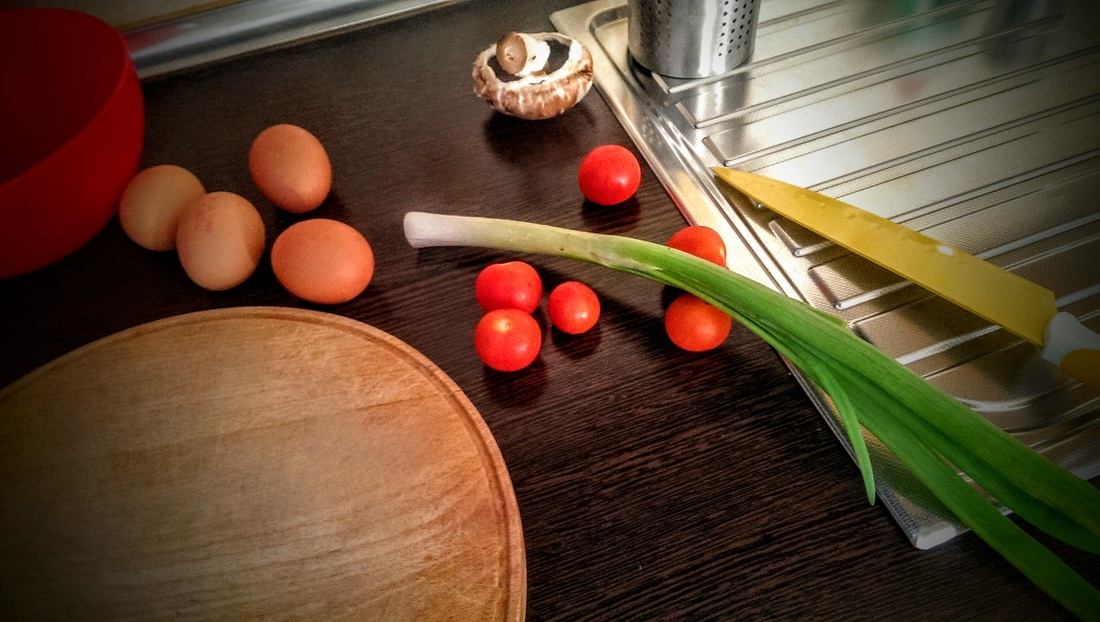
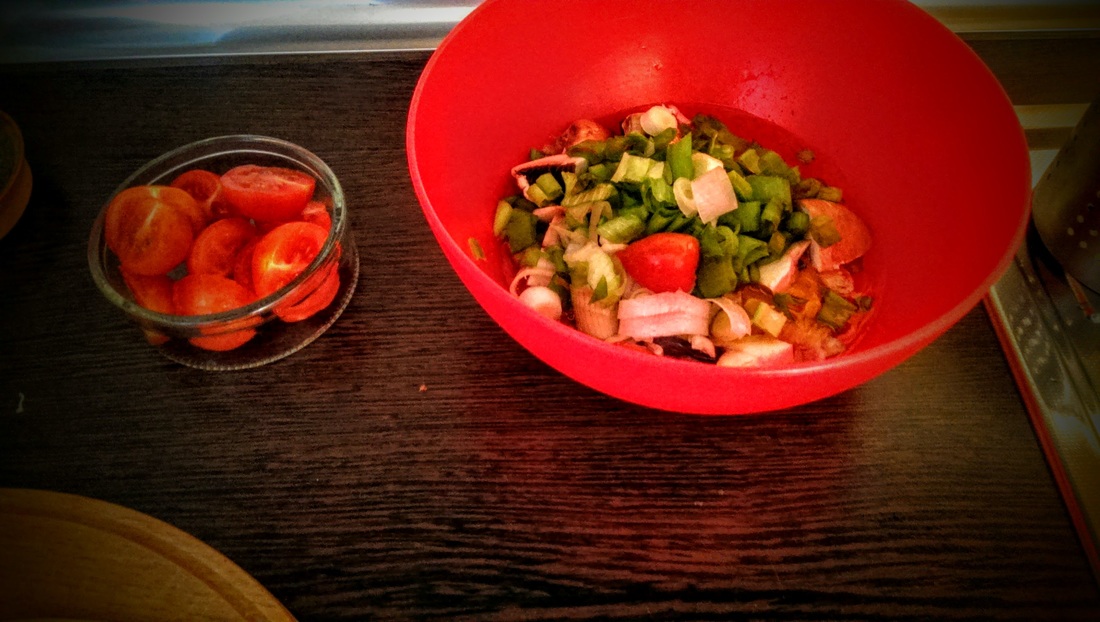
------------------------------------------------------------------------------ This is what came out of it, some 30 min. later. Embarrasingly easy. ------------------------------------------------------------------------------ TRY SEXUAL I'LL TRY ANY RECIPE (AT LEAST) ONCE. SUMAR: Ce am folosit pentru 2 persoane: 4 oua 1 fir de ceapa verde 1 ciuperca mare si bruna 3 linguri de faina 1 lingurita praf de copt sare, piper, oregano cateva rochii cherry cateva felii de mozarella Ce-am gresit: Am uitat sa pun ardei, dovlecel, sau alte legume mai aveam prin frigider Ce fac mai bun sau mai bine data viitoare: Pun si dovlecel/ardei/alte legume. De unde am reteta: Un filmulet de pe Tasty (vazut facebook) care mi-a ramas pe retina ----------------------------------------------------------------------------------------------------- SUMMARY What I used for 2 people: 4 eggs 1 Spring onion 1 big brown mushroom 3 spoons of flour 1 teaspoon of baking powder salt, pepper, oregano some cherry tomatoes some mozzarella slices What I did wrong: Forgot to add some zucchini, red bell pepper or whatever leftover vegetable I had in the fridge. What I need to do better or tastier the next time: I'll add some zucchini/red bell pepper/ other veggies. How I came across this recipe: Some quick video I watched on Tasty (Facebook page) that got stuck on my head  Fara mare preambul, am batut ouale cu sare si piper, cu o furculita. Am adaugat ceapa si ciupercile tocate. Am amestecat vitejeste; am adaugat faina si praful de copt si am amestecat din nou. -------------------------------------------------- No muss, no fuss - eggs get beated up with some salt&pepper, by hand. I then add my chopped Spring onions and mushrooms. Gave it a steady hand mix; then added flour and baking powder and mix once again.
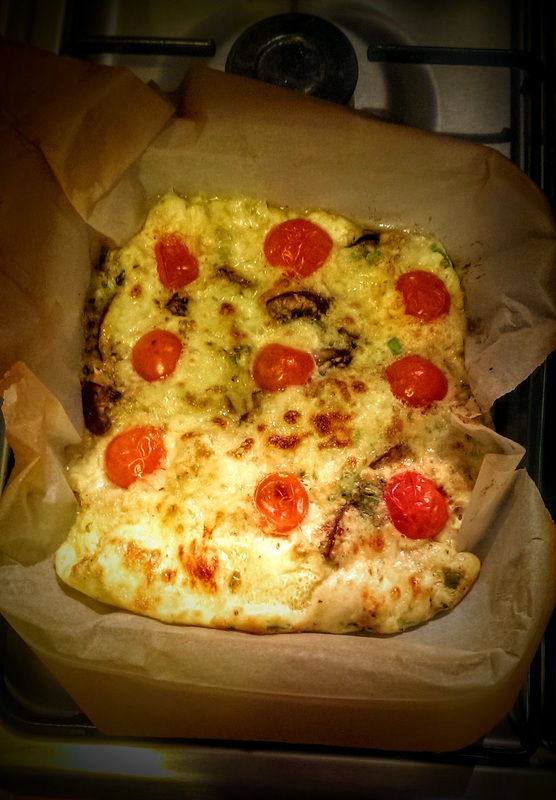
Am ales o tava yena mica (20x20), am asezat hartie de copt (de, niciunul dintre noi nu e lesinat dupa spalatul vaselor). Am pus compozitia in tava si am adaugat deasupra feliile de mozarella rupte cu mana, cateva jumatati de rochii cherry si am uitat de ea in cuptor vreo 15 min. la treapta a 2-a. -------------------------------------------------- I chose an oven safe glass tray (20x20 cm), placed some baking paper on it (since none of us are dish washing lovers). Placed my mix in the tray and then decorated with some cherry tomatoes halfs and mozzarella pieces. Popped it in the oven and forget all about it for approx. 15 min. at 2nd temperature level.
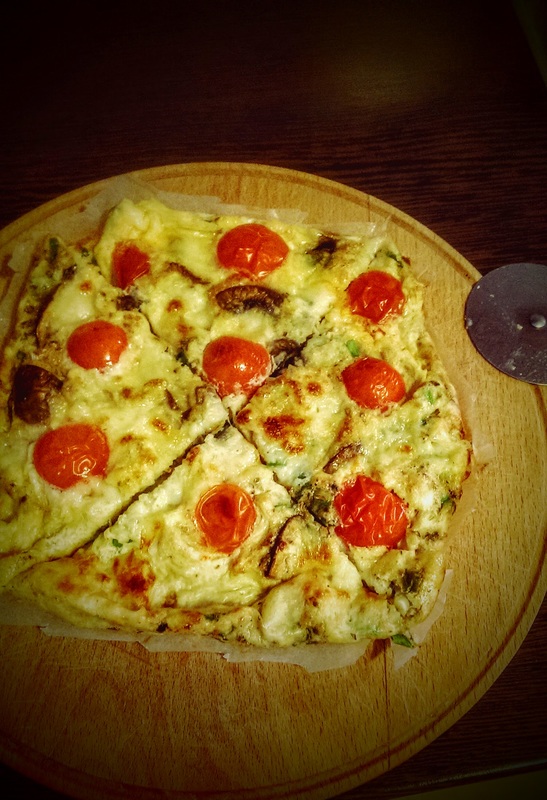
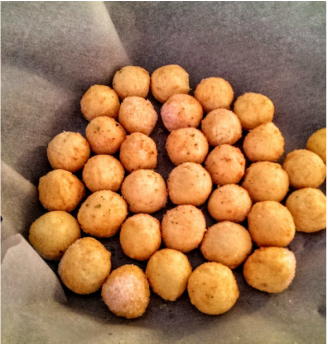
Asta a iesit. Am taiat-o cu rotita pentru pizza si am mancat cu placere. O alternativa buna la omleta sau ouale prajite. Plus, un adaos binevenit de legume proaspete si gustoase. -------------------------------------------------- This is what came out of the oven. I cut it with my pizza kife and we ate the whole thing while still hot. A tasty alternative to fried eggs or omelette. Plus, a well deserved addition of fresh and tasty veggies.  TRYSEXUAL -------------------------------------------------- I'LL TRY ANY RECIPE (AT LEAST) ONCE. SUMAR: Ce am folosit pentru 4 burgeri (2 veggie, 2 de vita): 4 chifle mici din comert (de la lidl) o casoleta de burgeri de vita (idem) 1 dovlecel romanesc 1 ciuperca mare si bruna maioneza, ketchup, castraveti murati Ce-am gresit: Am uitat ca eu nu mananc doi burgeri, asa ca ar fi trebuit sa fac doar unul Veggie. :) Sunt destul de satiosi. Ce fac mai bun sau mai bine data viitoare: Nu mai fac salata separat, ci adaug direct in chifla o frunza de salata, o felie de rosie si cateva inele de ceapa marinata in prealabil in putin otet de mere cu putin zahar brun. Daca ai o garnitura de cartofi, e mai mult decat suficient, alaturi de doi burgeri. ----------------------------------------------------------------------------------------------------- SUMMARY What I used for 4 burgers (2 Veggie, 2 beef): 4 ready made buns (from lidl) one pack of burgers (same) 1 zucchini 1 big brown mushroom mayo, ketchup, pickled cucumbers What I did wrong: I forgot I dont actually eat 2 burgers, ever. So I should have made just one Veggie. :) They're pretty nourishing. What I need to do better or tastier the next time: I won't make a side dish salad, but add one salad leaf, one tomato slice and some onion rings previously pickled in some apple vinegar with some brown sugar. If you already have a potato side dish, it is really more than enough, with 2 burgers. 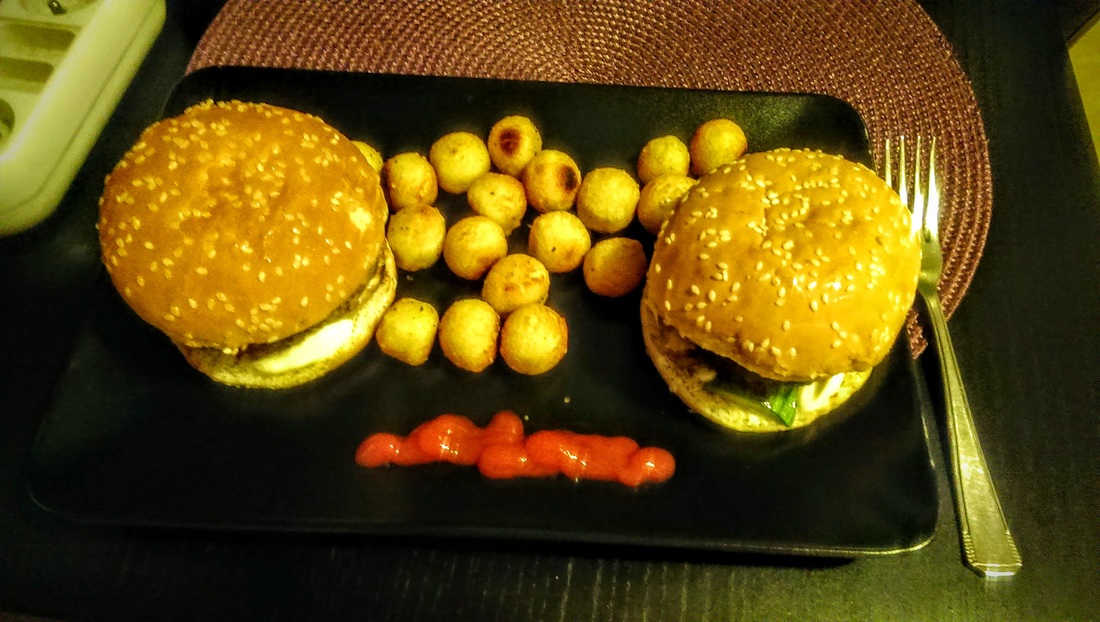 La noi, joia - sau oricare alta zi dintr-o saptamana de lucru - este zi de fast-food. Si nu ma refer la marile lanturi de profil, ci la mancare tip fast food facuta in casa. E un trend in sensul asta, e plin online-ul de retete fel si fel. Nu am urmarit o anume reteta, mai curand am pus impreuna ingredientele preferate ale fiecaruia dintre noi. Prin urmare, a rezultat un Veggie burger si un Beef burger, dupa cum urmeaza. ----------------------------------------------------------------------------------------------------- Thursdays - or any other day of a working week - at our place is definetly a fast-food day. And I'm definetly not talking about the fast-food restaurants' chains, but about home made 'fast-food'. There's an ascending trend about that lately and the online environment is full of it. I haven't actually followed through a certain recipe, but rather combining our favourite ingredients. So there you have it - one Veggie burger and one Beef Burger. 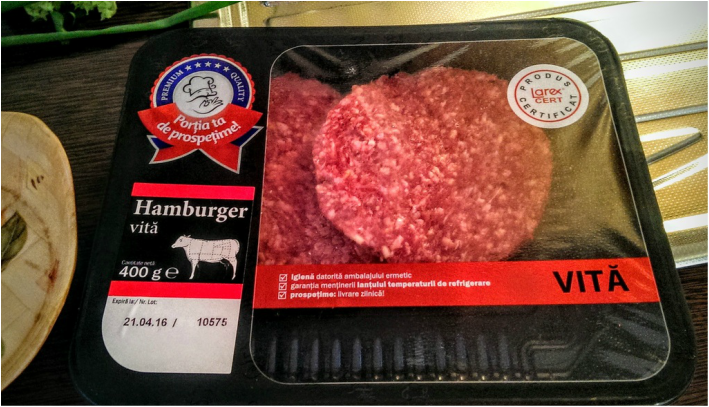 Burgeri de vita din comert; sunt sensibil mai mari decat chiflele (tot din comert), asa ca am obtinut 4 burgeri mici din cei doi mari. Am folosit doar doi, momentan, iar pe ceilalti i-am pus in congelator, pentru alta data. ----------------------------------------------------------------------------------------------------- Ready-made beef burgers; seriously larger than my buns (also ready made), so I just went ahead and cut those in half as to get 4 tiny ones. I just needed two for now, and the olther two will just easily stay 'cool' in the freezer, waiting for a next time. 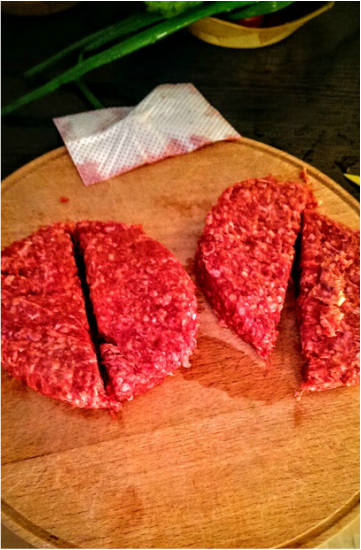 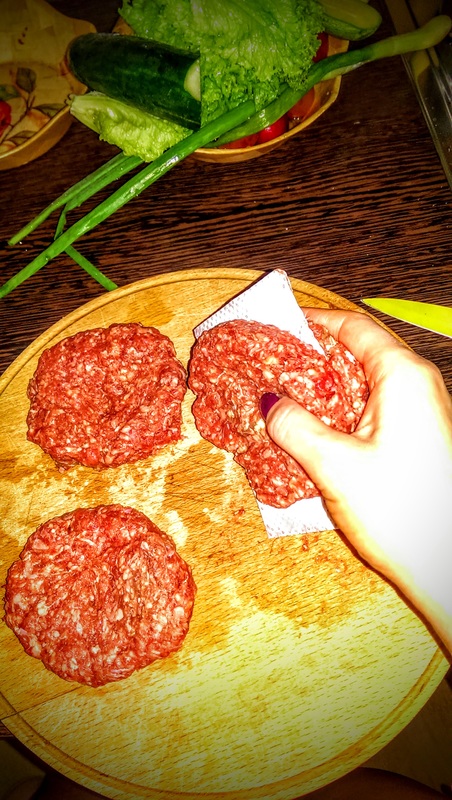 Atunci cand formati burgerii mai mici, incercati sa apasati usor in centrul discului de carne, pentru ca in timpul prepararii, sa isi pastreze forma. Desigur, in calitate de 'professional failure', nu am stiut ca burgerii contin amidon/alti agenti de crestere la cald care ii fac sa isi mareasca usor volumul, si m-am pomenit cu doua 'chiftele' de toata frumusetea, aproape sferice. :) In fine, pentru ca am ales tema 'fast food' si pentru ca mai aveam in congelator niscaiva cartofei pomme noisette (un soi de bulete din piure de cartofi cu invelis crocant), am pus in cuptor suficient cat pentru doi flamanzi. Merg foarte bine cu burgerii si sunt o alternativa ceva mai fancy si ceva mai sanatosi decat "clasicii" cartofii prajiti. ----------------------------------------------------------------------------------------------------- When making the smaller burgers, try pressing the center with your finger, since during the cooking they will slightly start raising and you need to have them flat. Sure, as a professional failure, I had no idea the burgers' meat mix may have starch or other raising agents so what I first got were two almost spherical burgers. :) Finally, since our chosen theme is 'fast food' and because I had some pomme noisette potatoes in my freezer, I threw some in the oven, just enough for two hungry people. They went really well with our burgers and seem a more healthy and sophisticated option than your usual French fries.
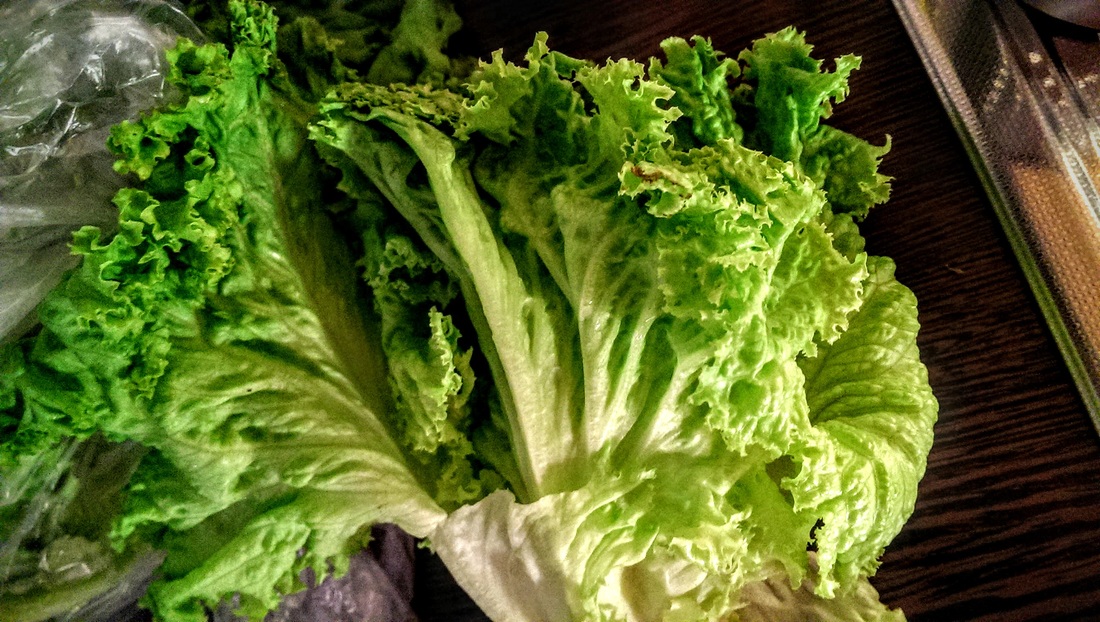
Pana sa punem burgerii pe tigaia grill, avem de facut si un Veggie burger. Asadar ne repezim la frigideri si scoatem cele de trebuinta pentru o salata (salata verde si creata, ridichi, rosii cherry, ceapa verde, castravete, branza de capra), si niscaiva legume potrivite pe grill si intr-o chifla de burger (o jumatate de dovlecel uitata de vreme si o ciuperca mare si bruna). ----------------------------------------------------------------------------------------------------- First and aforemost, prior to grilling our beef burgers, we need to get started on that veggie one. So off we go and take out everything we need for a salad (lollo biondo salad, radishes, cherry tomatoes, Spring onions, cucumber, goat cheese) and some grill-and-bun-suitable leftover veggies (half of leftover zucchini and one big brown mushroom).
Abandonam cartofeii in cuptor. Dupa igiena de rigoare, am taiat dovlecelul pe lung, ceva mai gros; am tocat si ciuperca tot ceva mai gros. Am constatat ca daca legumele sunt taiate prea subtire, se usuca la grill si devin fade si triste. Daca le pastrati mai groase si le aruncati pe grill cu putin ulei de masline si sare, atunci devin suculente. Si fericite. :) ----------------------------------------------------------------------------------------------------- We just abandon our pommes noisette in the oven. After the required hygene, we cut the zucchini on the long side, slightly thicker slices. I notices that thin cut veggies tend to get too dry on the grill pan and become tasteless and, well, sad. Keep them thicker, trow some olive oil and grill them salty, they become juicy. And merry. :)
Fericite asa cum erau in faza asta, taiate grosier, am incins o tigaie grill; am aruncat o suvita de ulei de masline si am lasat sa se incinga bine. Apoi, am asezat dovlecelul in tigaie si am aruncat peste el ceva sare. Acoperit cu capac, mi-am vazut de ale mele. Intors pe partea cealalta, aruncat sare, lasat cu capacul, rezulta cam ce e in poza de mai jos. Idem cu ciupercile. Numa bine dupa ce le-am scos in tigaie, le-am abandonat laolalta intr-un bol. Se pare ca, atata vreme cat s-au mai odihnit, au devenit si mai suculente. Daca se mai putea. ----------------------------------------------------------------------------------------------------- Merry as they were at this stage, thickly chopped, I got one grill pan hot, threw some olive oil and let that get hot too. Then, I added the zucchini and seasoned with some salt. Covered with the lid and carried on with my other tasks. When ready, I turn it on the other side, throw some salt, let it rest and you can see the result in the pic below. Same goes for the mushroom slices. Left them all to rest when they're all done. It seems that if they rest a little bit, they get even juicier. If possible.
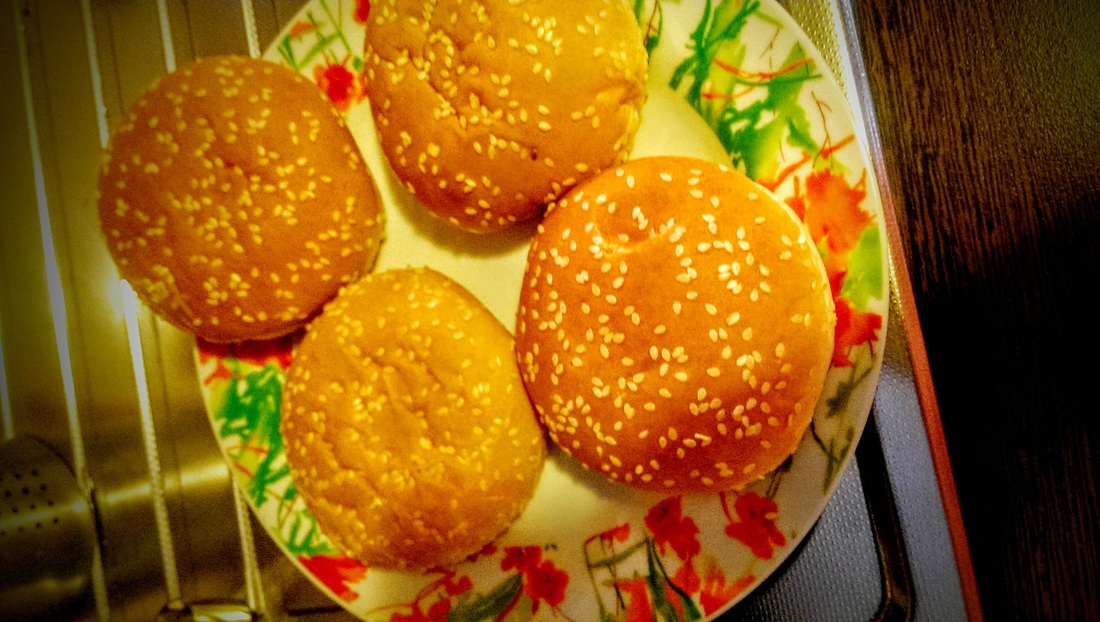
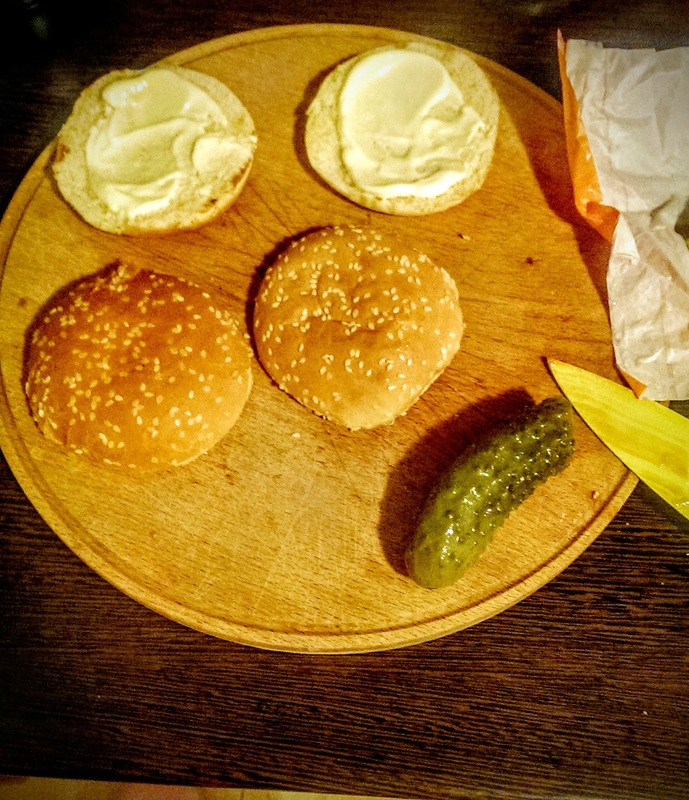
Pentru ca burgeri fara chifle nu se poate, avem si chifle. Sigur, din comert. :) Foamea e mare, si graba la fel. Promit sa revin, totusi, cu o varianta de home-made-gourmet-burgers, in care sa fac chiar eu inclusiv chiflele. Stay tuned... ----------------------------------------------------------------------------------------------------- And since you cannot have burgers without burger buns, we have that too. Ready-made as well, since we're in a hunger and hurry. I promise, though, to come back with a home-made-gourmet-burgers, where I make everything myself, including the buns. So stay tuned...
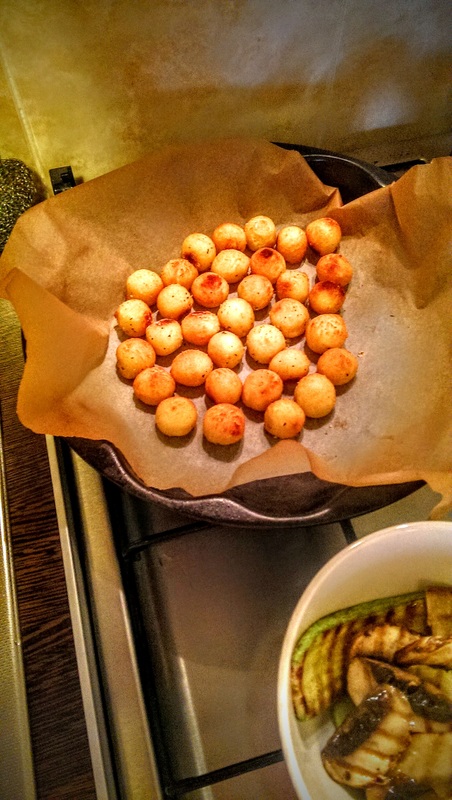
Am continuat cu chiflele, pe care le-am taiat si le-am fript pe tigaia grill cateva secunde, mai mult pentru a le incalzi usor. Intre timp, am constatat ca sunt gata si cartofii, ba chiar ca am reusit sa ii fac un pic prea crocanti. :) De, multe lucruri de facut in doar cateva minute. ----------------------------------------------------------------------------------------------------- I carried on with my buns, wich I cut and grilled for a few seconds, just to get them heated. In the mean time, I noticed that the potatoes are done too, a little too crispy, I might add. :)
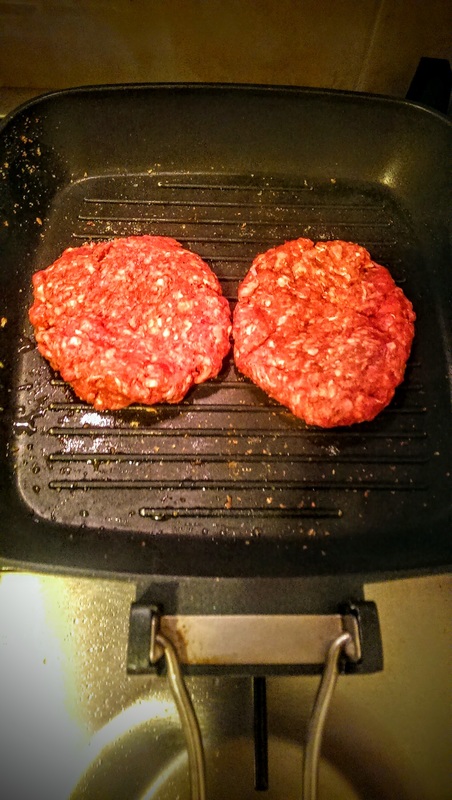
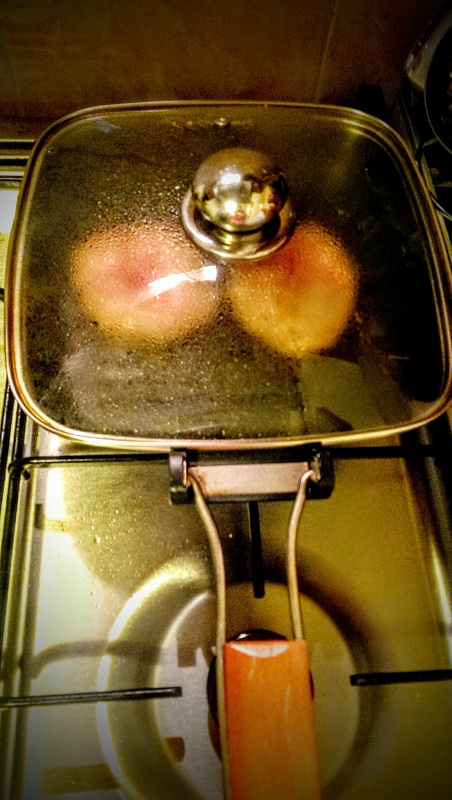
Dupa ce am perpelit putin chiflele pe interior, am decis ca e momentul sa perpelesc burgerii de vita si sa incep sa montez burgerul veggie. Fara mare preambul, am pus burgerii in tigaia deja destul de incinsa, data la foc mic. Pus capac, lasat cateva minute pe fiecare parte. La mine e simplu - carnivorul prefera well done, asa ca am asteptat sa devina albiciosi (semn ca s-au patruns bine), iar apoi i-am intors. ----------------------------------------------------------------------------------------------------- After getting the inside of my buns slightly cooked, I decided it was time for the burgers to start cooking and the veggie ones to get set up. Without furthe ado, I placed my burgers on the already hot pan, at low temperature. I popped the lid on, left it few minutes on each side. My life's easy since my meat lover likes his burgers well done, so I waited until they got white and done and then I switched them to the other side.
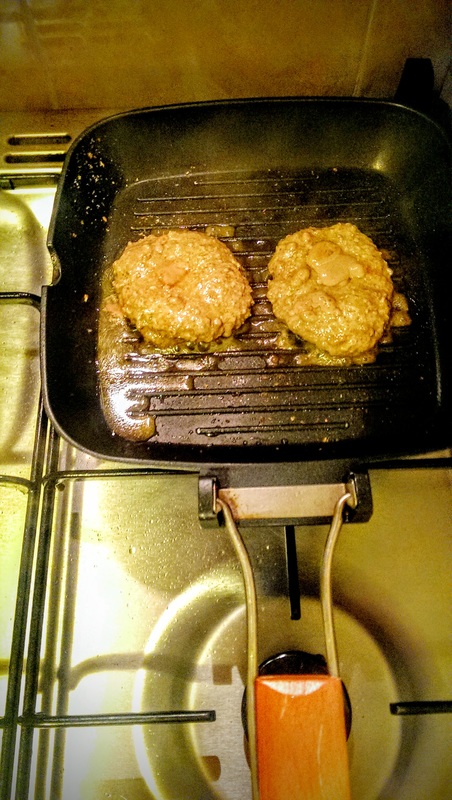
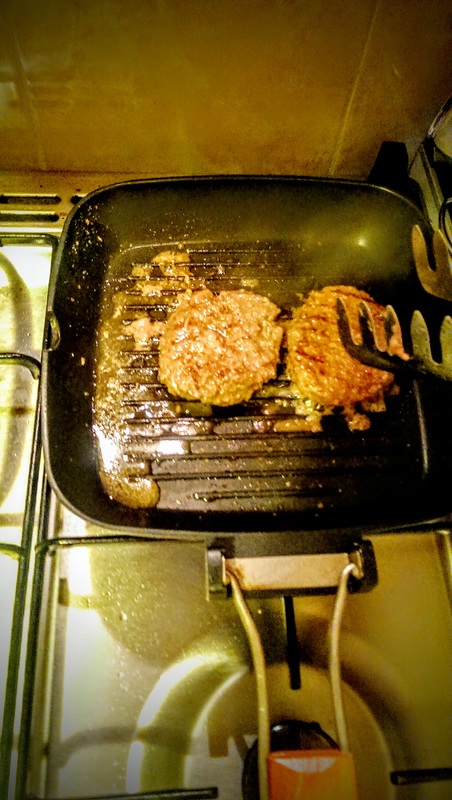
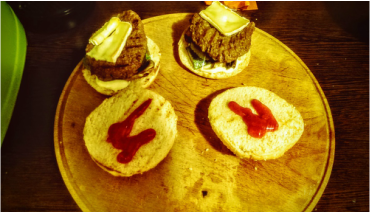
In poza din stanga jos este vizibil cum burgerii erau gata de intors, iar in cea din dreapta - cum aratau dupa ce i-am intors. ----------------------------------------------------------------------------------------------------- The below pics show how the burgers were ready to be turned on the other side (left) and hoe they looked when turned over (right side pic).
Daca vorbim de montaj - nimic ma simplu. Eu am pus o lingurita de maioneza (si asta din comert, destul de light - pentru o maioneza; si se pare ca a intalnit si oul in 'viata' ei). Am asezat dovlecelul si ciupercile, astfel incat sa nu iasa afara prea usor. Nu e vreo inginerie, doar ca ar trebui sa stea 'in picioare' cu tot cu chifla de deasupra. Si daca nu sta, puteti folosi o tepusa pentru frigaruie ori o scobitoare. Frunza de salata ar fi fost, in cazul meu, inutila - avand salata pe masa - asa ca am continuat cu felii de castravete murat (se impaca foarte bine cu maioneza) si feliute subtiri dintr-o branza moale (poate fi camembert sau orice altceva va place). Am procedat identic pentru toti burgerii, diferenta a fost doar ca la cel veggie, m-am oprit aici, am adaugat"capacul"uns cu putin ketchup si gata. ----------------------------------------------------------------------------------------------------- Now it's time for the super-easy set-up. I added a teaspoon of mayo (ready made, as well). I placed the zuccini slices and the mushrooms too so that they don't leave the bun too easily. Not much of a science, just that they have to be able to 'stand up' with the bun on top. And even if you don't manage that, you can just use a skewer stik or just a toothpick. The classic salad leave would have been useless in my case, since I also made a salad, so I just carried on with pickled cucumber slices (they're great with the mayo) and thin slices of any soft cheese you like (can be camembert, like mine). I did the same set-up for all burgers, the difference being that this set-up was all I had to do for my Veggie ones. I just added the 'bun lid' with a bit of ketchup and they were done.
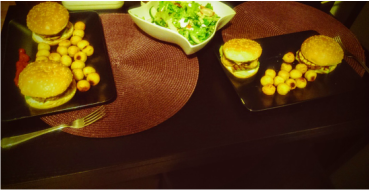
Pentru burgerul de vita, am adaugat carnea din tigaie si branza camembert imediat deasupra, ca sa se topeasca putin la caldura degajata de carne. La fel, adaugat 'capacul' si pus in farfurie. ----------------------------------------------------------------------------------------------------- For my beef burger, I added the meat and camembert cheese right on top, so that it gets slightly melted from that heat. Then add the 'bun lid' and serve.
Finally. Dupa cca. 30-45 de minute: masa e gata! Ca tare foame mi-a mai fost (si) azi.... ----------------------------------------------------------------------------------------------------- Finally. After about 30-45 minutes: dinner's ready! Man, I was sooo hungry today (as well)...
O cina... corecta. Si care intruneste cei 4 factori esentiali pentru pregatirea unei mese in timpul saptamanii.
----------------------------------------------------------------------------------------------------- A fair enough dinner, that puts together all 4 main factors for cooking a meal during a working week. ----------------------------------------------------------- TRYSEXUAL I'll try any recipe (at least) once. |
Author"I'm a TRYsexual. I'll try anything once!" (Sam Jones, SATC) Archives
February 2017
Categories
All
|


 RSS Feed
