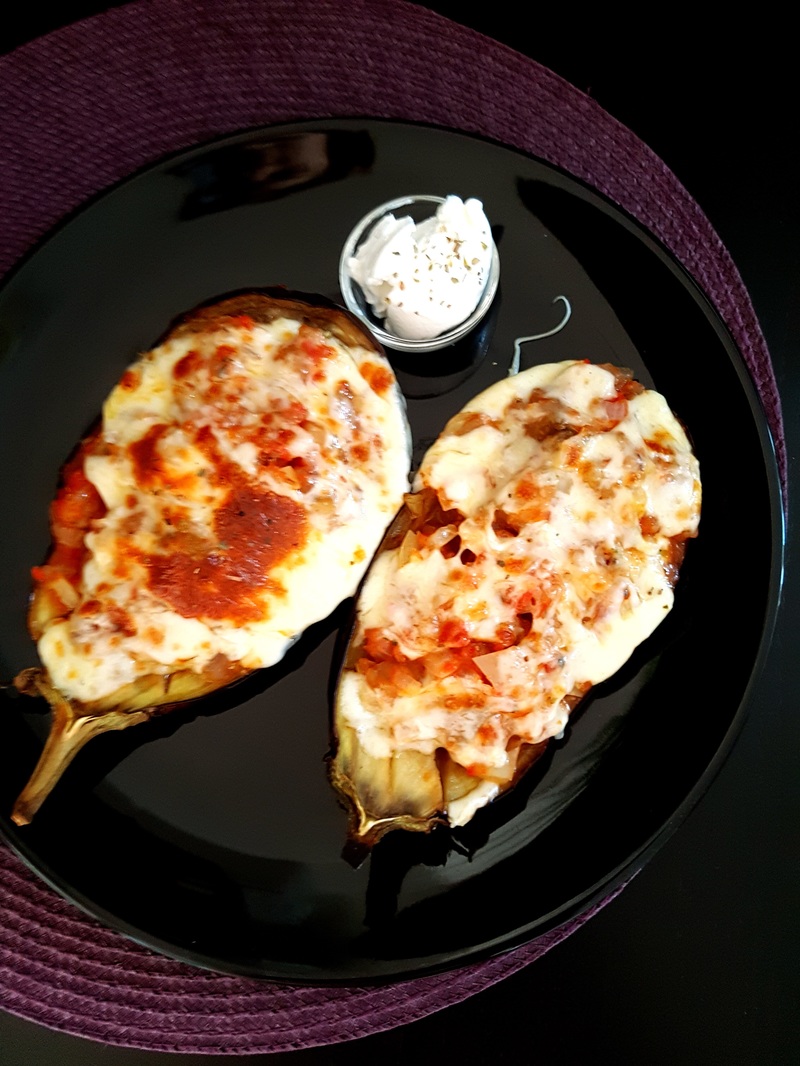
 Bine am revenit. Ca muuulte mai avura loc in ultimele saptamani. Deh, evenimente esentiale si pe plan personal, si profesional. Care au culminat cu un alt 'eveniment', asta chiar rar intalnit de mine: am uitat de unde e reteta asta. Si e SI-GUR de undeva... In speranta ca nu o fi pierit in negura, si s-o afla prin vreo statie de autobuz, revin cu un later edit pe cand oi avea idee. Am oricum o semi-sursa, intre timp. Caci daca carecumva 'oti vrea sa fiu eu singura voastra sursa de reteta... va admir curajul :) Sa trecem la treaba: SUMAR: Ce am folosit pentru 2 portii (2 jumatati de vinete per caciula): 2 vinete medii 2 ardei grasi si galbiori 2 rosii bine coapte, medii 1 ceapa mare si alba sa tot fi fost vreo 4 felii groase de mozarella Sare, piper, ulei de masline si busuioc Ce-am gresit: Daca trecem peste faptul ca am uitat de unde o fi reteta... Sa zicem ca e destul de basic si am reusit sa nu carbonizez definitiv vinetele. Regrete eterne ca am descoperit relativ tarziu reteta si se cam terminasera vinetele, vara si practic vremurile bune. Ce fac mai bun sau mai bine data viitoare: Fac mai des. Vara viitoare, cand vinetele or avea macar niscaiva aroma de vinete. De unde am reteta: De aici, partial. O sa vedeti ca procesul se cam opreste la coacere. Restul se continua in alta parte, nu mai stiu unde. Iertare... Batranete, haine grele :) Va puteti baza cu incredere pe detaliile subsemnatei. Parole d'honoeur! ----------------------------------------------------------------------------------------------------- SUMMARY What I used for 2 servings (2 halves per person): 2 eggplants 2 yellow bell peppers 1 big plain white onion 2 medium-sized sun-kissed tomatoes 4 thick slices of cheese salt, pepper, olive oil and basil What I did wrong: If we can disregard the minor issue of totally forgetting where is this recipe from... let's just say it is semi-basic, since I managed not burning the beloved eggplants. Sure, I am sorry I found the recipe so late in the summer, when eggplants were almost gone. What I need to do better or tastier the next time: Well, I definetly need to develop a habit out of cooking these in the summer, when eggplants actually have their best flavour. How I came across this recipe: This is from here. You will notice this is not the full recipe, but merely up until the eggplants' baking part. The rest, I must have read somewhere else, that magic place I do not remember :) So sorry. My elderly days have early started to kick in, as it shows. You can probably get away with doing it based on these instructions. I promise.
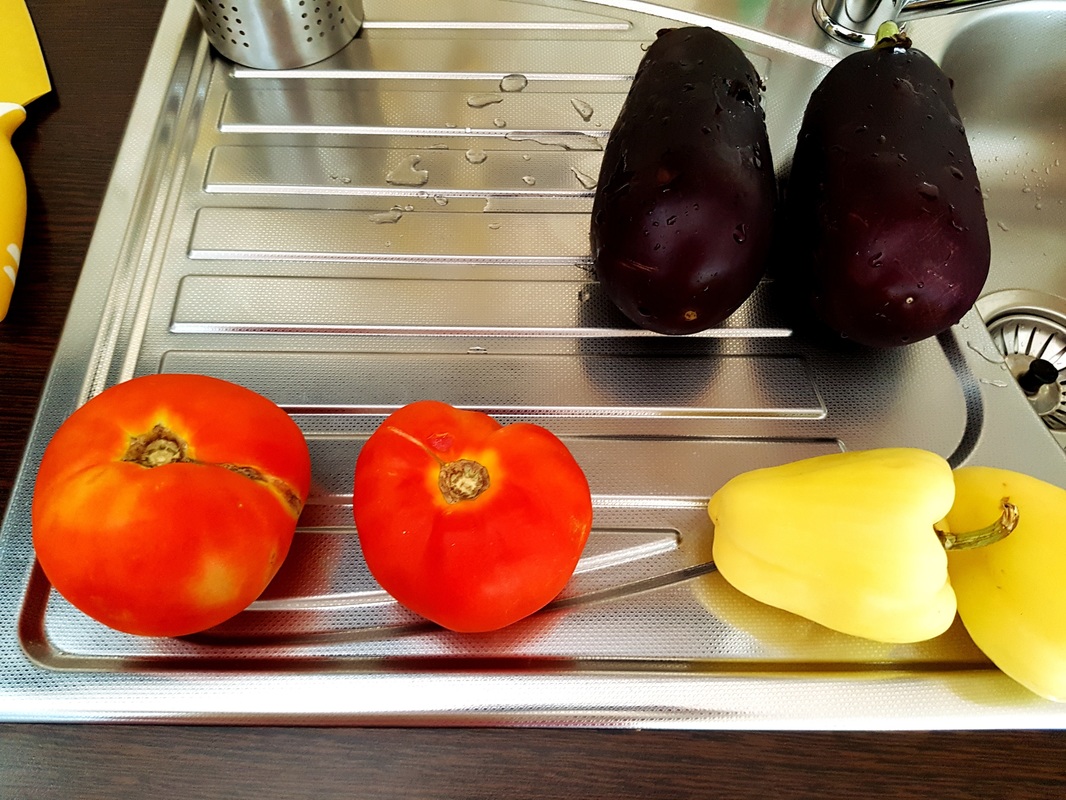
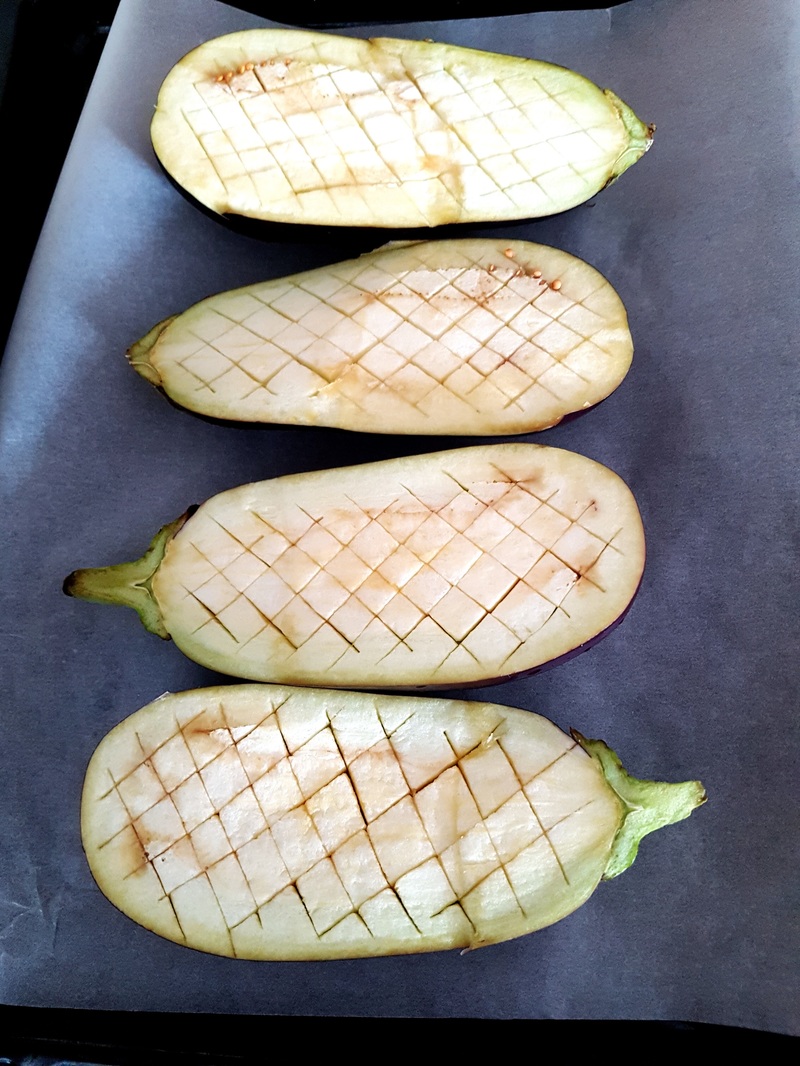
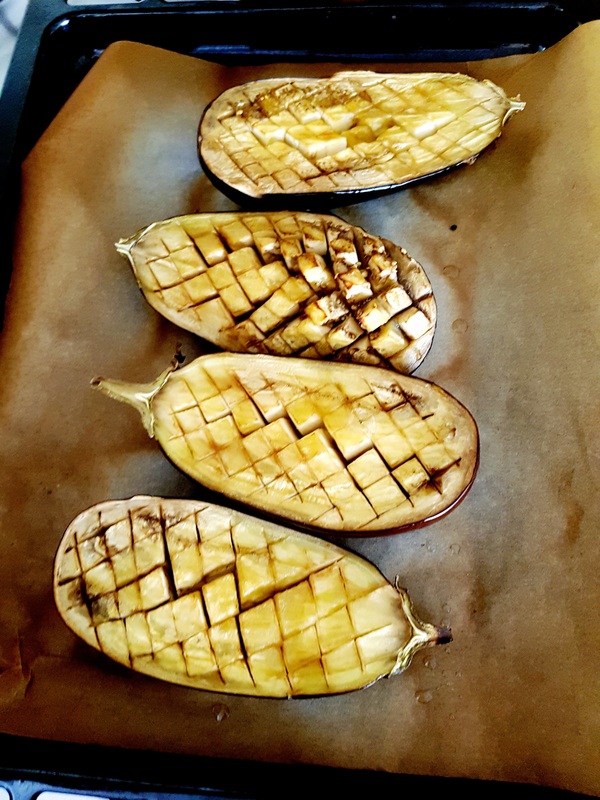
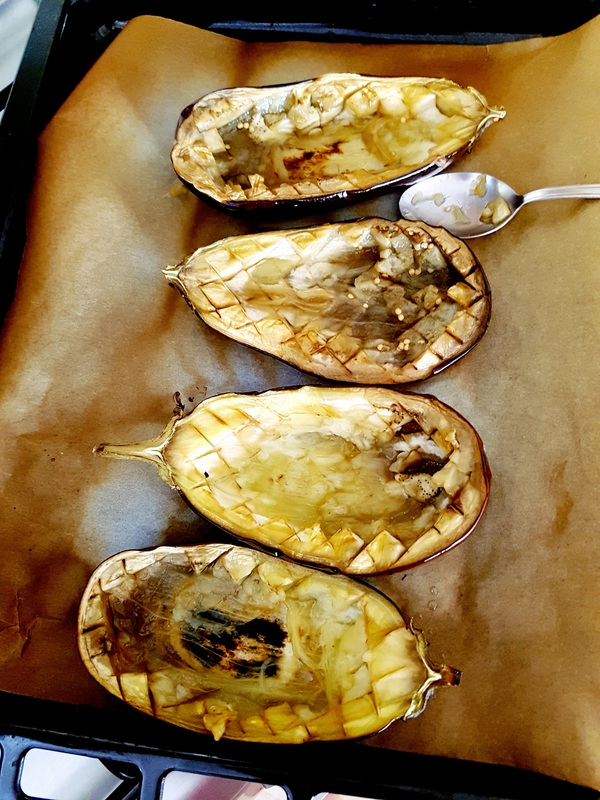
Reteta asta e asa simpla ca ma simt inutila :) Pornim cu 2 vinete, dar va impart un secret: cel putin pentru mine, a fost o noutate. Vinetele cu mai putine seminte sunt cele de forma alungita mai mult decat rotunjita si daca sunt ferme la atingere, atunci sunt destul de 'proaspete', in masura in care putem spune asta despre legume (nu mji-e foarte clar daca e cel mai potrivit cuvant). Si, desigur: e dezirabil sa le cautam cu ceva mai putine seminte, caci nu prea e loc de eliminat din ele. Si nu mint, e mai comod sa nu. Spalate, taiate in jumatati pe lung, inclusiv cu codita lasata atasat. Se sectioneaza foarte putin partea mov, care se va aseza in tava; asta in cazul in care sunt prea rotofeie si nu stau frumusel in tava. Daca le cautati de forma alungita, ar trebui sa stea frumos si netaiate. La mine, asa a fost si nu a fost nevoie sa tai o feliuta din partea 'dorsala' a vinetelor-jumatati. ----------------------------------------------------------------------------- This recipe is too easy to be told; so much so, I feel useless. :) I started off with 2 eggplants, medium sized. I will share a trick with you: you can guess which eggplants have less seeds by their shape. The ones more out long and rather thinner may have less seeds, while the ones more round-shaped are definetly filled with seeds. Also, if they are firm when gently touching, they are fresh. Sure, especially considering this particular recipe, it would be best to have eggplants with less seeds, since removing them is really out of the question in this case and let's face it: it is damn more easy not to. Wash the 2, cut them in halves on the long side, let the small green leave part exactly there. Should your eggplants be more round, then you might face issues with them laying in the baking tray, so you should cut a thin slice off of their purple part so that they can sit properly in the tray, without moving. Since mine were rather long than round, I didn't have to do this step, so I just layed them in the tray like that.
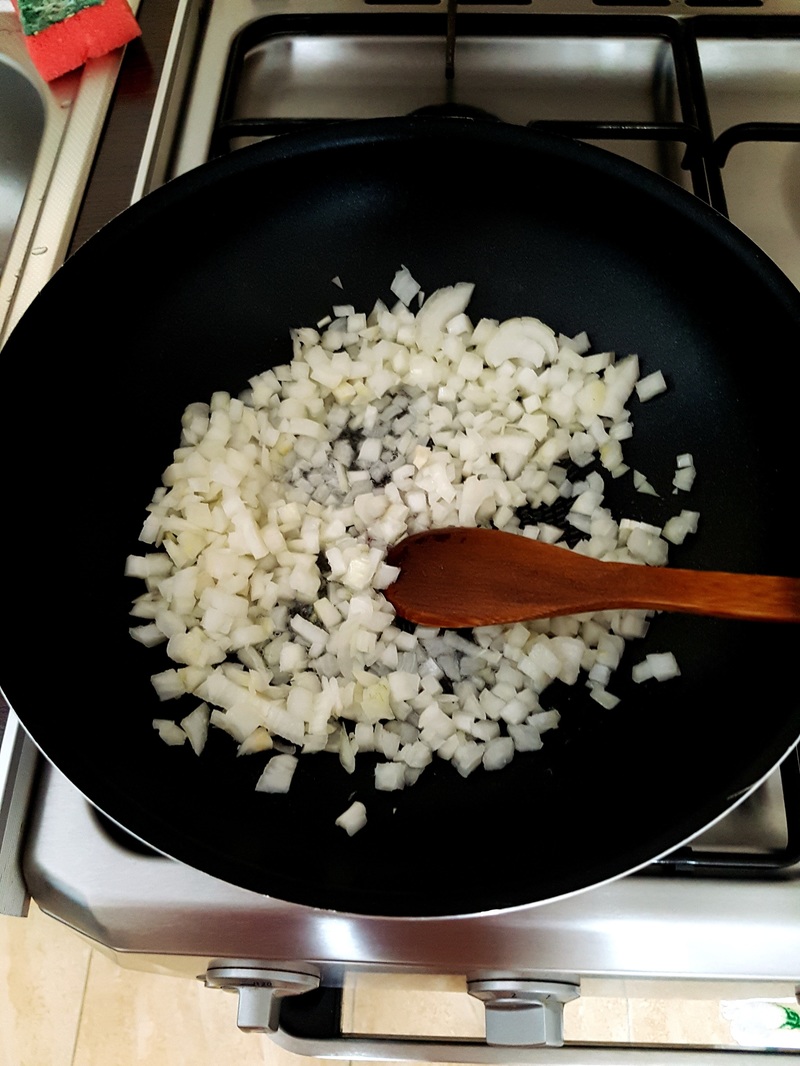
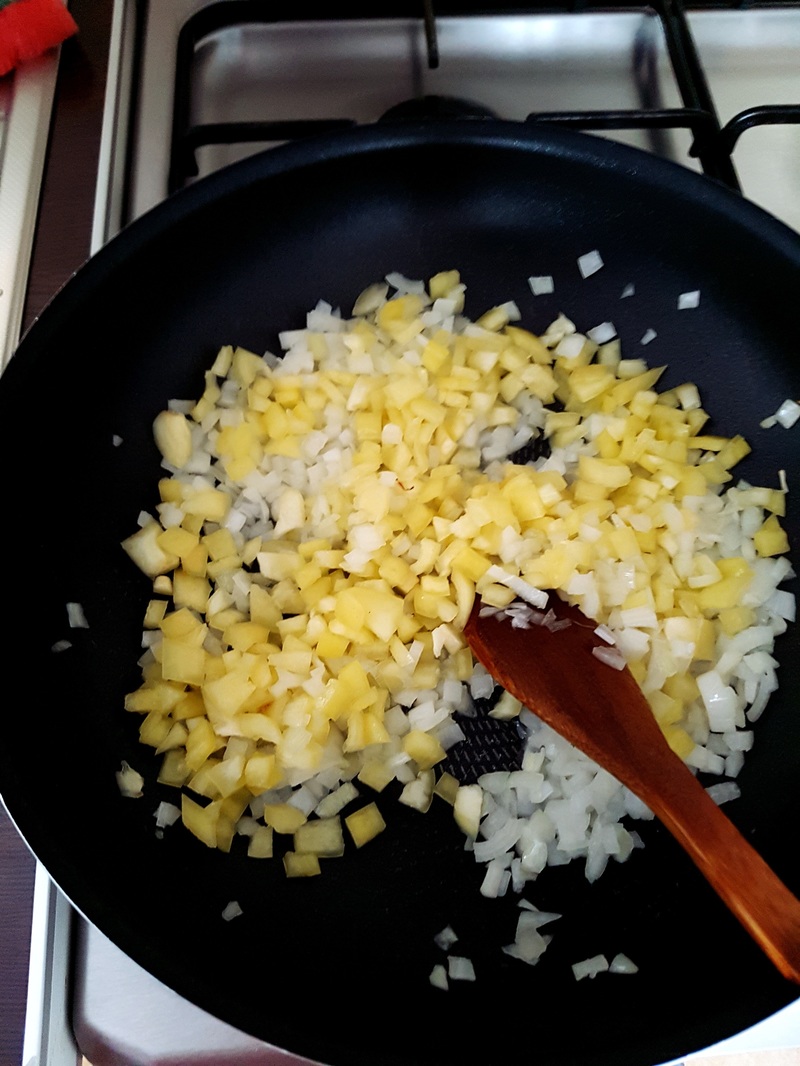
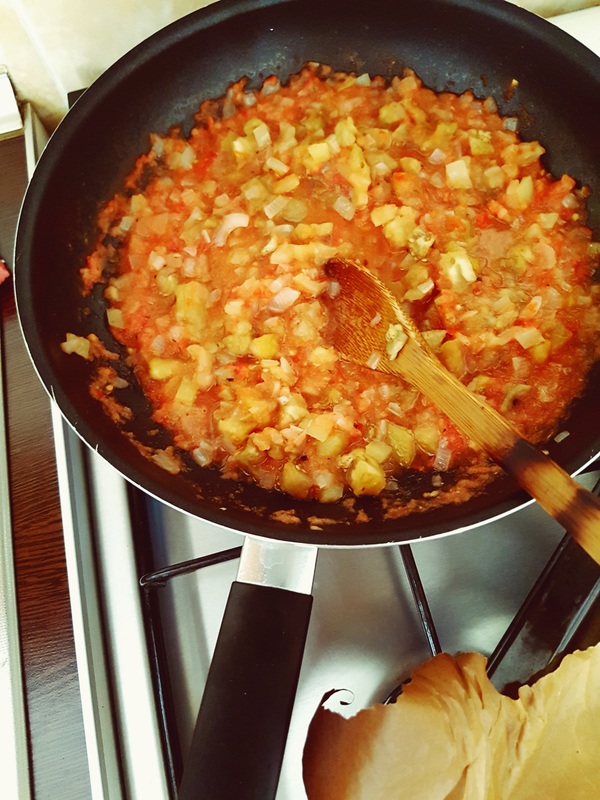
Ceapa, ardeiul se taie cubulete; rosiile le-am dat la blender, taiate cuburi mari in prealabil. Era sezonul lor, in august, cand am facut reteta asta, astfel ca am preferat in locul unei obisnuite passata di pomodori. Vinetele se taie oblic, in ambele directii, asa incat sa se intalneasca in cruce, apoi se ung cu ulei de masline. Un strat fin de sare si piper nu a facu rau nimanui, din cate stim noi in mod cert (zvonuri circula despre noi toti oricum). ----------------------------------------------------------------------------- The onion, bell pepper are diced and tomatoes go in the blender, grossly chopped before that. It was the scene for tomatoes, so I preferred them instead of the usual passata di pomodori. Eggplants are supposed to be cut oblique, on both directions, so that the 2 lines make a cross. Then just add some olive oil, salt& pepper.
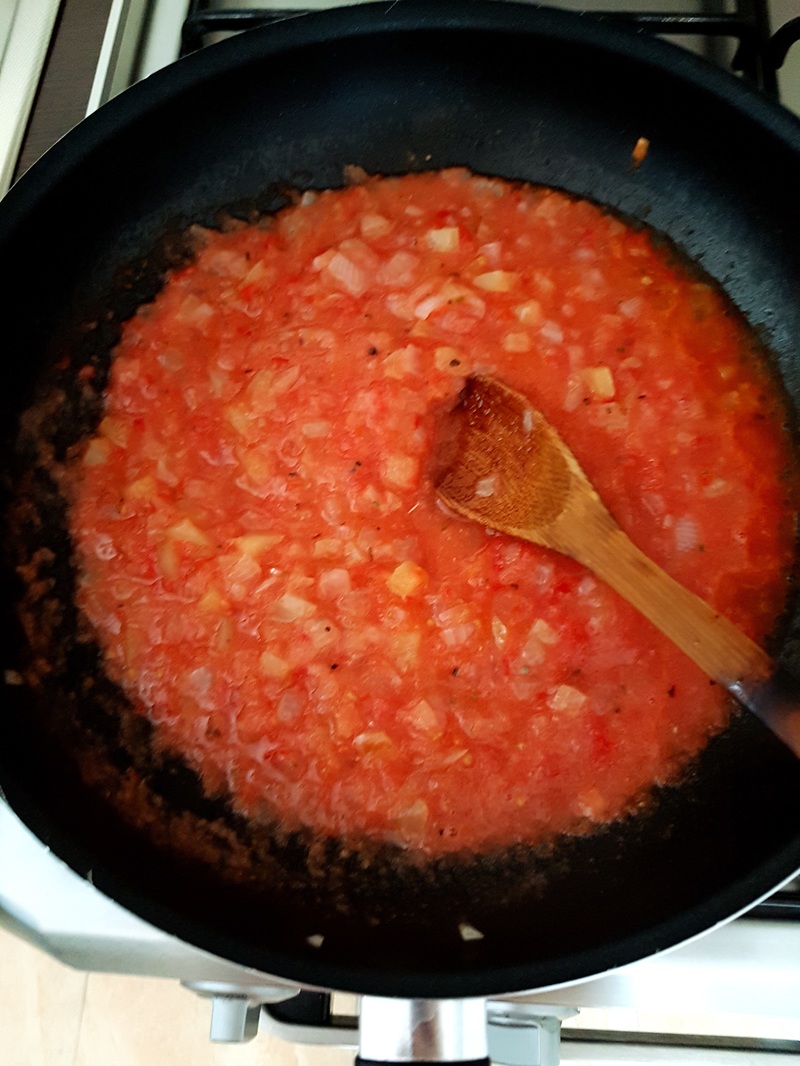
Cat vinetele merg in cuptor vreo jumatate de ora la un foc mediu, ar fi cazul sa ne (pre)ocupam de intunericul cu care sa le umplem. Asa ca incepem cu o tigaie de saute sau un wok, o fasie de ulei de masline, adaugam ceapa, ulterior ardeiul si le dam ocazia sa se imprieteneasca. Pe cand au devenit usor galbuie si pare ca s-au inmuiat, incercam timid sa adaugam rosiile in combinatia asta. Capac deasupra, foc redus, ajustat de sare si piper. Le dam si lor ocazia sa bolboroseasca nitel. Ne intereseaza ca rosiile sa isi piarda in metrou aciditatea. ----------------------------------------------------------------------------- While our eggplants cook gently in the oven for about one half an hour at a medium heat, it might be the case to tend to the mighty stuffing pertaining thereto. So off we go and start off with a sautee or even a wok pan, a dash of live oil, add our onions, then bell pepper. Leave to turn a bit goldish, then add the tomatoes, adjust for salt&pepper and leave everything to simmer for some minutes under a low heat, preferably with a lid on. The whole issue is just to leave our tomatoes to cook until you no longer feel their acidity.
Pe cand vinetele sunt gata, ar fi cazul sa le scoatem continutul cu o lingura. Ar trebui sa se scoata destul de usor, asta daca sunt coapte de tot. Rezistati tentatiei de a le lasa prea mult, caci 'coaja' se va inmuia excesiv si nu va fi in stare sa sustina incarcare umpluturii de intuneric. ----------------------------------------------------------------------------- When the eggplants are finally done, we should go ahead by all means and spoon out their contents while only leaving the 'shell'. The contents should come off quite easily if properly cooked. However you should resist the temptation to leave them to overcook, in which case you might end up with a shell turned to mush, not at all firm and totally incapable of holding in any stuffing.
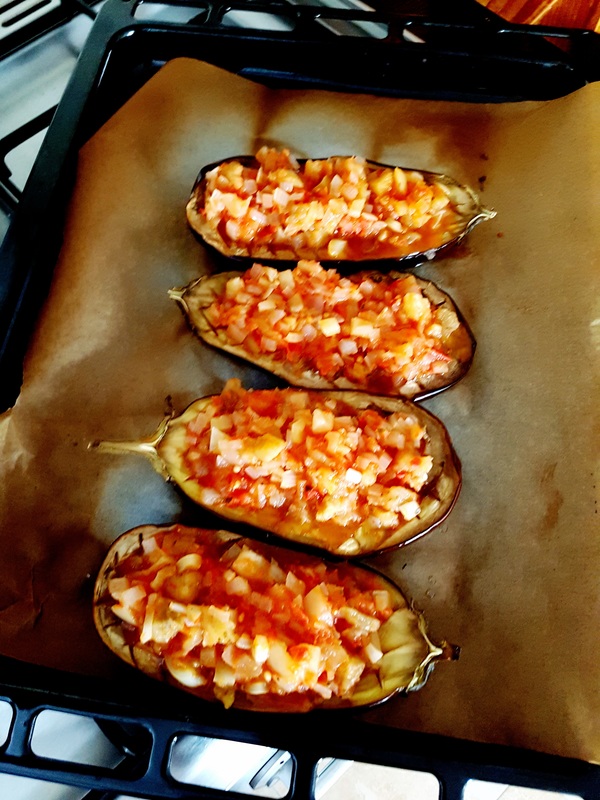
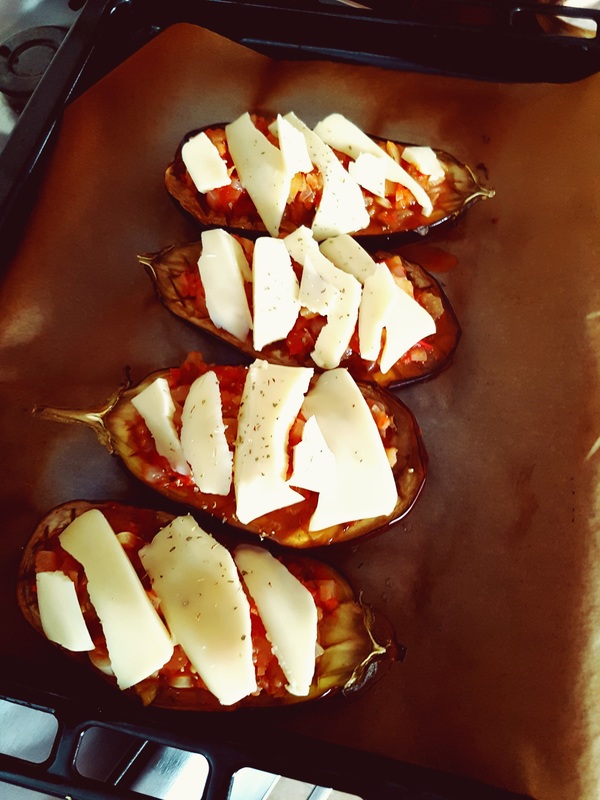
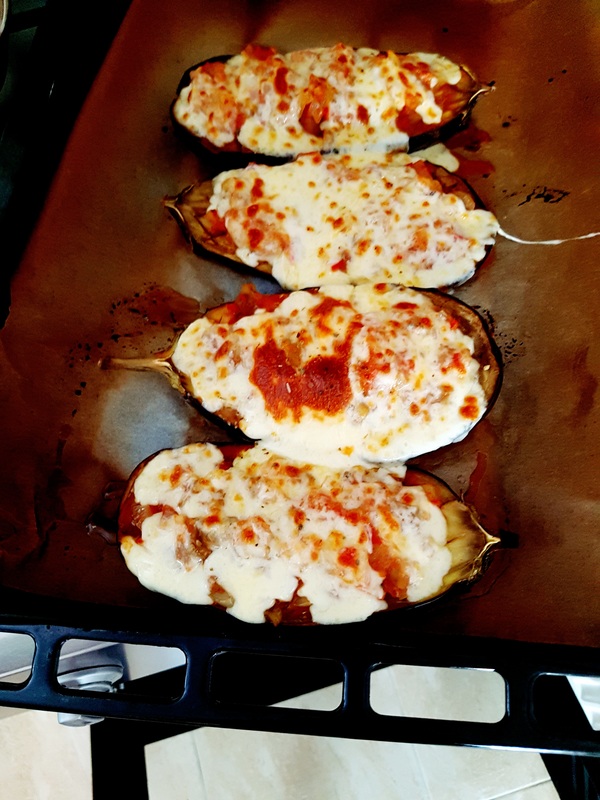
Miezul de vanata ar trebui tocat nitel, sau cel putin la mine a necesitat, nefiind 100% copt. Am tocat grosier, incercand sa obtin genul de patratele precum cele crestate. Am adaugat vinetele in amestecul cu rosii, ceapa si ardei si am mai lasat pret de niscaiva minute (5-10). Am parfumat cu busuioc uscat, apoi am purces si le-am umplut cu intuneric. Ba nu, de fapt: cu lingura. Am asezat peste feliile de mozarella si le-am mai dat la cuptor cat sa se gratineze. ----------------------------------------------------------------------------- The eggplants' contents should be slightly chopped; or at least mine needed this, since they weren't 100% baked. I chopped about the same size of the cuts I made previously in the eggplant halves. I added the chopped eggplants into my tomatoes-onion-peppers mix and left them to simmer together for another 5-10 minutes. I added some dry basil just to freshen them up just a tiny bit and then I stuffed the eggplants with this mix, using a spoon. Then, I added the mozarella slices on top and return it back into the oven just to give it a chance to melt.
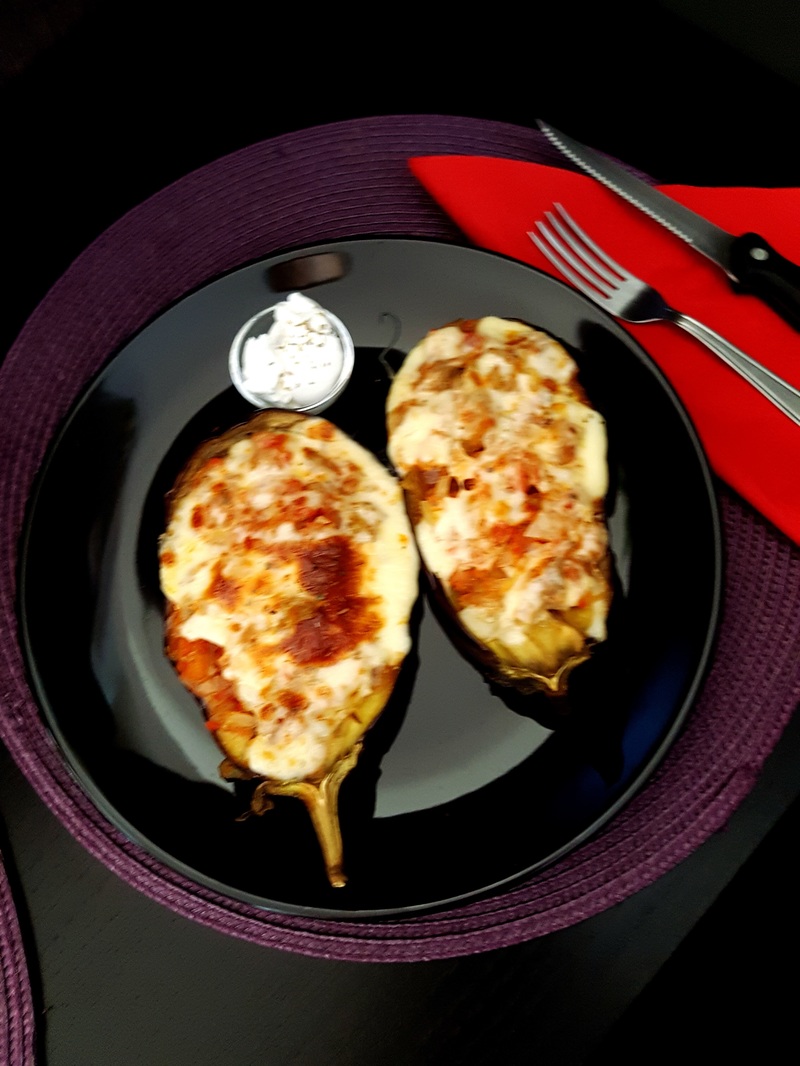
Nu pot sa explic ce minunatie a iesit. Si nici nu prea vreau - e de incercat fara prea multe comentarii. Raportul efort-cost-beneficiu e clar unul rentabil si fezabil :) ----------------------------------------------------------------------------- I cannot explain the extraordinary tasteful dish that came out of the oven. And frankly - I refuse to, since this is for sure a recipe for YOU to try. The cost-effort-benefits report is clearly feasible :)
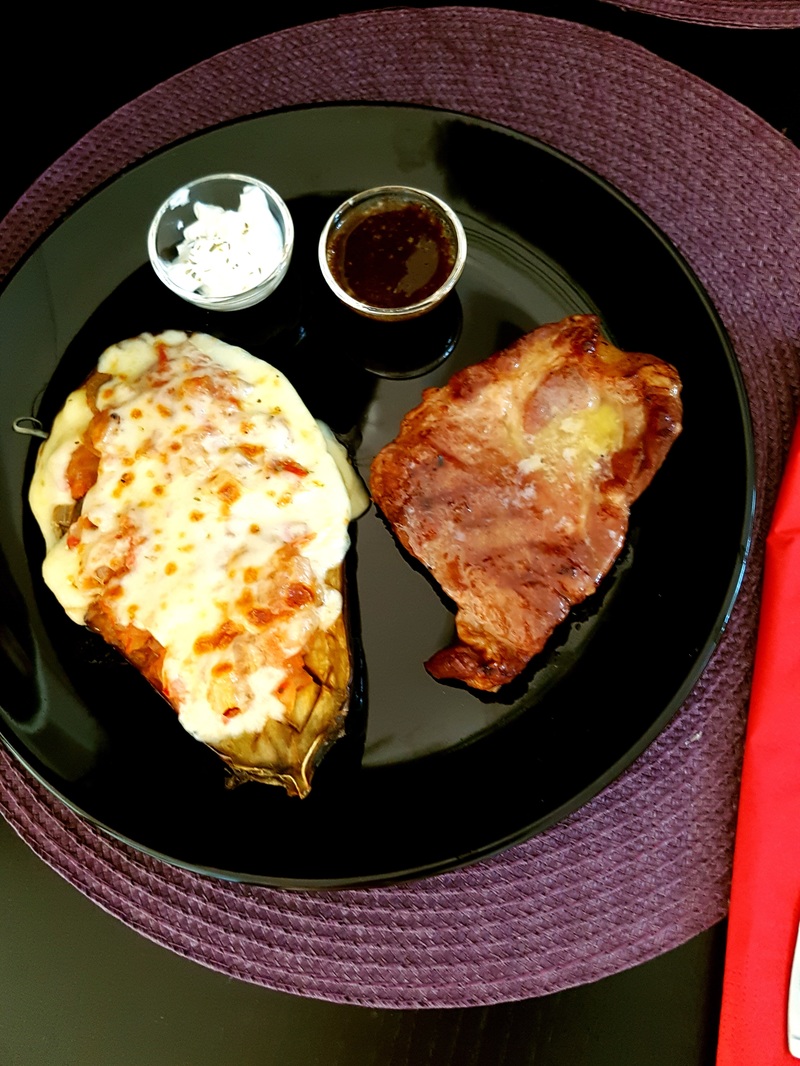
Si sa nu omitem: Carnivorului ii plac vinetele. Dar le iubeste, daca insotesc o bucata de carne. Asa ca in cazul lui, au fost garnitura la o ceafa de porc fripta la grill, lasata sa se hodineasca nitel, unsa cu untisor si parfumata cu putin cimbru. Am servit cu smantana in varianta veggie si un sos 'gravy', pe baza resturilor de carne si a sucurilor sale ramase de la gatitul carnii in tigaie. ----------------------------------------------------------------------------- And let's not forget: my Meat Lover likes eggplants, but he can love them if they accompany a good old chunk of meat. So in his case, the eggplants were merely the side dish to a grilled pork steak, left to stay for a little bit, then buttered and perfumed with thyme. I served with sour cream, for the Veggie version and gravy for the Meat Lover, using the leftovers from cooking the pork steak.
-----------------------------------------------------------------------------
TRY SEXUAL I'LL TRY ANY RECIPE (AT LEAST) ONCE.
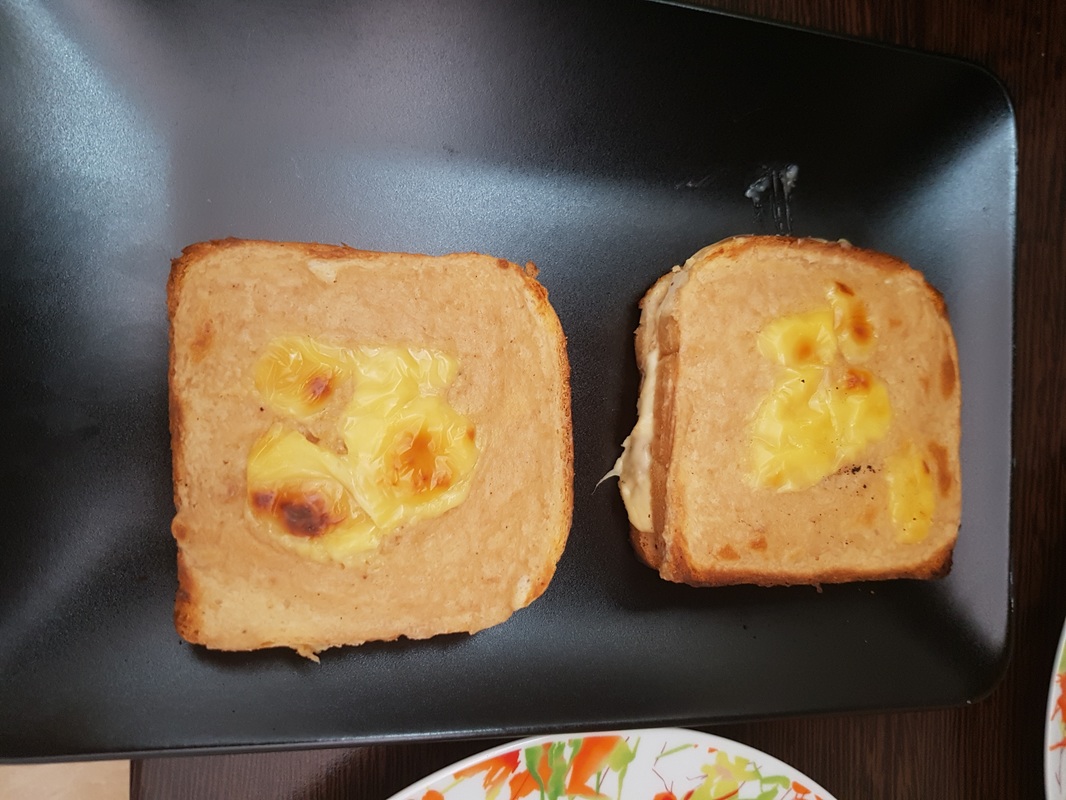
0 Comments
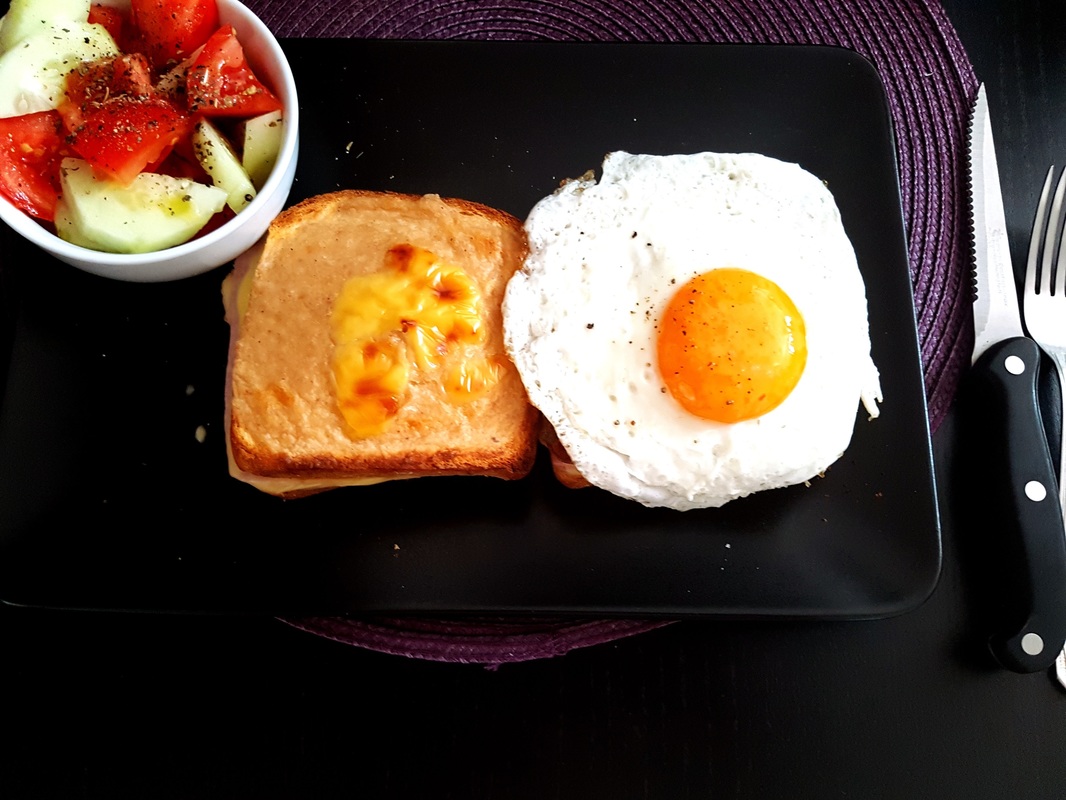 Sambetele sunt - pentru mine - zile in care realizez: 1. ca a mai trecut o saptamana 2. ca am supravietuit in mod miraculos (inca) unei saptamani de munca asidua 3. ca am dormit pana la o ora obscena si, bineinteles 4. ca mi-e foaaame. Si cum timpul nu mai e asa o mare problema, devine momentul propice pentru nitel rasfat. Odata stabilita geneza retetei incercate, sa purcedem la povestirea ei. SUMAR: Ce am folosit pentru 4 sandwich-uri (2 cu sunca, 2 fara): 8 felii de paine 2 felii de sunca Sissi de porc 4 felii groase de cascaval afumat 4 felii de cascaval taiat subtire Pentru sosul Bechamel: 200ml lapte semidegresat 15g faina 15g unt Sare, piper si nucsoara macinata Ce-am gresit: M-am pripit cu incercarea retetei si nu am avut branza Gruyere ori Comte sau o alta branza cu textura semi-tare si fara o aroma exagerata. Am folosit cascaval afumat, taiat putin mai gros pentru a nu se topi prea repede. Si - cum sunt o piromana - le-am lasat prea jos in cuptor, asa ca s-au rumenit bine de tot pe partea de jos. Ce fac mai bun sau mai bine data viitoare: Incerc inca o data cu Gruyere, in mod cert. Si le ridic mai sus in cuptor (ar trebui sa fie pe mijloc ori putin mai sus, chiar). De unde am reteta: De aici. Bine, se discuta doar despre Croque Monsieur, insa oul prajit si adaugat deasupra face ca sandwich-ul sa se numeasca "Madame". Pentru ca, nu-i asa, doamnele sunt mai complexe. :) ----------------------------------------------------------------------------------------------------- SUMMARY What I used for 4 sandwiches (2 with ham, 2 without): 8 bread slices 2 ham slices 4 thin slices of cheese 4 thick slices of smoked cheese For the Bechamel sauce: 200ml milk 15g plain white flour 15g butter salt, pepper, grounded nutmeg What I did wrong: I didn't quite prepare for this recipe so I used smoked cheese although the recipe calls for Gruyere or Comte cheese; I didn't have any other cheese with semi-hard texture and not too much flavour. I used the smoked cheese but slightly ticker slices so that it doesn't melt too soon in the oven. And, since I am a regular arsonist, I placed the tray too down in the oven and so the sandwiches got a little too crispy. What I need to do better or tastier the next time: I definetly must try again with Gruyere cheese and of course, place the tray in the mid section of the oven or even on the higher one. How I came across this recipe: This is from here. Sure, it talk about Croque Monsieur, but the sole difference is the fried egg placed on top of the sandwich - and then, it's a Croque Madame. Makes sense, really: since ladies are indeed more complex. :)
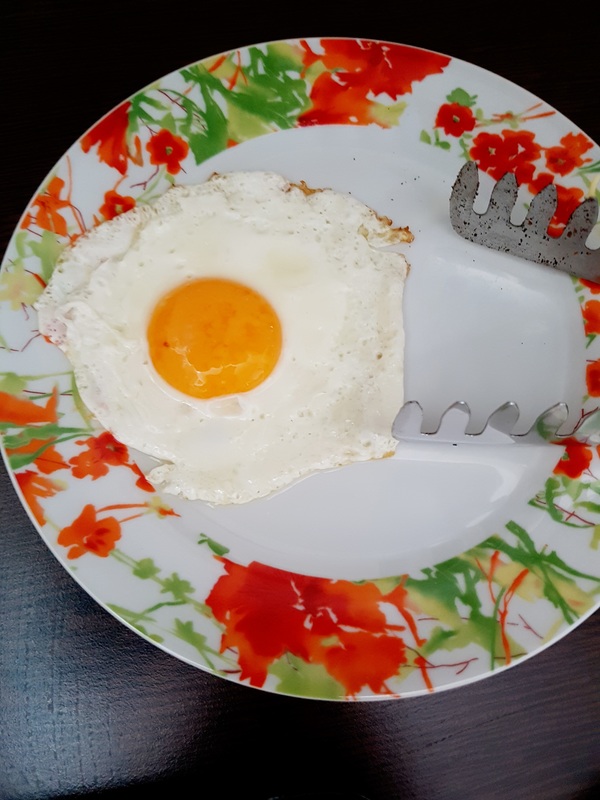
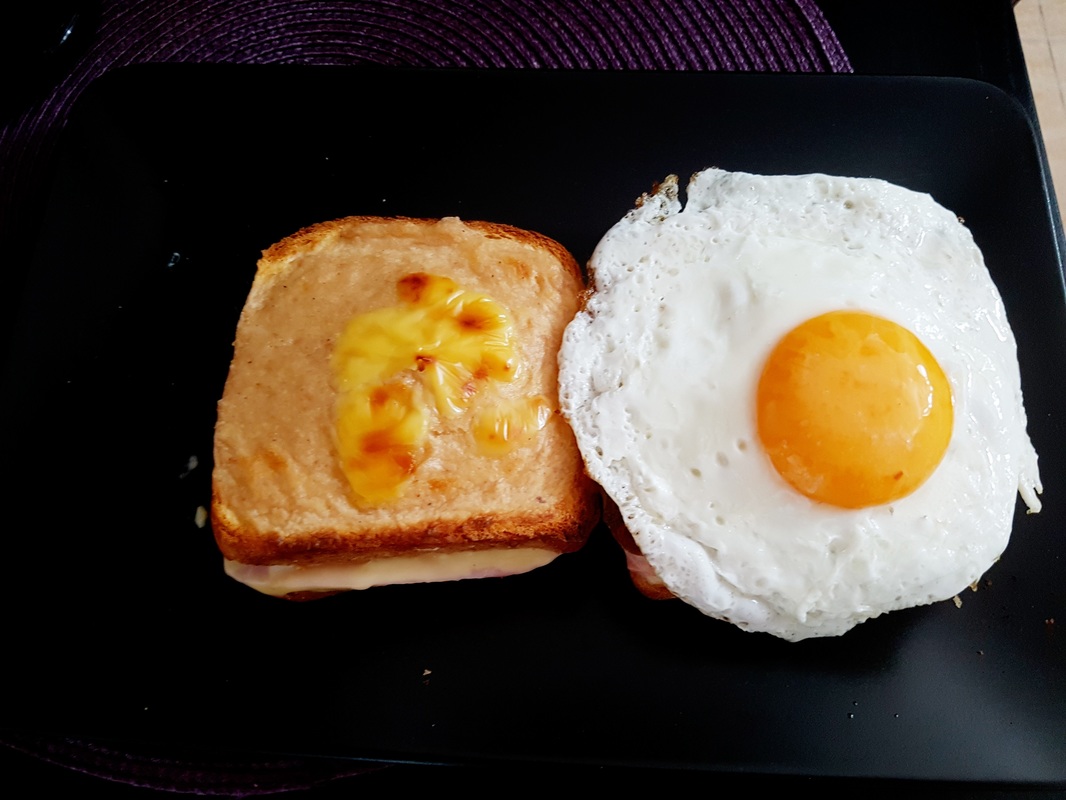
Am inceput cu o tava care merge la cuptor, foaie de copt si o tigaie pentru oul prajit. Acuma e cazul sa va dezvalui cam cum am reusit mandretea de ou :) Ei bine, am citit ca oul - ca multe alte ingrediente - contine apa si, pentru a evita sa sara uleiul in tigaie, e util sa il strecuram inainte de a-l arunca in tigaie. Zis si facut: pregatit o tigaie anti-aderenta, aruncat o suvita de ulei de masline, luat ou din frigider si o strecuratoare micuta, ca pentru ceai si un vas care se plaseaza sub strecuratoare, Am spart oul in strecuratoare si l-am aruncat in tigaie. Focul a fost mic, am aruncat pe el putina sare sa-i fie buna inima si am asteptat. Albusul s-a gatit iar galbenusul a ramas moale, asa cum - dupa cele mai multe standarde - e delicios. Eu am alte standarde pentru gust, insa cu siguranta apreciez ca e aratos. ----------------------------------------------------------------------------- I started off with a oven-safe tray and some baking paper, placed the 4 bread slices in the tray and then got along with frying the egg. Time to reveal the technique behind such a success: I once read the egg - as many more ingredients - retains water and we can avoid the frying oil becoming crazy by straining it before frying it. So I did: i prepared a non-stick pan and used a dash of olive oil and left that to a mild fire on the stove. I got an egg from the fridge, a small tea-size strainer and a small dish which I placed under the strainer, then cracked open the egg in the strainer. I then added the egg in the frying pan and left it until the eggwhite was done and the eggyolk was still bright yellow and moist. Which is, according to most standards, the tastyiest way to have a fried egg. I can't say this is my standard as well, however I am more than thrilled of how it looks.
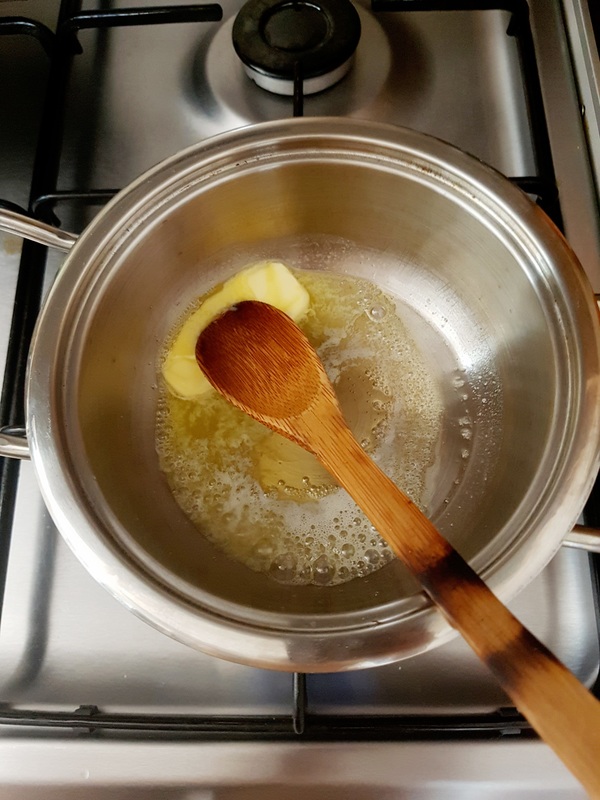
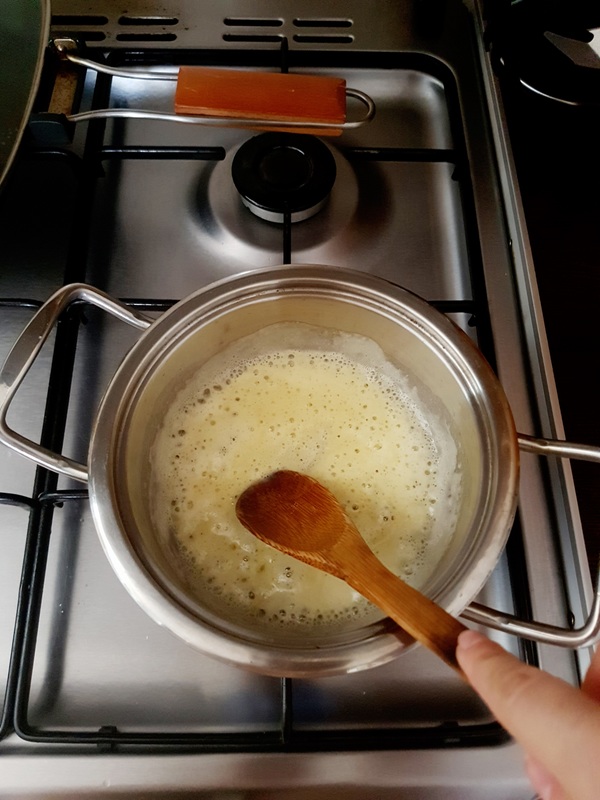
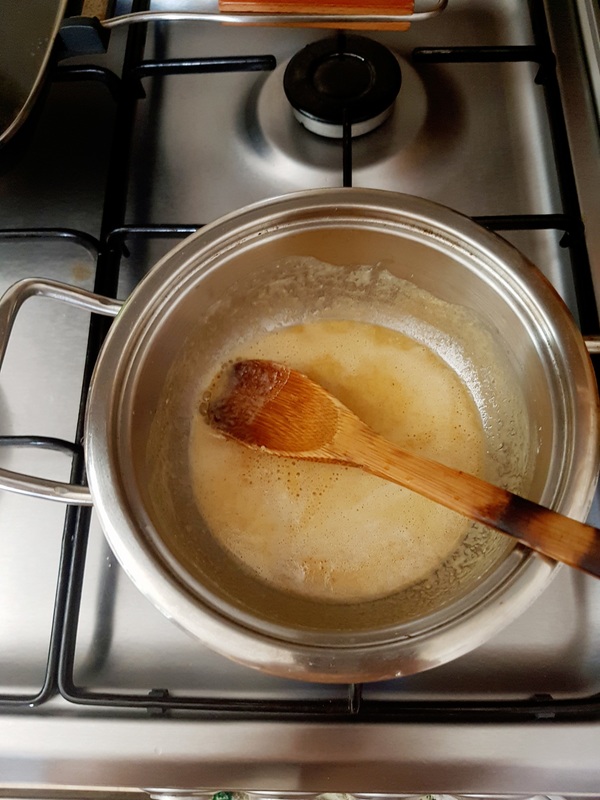
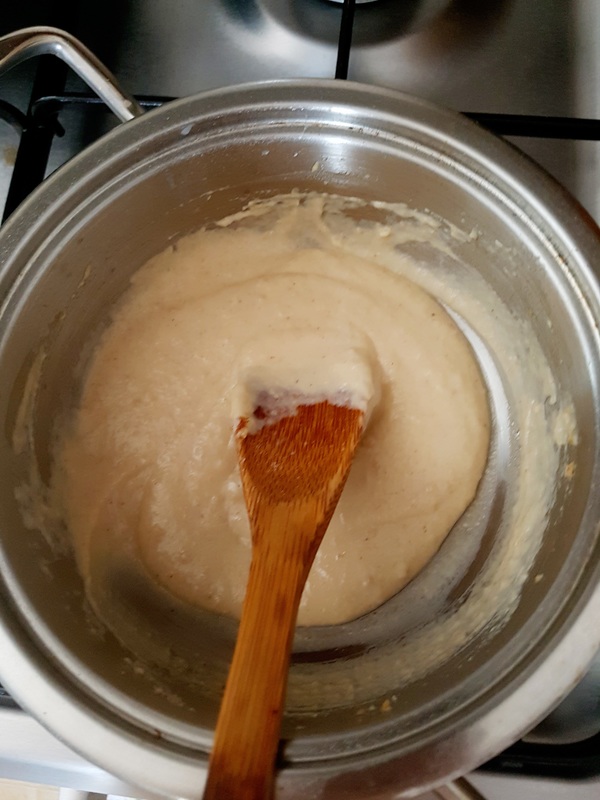
Dupa asta, m-am apucat de bechamel: am pus untul la topit intr-o craticioara mica, cu fund dublu, antiaderenta. Dupa ce untul s-a topit, am adaugat faina si am amestecat continuu. In cateva secunde, amestecul a devenit omogen si am adaugat treptat laptele pentru a desface compozitia pana la consistenta unui sos gros. Apoi, nu mi-a ramas decat sa presar sare, piper si un varf de cutit de nucsoara. Nu era prima data cand faceam bechamel, caci mai facusem Lasagna si altele asemenea, insa reteta m-a dat putin pe spate din doua motive: 1. recomandarea este sa lasi faina sa se rumeneasca cca. 2 minute si 2. exprimarea cantitatii de lapte era in ...centilitri. Pentru prima situatie, pot spune ca in cazul meu, pe ochiul cel mai mic al aragazului, faina s-a rumenit putin prea tare dupa cateva secunde (!) fapt care a dat sosului o culoare de care nu avea nevoie. Indiferent de timp - caci ma indoiesc sincer ca e relevant in vreun fel - important este ca untul topit si faina adaugata sa devina aurii si sa ajunga la o textura groasa (apare la un moment dat un bot cremos, iar acesta se dilueaza cu laptele). Cat despre punctul 2, ce sa zic... M-am folosit de cunostintele anterioare si ulterior am cautat un convertor online. In orice caz, am ramans nedumerita si acum de acesti centilitri. ----------------------------------------------------------------------------- Afterwards, I got on with the bechamel sauce: I placed the butter in a small non-stick pot and after the butter was melted, I added the flour and kept on mixing. Within some seconds, the mixture got homogenous and I started adding the milk, little by little, so that the mixture would melt down into a thick sauce. Then, all i had to do was to add some salt, pepper and a pinch of nutmeg. This wasn't my first time doing bechamel sauce - I also made Lasagna and other dishes alike - however this recipe had 2 issues: 1. it recommends to leave the flour in the melted butter for about 2 minutes (!) and 2. it calls for 20 centilitres of milk. In the first case, in my case the flour was brown within seconds, and this was on the smallest possible flame on my stove so leaving it a little longer only got the sauce some colouring which it didn't need. Regardless of the time - since clearly it is of no relevance - the important thing to watch is to make sure the flour gets golden and not brown and it gets a very creamy and homogenous texture which is when you are supposed to add the milk. About the 2nd issue: what can I say. I used my previous knowledge and searched for an online convertor from centilitres to litres or mililitres. I am still fuzzy as to why would someone use such metric system.
Am uns feliile cu sos si am adaugat cascavalul afumat. Apoi, am pus feliile de sunca (pe 2 dintre feliile de paine) si iarasi cascaval din cel subtire feliat peste sunca. Am plasat feliile de paine deasupra si iarasi un strat generos de sos bechamel si cascaval. ----------------------------------------------------------------------------- I anointed the bread slices with the sauce and then added the smoked cheese. On top of that, for just 2 of the 4, I added the ham and another layer of thinly sliced cheese. I placed the other 4 bread slices on top and added some more of that bechamel and some cheese.
Le-am dat la cuptor pentru cateva minute - pana cand cascavalul s-a topit. Peste unul dintre Croque-uri, am plasat cu atentie gratiosul Ou. Am adaugat si o salata de sezon la servire. A fost crocant si de-li-cios, un start numai bun pentru un week-end frumos. ----------------------------------------------------------------------------- I placed the whole thing in the oven for some minutes, for until the cheese was golden melted. On top of one of the Croques, I added the gorgeous Egg and put together a salad for serving. It was crispy and delish, just the right thing for a pleasant week-end.
-----------------------------------------------------------------------------
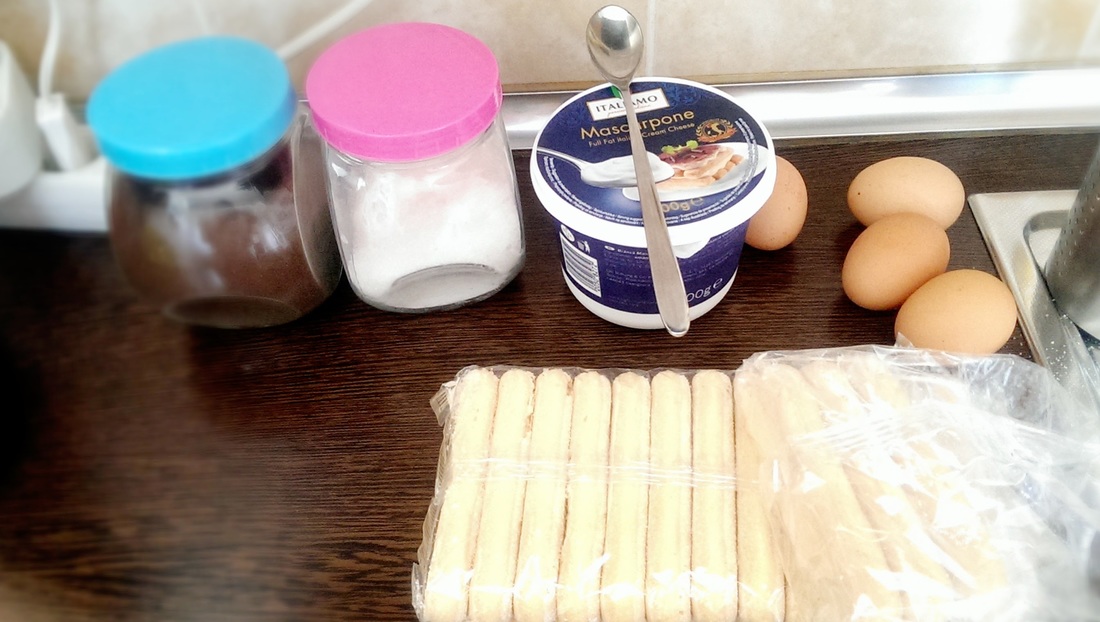
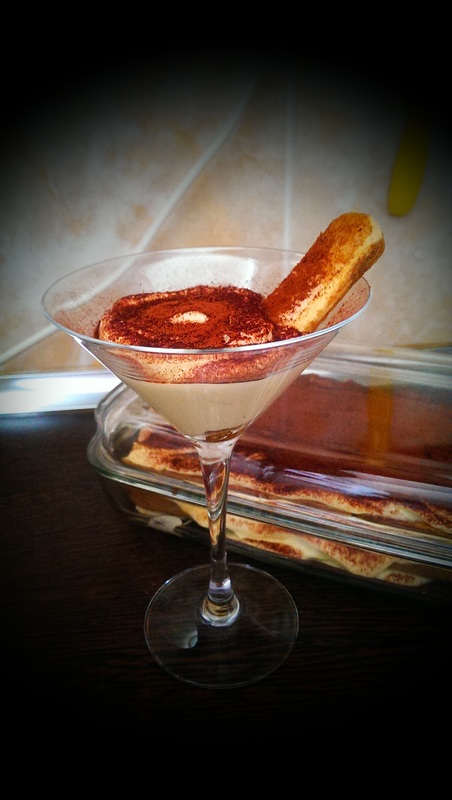
TRY SEXUAL I'LL TRY ANY RECIPE (AT LEAST) ONCE.  SUMAR: Ce am folosit pentru aprox. 10 portii: 500 g mascarpone doua pachete de piscoturi tip Savoiardi (aprox. 200g fiecare) 200ml cafea preparata forte si neindulcita 100g zahar 4 oua 1 pliculet zahar vanilinat (asta din urma nu era in reteta, dar eu pun by default, ca sa nu am (ne)placerea sa simt vreun iz de ou in prajitura) Ce-am gresit: Cred ca mai nimic. If eating sugar is wrong, I don't wanna be right. Ce fac mai bun sau mai bine data viitoare: Aici nu prea se aplica povestea asta. E reteta clasica, dar pot sa incerc data viitoare o varianta reinterpretata, cu fructe de padure. De unde am reteta: De aici. Un blog de bun-simt care respecta reteta clasica a desertului italian. ----------------------------------------------------------------------------------------------------- SUMMARY What I used for about 10 servings: 500g mascarpone 2x200g ready made Savoiardi biscuits 200ml strong coffee with no sugar added 100g sugar 4 eggs 1 Vanilla sugar (the latter was not asked for in the recipe, however I pretty much add it by default whenever baking cakes so that I don't end up with the egg flavour) What I did wrong: I suppose close to nothing. If eating sugar is wrong, I don't wanna be right. What I need to do better or tastier the next time: This section doesn't really fit in this time. This is a classic, so there's not much room for any improvement, however I can try the reinterpreted berries Tiramisu next time. How I came across this recipe: This is from here. A decent blog, really.
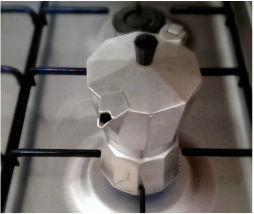
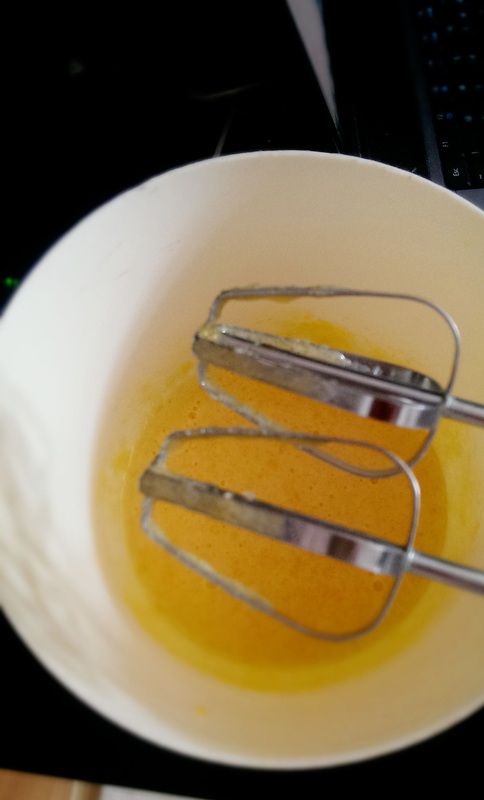
Totul incepe cu doua runde de cafea preparata la ingineria asta italieneasca. Povestea asta prepara o cafea tare ca piatra; sa tot fie un soi de predecesor al espressorului cu 15 bari presiune. Se gasesc in toate hypermarketurile si cu siguranta si in afara lor, de dimensiuni si chiar culori variate. Eu am una inox care se infierbanta mai ceva ca iadul si tre sa am grija cand prepar a doua runda de cafea. Pentru ca, desigur, nu are capacitate mai mare de 100ml. Deci trebuie sa dansez acest tango de 2 ori. Inventia asta se desface de la mijloc, apa se pune in partea de jos iar deasupra ei se aseaza un suport cu mici orificii; in acesta din urma se pune cafeaua, iar apoi se monteaza partea de sus. Se lasa la fiert, pret de cateva minute, iar cafeaua e gata atunci cand a 'urcat' in partea de sus a recipientului. O lasam la racit intr-o farfurie pe cat posibil intinsa. Cata vreme se raceste cafeaua, am avut timp sa ma preocup de oua. Separat galbenusul de albus, batut albusurile spuma cu nitica sare si galbenusurile cu cele 100g zahar+pliculetul de zahar vanilinat. Pozele de mai jos sunt stil 'before&after', cu galbenusurile. ----------------------------------------------------------------------------- Everything starts with two batches of freshly made coffee, using this Italian thing. This is used for making a strong coffee, like the ancester of the 15 bar pressure espresso machines these days. You can find it in almost all hypermarkets and not onlu there, in a variety of colours and sizes. I have one in stainless steel and it gets hot as hell whenever I use it, so I have to pay attention when doing the 2nd batch of coffee. And I have to do 2 batches, since mine has a 100ml capacity only. So I have to do the tango twice. This thing unfolds at the middle, you add the water in the part below and on top of such you add the coffee in the relevant device with wholes. You then put it back together and leave it to boil under a light flame for about 5 minutes or so, during which time the water climbs up to the upper part of the device. Then it has to be left to cool, preferably into a more flat plate. In the mean time, we need to prepare the eggs mix, and to this end I separated the eggwhites from the eggyolks, and beaten the first ones with a sprinkle of salt and the latter ones with the entire sugar amount. The below pic shows the eggyolks, before and after being beaten to a creamy consistency.
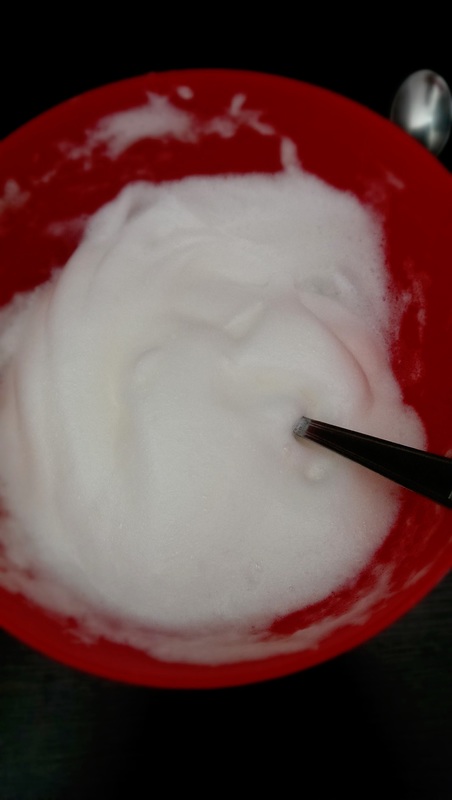
Before&after si cu albusurile. ----------------------------------------------------------------------------- Before& after for the eggwhites.
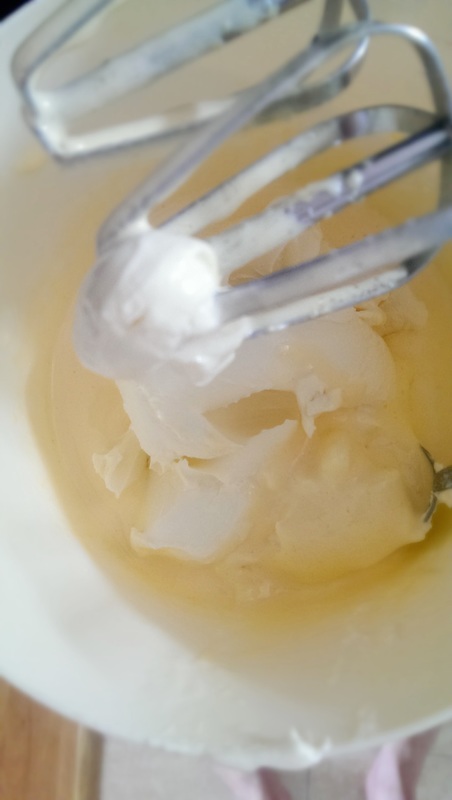
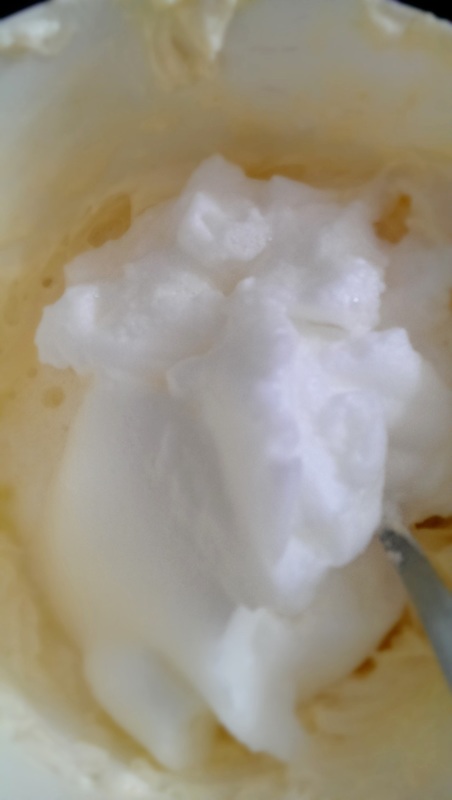
Dupa asta, nu-mi mai ramasese decat sa le impreunez. Asa ca am adaugat mascarpone peste galbenusuri, am omogenizat putin cu mizerul si am adaugat apoi si albusurile. In cazul celor din urma, fara mixer, pentru a nu 'distruge' bulele de aer. ----------------------------------------------------------------------------- After such was done, I only had to put everything together. So I added the mascarpone to the eggyolks mixture and gave it another mix with the help of my mixer. I then added the eggwhites mixture, but I no longer used the mixer for them, since it would have destroyed the flufflyiness.
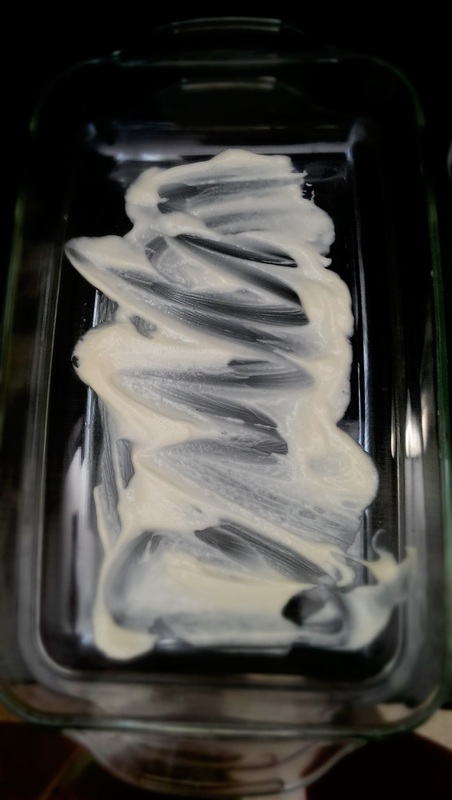
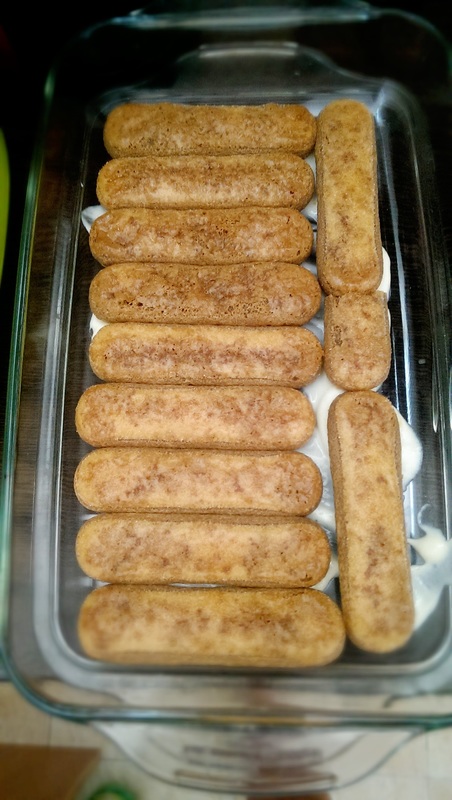
Apoi am lasat crema la rece nitel, cata vreme m-am apucat de montaj. Am ales o tava jena cu capac, pentru ca aroma sa se mentina in frigider. Am pus putina crema pe fundul vasului, pentru ca piscoturile sa nu se lipeasca de fundul vasului atunci cand va fi cazul sa servesc o portie. Am pus rapid piscoturile, unul cate unul, in cafeaua deja racita, o fractiune de secunda pe fiecare parte. Secretul ar fi sa ne miscam rapid, pentru ca piscoturile care au atras prea multa cafea vor transforma prajitura intr-un... lac. Daca vi se par prea 'tari', promit ca se insiropeaza cata vreme vor sta in frigider, acoperite de crema. ----------------------------------------------------------------------------- I then left the cream to cool for a bit, while I had to set up the Tiramisu. I chose a Jena dish with a lid, since I wanted all flavours to be kept inside. I added a sprinkle of cream on the bottom of the dish so that the Savoiardi would not clinch to the bottom of the tray making in impossible to get out a serving without ruining the looks of it. I quickly dipped the Savoiardi in the cooled coffee, one by one and for about a milisecond on each side. The secret with this operation is to be as quickly as possible so that the Savoiardi don't get too much coffee, because in this case you will most likely end up with a lake-looking Tiramisu, Don't worry if you feel the Savoiardis are too hard; I promise you this: they will get much softer while staying in the fridge, covered with cream.
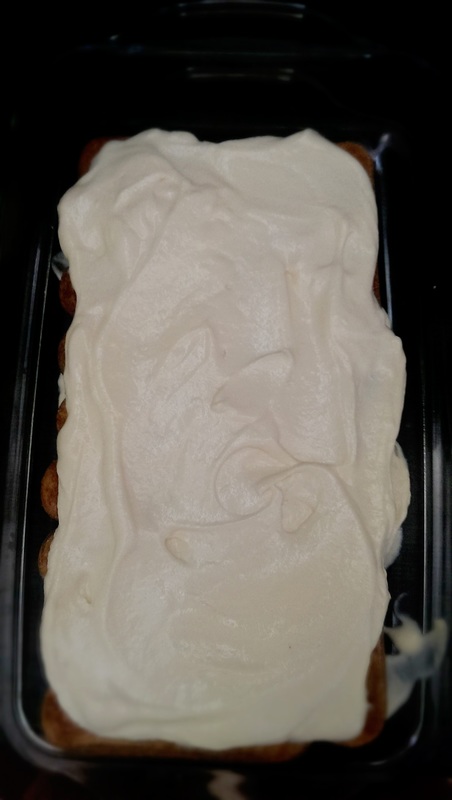
Sigur, am continuat succesiunea de piscoturi pana cand 'armata' a acoperit fundul vasului. Apoi am turnat jumatate din cantitatea de crema peste ele. Acelasi lucru cu a doua generatie de piscoturi, si gata. ----------------------------------------------------------------------------- Sure, I carried on with the Savoiardis on an on until the bottom of the dish was covered fully. I then added half of the cream and another layer of Savoiardis on top of it, then the other part of cream and done.
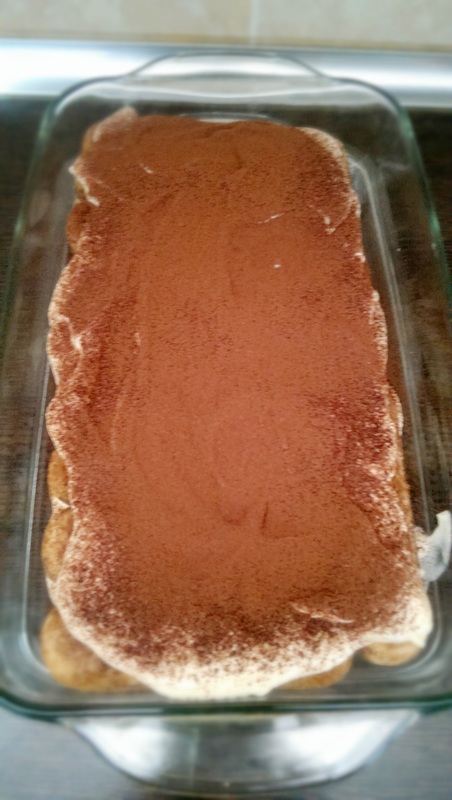
Nu era tiramisu daca nu adaugam o ploaie de cacao buna deasupra, asa ca am facut apel la o strecuratoare fina si am facut sa ploua cu cacao in strat generos. Bine, eu am un blog, se pare, asa ca am salvat ceva ramasite pentru un display mai ... stylish. ----------------------------------------------------------------------------- It wouldn't have been a Tiramisu if I wouldn't added a sprinkle of cocoa powder on top, so I used a fine strainer so that the cocoa would 'rain' in a generous and fine layer.
Si acum vine partea cea mai grea din aceasta reteta. Recomandarea sa o lasi la rece peste noapte si sa o consumi a doua zi. Rezultatul se promite a fi unul fenomenal, insa personal nu cunosc pe nimeni care sa fi asteptat atat pentru Marele Clasic italienesc. :)
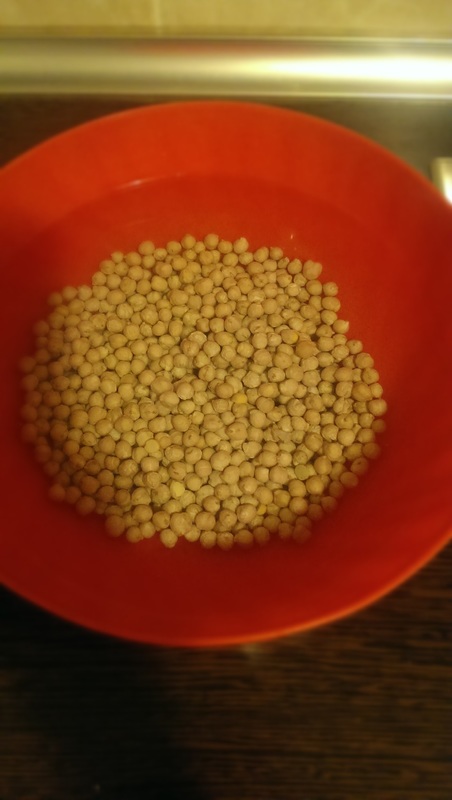
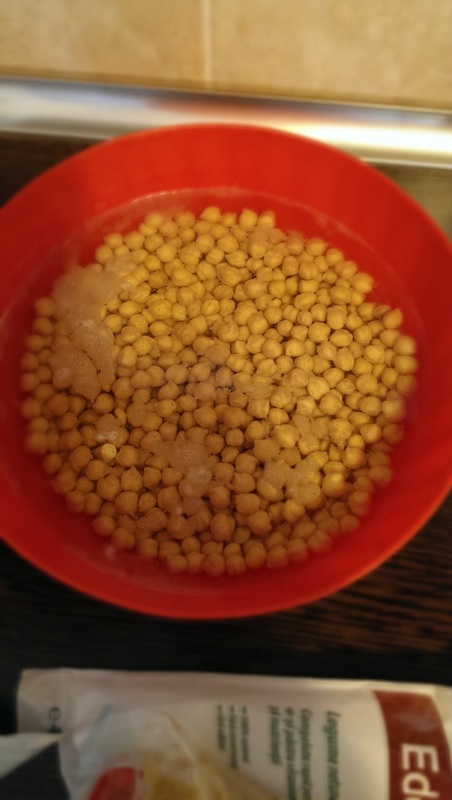
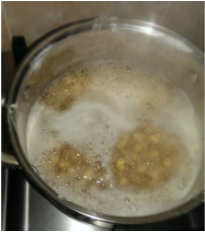
----------------------------------------------------------------------------- And now comes the harder part of this recipe. The recommendation to leave it to rest over night and eat it the next day. They promise the result should be amazing, however I don't personally know one who actually waited this long for this true-to-soul Italian Classic dessert. :) ----------------------------------------------------------------------------- TRY SEXUAL I'LL TRY ANY RECIPE (AT LEAST) ONCE. SUMAR: Ce am folosit: 250g naut uscat 2 linguri pasta de susan (tahini) 5 linguri ulei de masline zeama unei lamai 4 catei usturoi 1/2 lingurita bicarbonat de sodiu sare, piper, boia dulce Ce-am gresit: Am fiert la foc mare nautul si s-a cam rasfiert. Nu era panica, caci oricum se paseaza :) In schimb am incercat sa fac si lipiile, si nu mi-au iesit chiar cum ar fi trebuit. Respectiv nu s-au umflat aproape deloc, probabil ar fi avut nevoie de mai mult timp sa creasca. Ce fac mai bun sau mai bine data viitoare: Perseverez pana scot si eu din cuptor asa lipii umflate de bucurie. De unde am reteta: De aici. Iar cea de lipii (ne)reusite in cazul meu de aici. ----------------------------------------------------------------------------------------------------- SUMMARY What I used for this Lebanese delight: 250 g chickpeas 2 table spoons tahini (sesami) paste, ready made 5 tbsp. olive oil the juice from 1 lemon 4 garlic cloves 1/2 tbs. sodium bicarbonate salt, pepper, sweet paprika What I did wrong: I cooked the chickpeas at a high flame and it kind of over-cooked. Of course, this didn't make much of a difference, considering it would have been blended anyway :) However, I tried to bake traditional Lebanese flatbread as well and that did not come out as it should have. Namely, they did not rise almost at all; probably needed more time to rise. What I need to do better or tastier the next time: I will definetly try the Lebanese flatbread once again. And again until successfull. How I came across this recipe: The recipe for Hummus is from here and the one for the flatbread is from here. 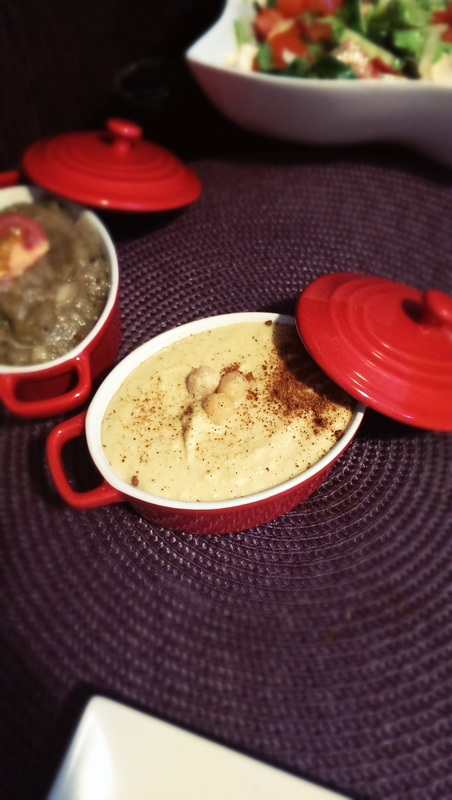 Am inceput cu o seara inainte, punand la inmuiat nautul intr-un vas cu apa. Deci clar nu e o reteta 'de impuls', ci necesita un minimum de pregatire in avans. ----------------------------------------------------------------------------- I started off the prior evening, by placing the chickpeas in a larger bowl and leave it covered with water. So this is clearly not an 'impulse' recipe, but rather one that requires a tad more preparation.  Am respectat pasii din reteta video; problema cu asta este ca nu poti urmari usor pasii de realizat. In fine, cu fast forward si rewind, am pus oala la fiert impreuna cu bicarbonatul de sodiu. Nu prea i-am dat atentie si nici nu cred ca merita, caci urma sa fie blendata toata istoria asta in curand. ----------------------------------------------------------------------------- I followed the steps from the video recipe; the issue is you cannot really follow the steps you need to make that easily. Regardless, using fast forward and rewind where needed, I placed the chickpeas in a larger pan and left it boil together with the sodium bicarbonate.
Dupa ce istoria asta a fiert, ceea ce poate sa fi durat o jumate de ceas, am scurs-o si am plasat-o intr-un bol. Pai trebuia sa o las si la racit, insa era foame mare si am cam sarit (si) peste asta. Am pus zeama de lamaie, cateii de usturoi, pasta de susan, sare, piper si am blendat pana la obtinerea unei paste omogene. Carevasazica pana ce a inceput sa aduca a hummus. ----------------------------------------------------------------------------- After the chickpeas were boiled, which might have lasted for a half an hour or so, I drained it and placed it into a bowl. I should have left it to cool prior to being blended, but I was one step too close to starvation so I kind of skipped this stage (as well). I then added the lemon juice, cloves of garlic, tahini paste and olive oil, seasoned with salt and pepper and blended up until I got somewhat of a paste. It kind of started looking like Hummus.
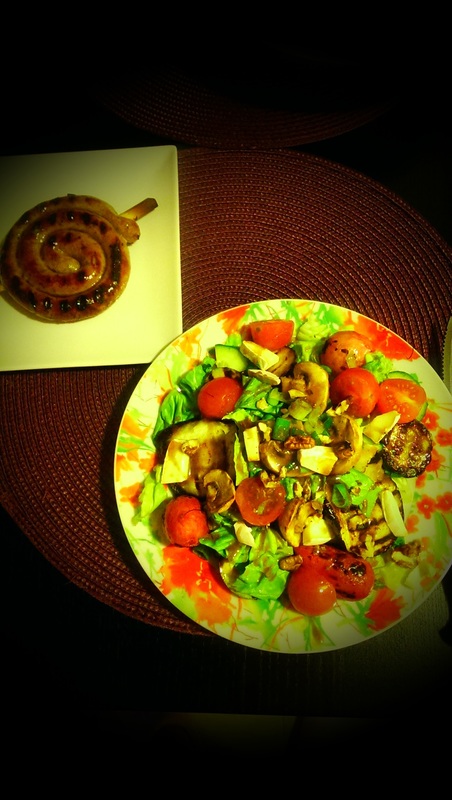
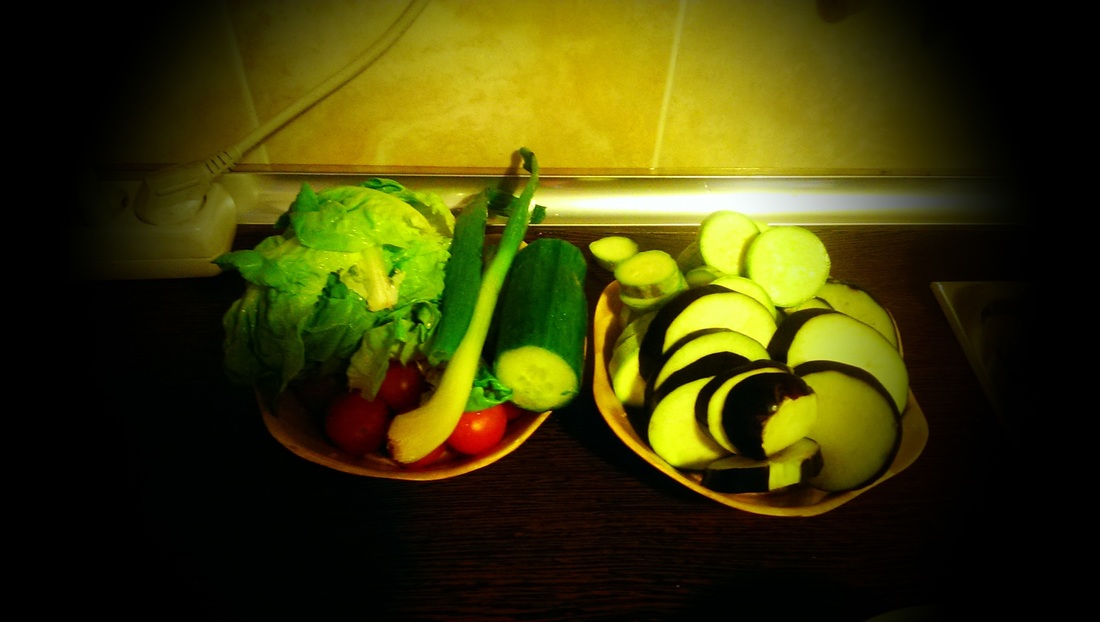
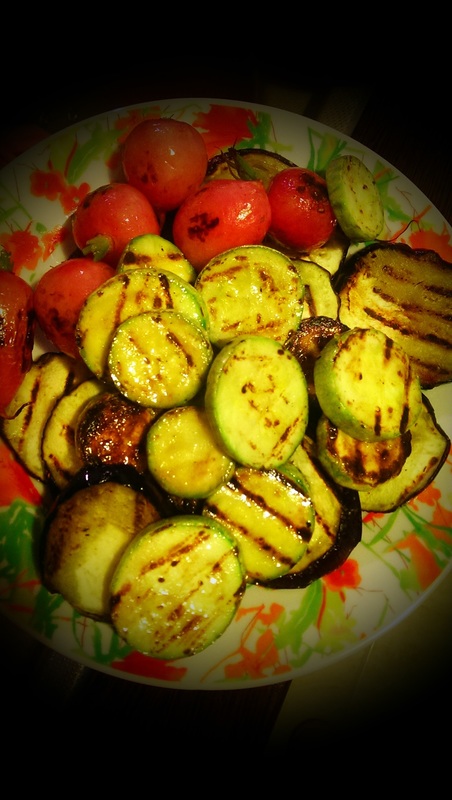
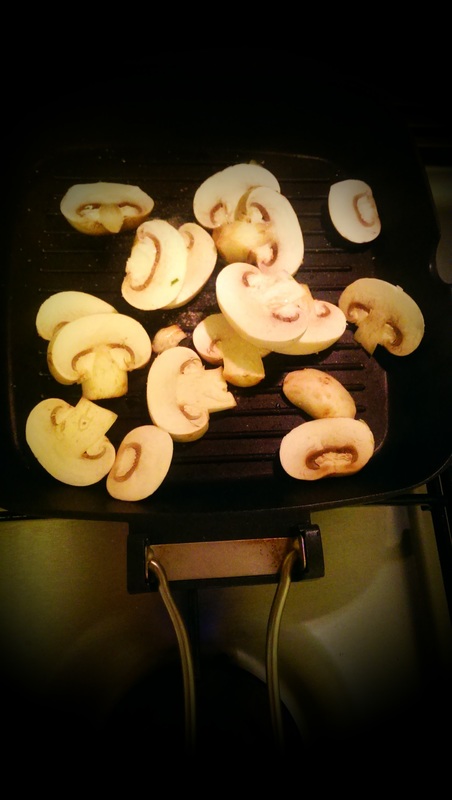
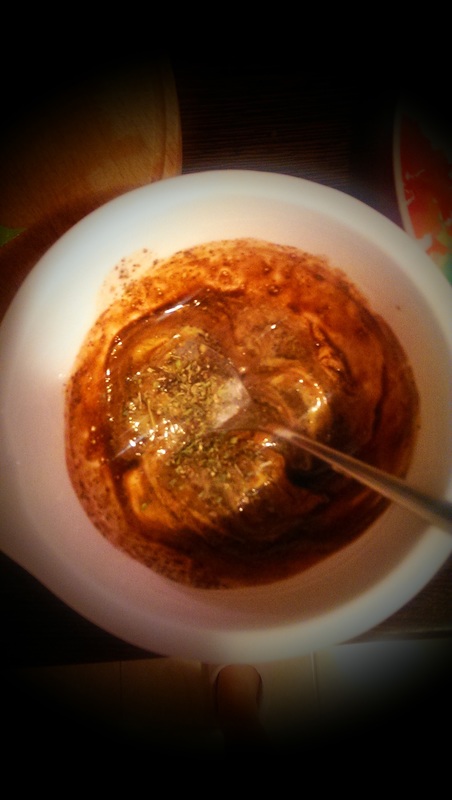
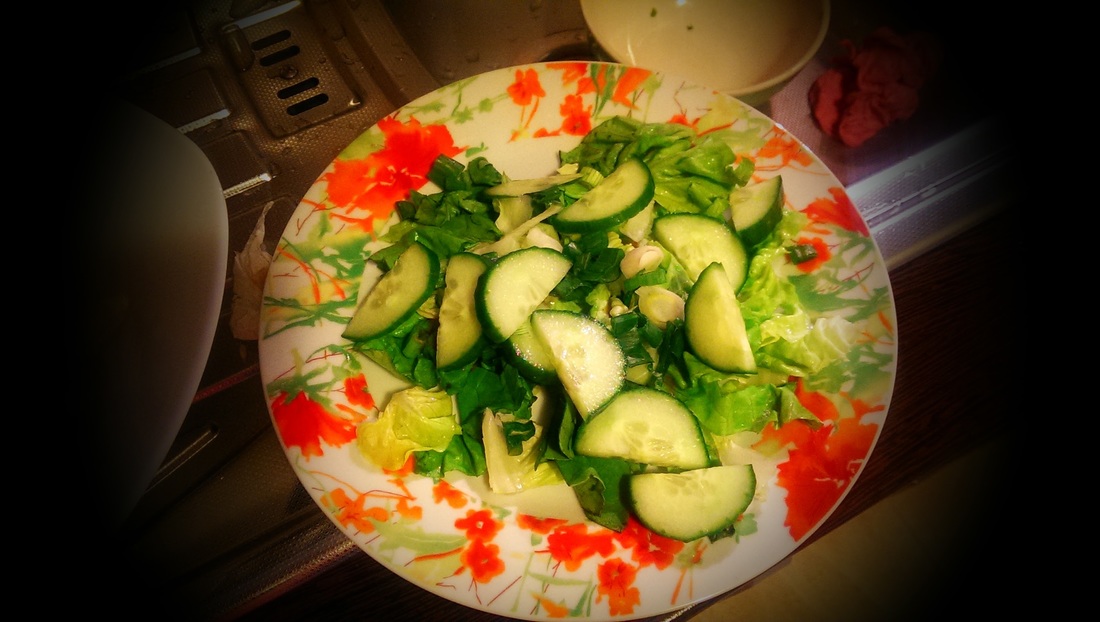
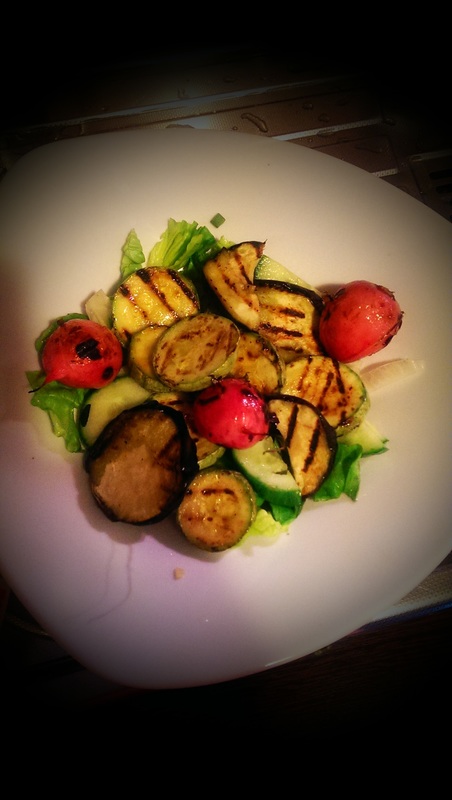
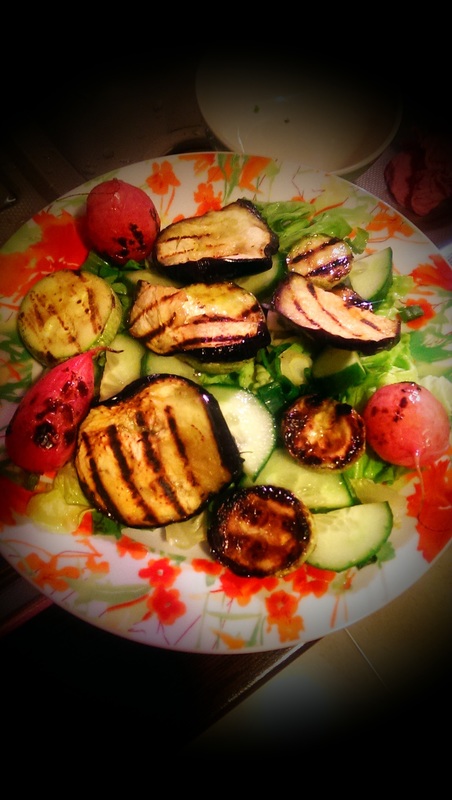
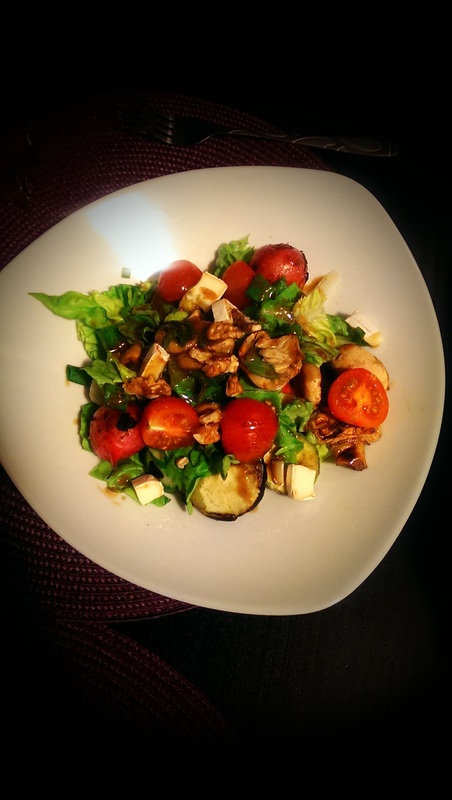
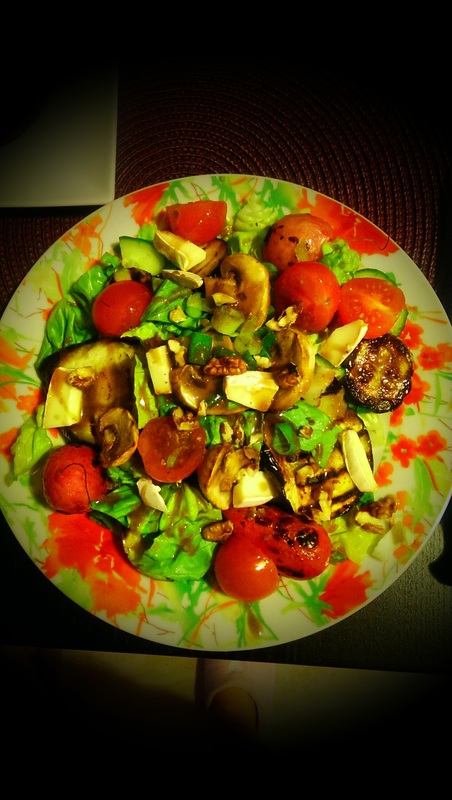
Posibil din cauza ca nu se prea racise nautul meu, hummusul parea sa aiba o consistenta putin prea moale. Insa asta s-a aranjat de indata ce s-a racit putin, iar consistenta a fost in regula, semn de corelare buna a cantitatilor. ----------------------------------------------------------------------------- It might have been due to the chickpeas not being cool enough, but the Hummus seemed to be a tad too moist. But that was solved once it had a chance to cool for a bit, and then its consistency was fine, which is usually and indicator of the correct calculation of amounts and ingredients. 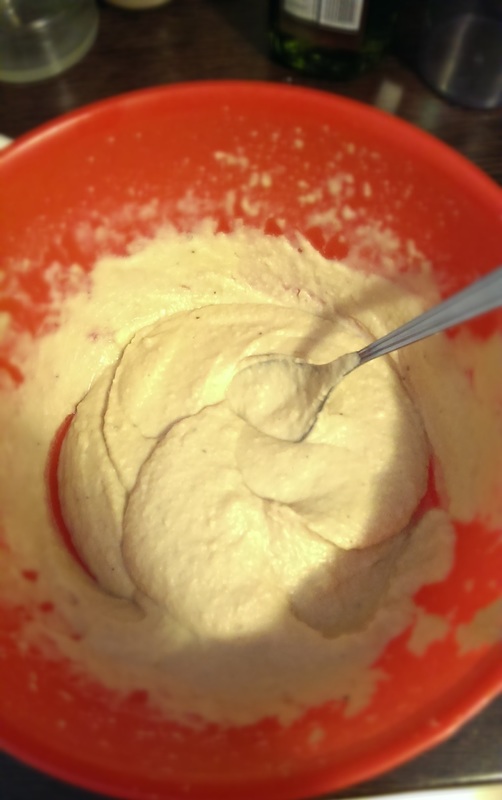 L-am pus aratos intr-un vas cu nitel iz oriental si am presarat niscaiva boia de ardei. Am pastrat si vreo 3 boabe fierte dar intregi, pentru decor. A iesit o bunatate, nu pot sa va spun. ----------------------------------------------------------------------------- I placed the fabulous Hummus onto a small dish Oriental style and I sprinkled some paprika. I saved about 3 whole boiled chickpeas for decor. I cannot begin to describe how good it was. 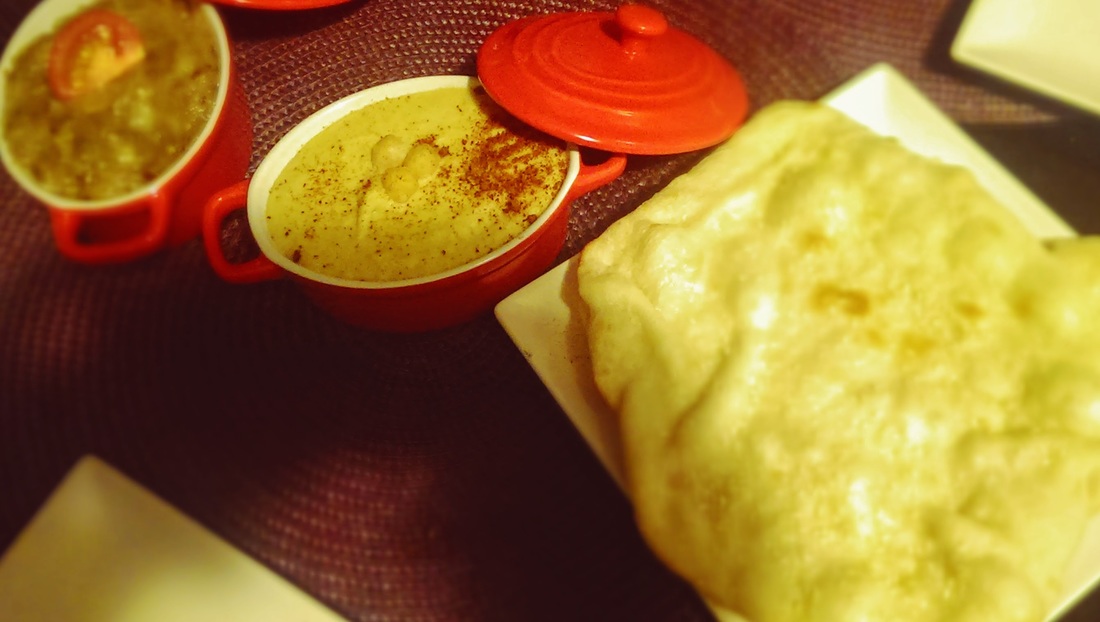 I swear I almost heard Oriental music playing in the background. 3 words: Love for Lebanon. ----------------------------------------------------------------------------- TRY SEXUAL I'LL TRY ANY RECIPE (AT LEAST) ONCE. SUMAR: Ce am folosit pentru 2 salate: o mana de frunze de salata lollo biondo o jumatate de vanata un dovlecel mic, romanesc vreo 4-5 ridichi romanesti vreo 6 rosii Cherry 1 ceapa verde mai grasuta vreo 5-6 ciuperci Champgnon potrivite ca marime vreo 2-4 felii de branza cu mucegai alb cateva nuci (maxim 5 buc. miez de nuca per farfurie) sare si ulei de masline pentru grill Pentru dressing: 1 lingurita de mustar simplu, clasic 2 lingurite de miere oarecare 1 lingurita otet balsamic 1 lingurita ulei de masline sare, piper, oregano Ce-am gresit: Am incercat sa prepar termic ridichile pe grill, dupa un pont citit pe Epicurious; au iesit foarte gustoase, dar ar fi mers coapte in cuptor si nu pe grill (caldura directa le-a innegrit nitel pe ici colo si nu au mai fost asa aratoase) Ce fac mai bun sau mai bine data viitoare: Coc in cuptor ridichile, clar. De unde am reteta: 50% inspiratie de aici, 40% inventie, 10% dressing clasic de salata. ----------------------------------------------------------------------------------------------------- SUMMARY What I used for 2 salads: some lollo biondo salad leafes one half of eggplant one small zucchini about 4-5 radishes about 6 Cherry tomatoes 1 hell of a Spring onion about 5-6 Champgnon mushrooms, not too large about 2-4 white mold cheese some walnuts (not more than 5 pieces per each plate) salt and olive oil for the grill pan For the dressing: 1 small spoon simple, classic mustard 2 small spoons plain honey 1 small spoon balsamic vinegar 1 small spoon olive oil salt, pepper, oregano What I did wrong: I tried grilling the radishes, ispired by a tip I got from Epicurious; they were really tasty but should have actually been roasted in the oven and not on the grill pan (it turns out that direct heat causes them to go slightly brownish and less pretty) What I need to do better or tastier the next time: Surely, roast the radishes in the oven. How I came across this recipe: 50% Epicurious inspiration from here, 40% invention,10% classic salad dressing
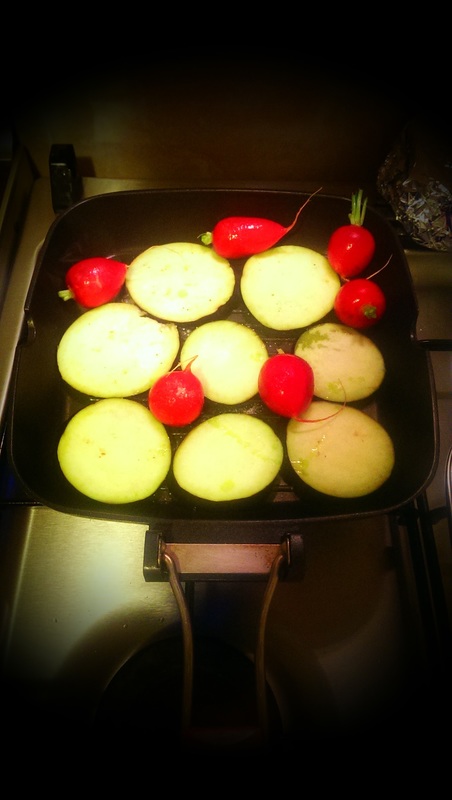
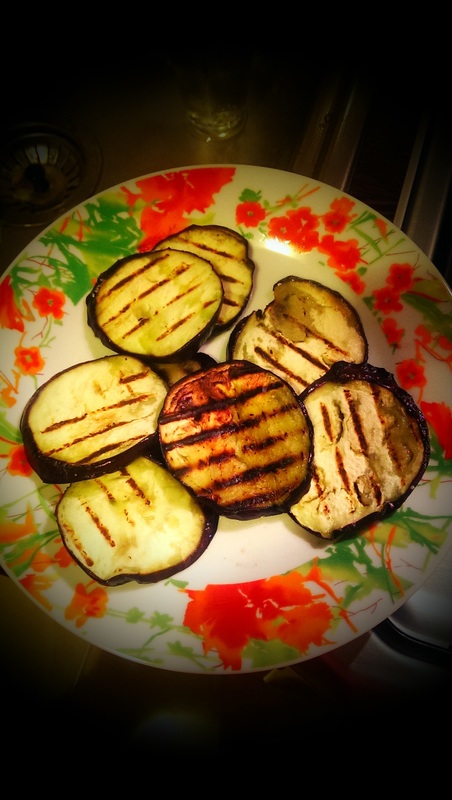
Sar cu brio peste partea in care povestim despre curatatul si spalatul legumelor. Vanata, dovlecelul si ciupercile au fost feliate nitel mai gros, cat sa ramana suculente dupa grill; le-am preparat in ordinea enumerarii, ajutandu-ma de putin ulei de masline si sare, aruncate deasupra lor. Am lasat putin din codita ridichilor doar pentru ca mi s-au parut mai dragute asa; pe ele le-am pus intregi pe grill, deaspra feliilor de vanata/dovlecel. ----------------------------------------------------------------------------------------------------- I will go ahead and skip the part where we talk about cleaning all veggies. I got the eggplant, zucchini and mushrooms diced slightly thicker, so that they stay juicy after being grilled. I added them to the grill in the order I mentioned them, adding also a dash of olive oil and salt on top of them. I wanted to leave a tiny bit of my radishes green side, just because I liked the way they looked. These were added whole, on top of eggplant sclices.
Le-am lasat sa se faca la foc mediu, cu capac; le-am intors cand au prins urme de grill. Trebuie ca nu a durat mai mult de 10 minute pentru fiecare transa. ----------------------------------------------------------------------------------------------------- I left them cook over medium heat, with the lid on top; i fliped them over when they had grill marks. It shouldn't have lasted more than 10 minutes each turn.
Cat timp legumele si-au facut de cap, m-am apucat de dressing si de montaj. Daca pentru primul nu am facut decat sa le amestec pe toate cu mojarul pana am obtinut o compozitie decenta (semi-omogena), pentru cealalta parte m-am agatat de 2 farfurii si am montat in straturi: frunze de salata, ceapa verde tocata, putin dressing, cateva bucatele de nuca maruntita, am asezat felii de vanata/dovlecel, din nou dressing, salata si ceapa verde, iar la final am asezat deasupra ridichile si branza cu rosiile. Ideea este ca nu poti amesteca o salata servita pe farfurie, asa ca ar trebui ca dressing-ul sa acopere majoritatea ingredientelor, cu atat mai mult cele ramase crude. ----------------------------------------------------------------------------------------------------- For while the veggies had their way with the grill, I got on to the dressing and set-up. The first part was very easy, I just mixed all ingredients up to the point where everything was semi-mixed. For the set-up, I got 2 plates and started to place layers of salad leafes and chopped Spring onions, added some dressing, some diced walnuts, then placed eggplant/ zucchini slices and some more dressing, salad leafes and Spring onion; finally, I added the radished and cheese, together with the Cherry tomatoes. The point is you cannot actually mix a salad that is being served on a plate, so the dressing should get to the vast majority of the ingredients and especially to the ones that remained raw.
Am obtinut o salata foarte interesanta, iar experienta ridichilor preparate termic e clar de repetat. Sigur, Carnivorul nu putea trai doar cu atat pana dimineata, asa ca am trantit la final si un carnacior pe grill, dupa ce au fost gata legumele. Acum ma inclin in fata ridichilor, iar inainte nu le suportam. Multumesc, Epicurious. ----------------------------------------------------------------------------------------------------- I got a very interesting salad and the cooked radishes was clearly a nice experience, which I'll definetly try again. Surely, the Meat lover would have starved by morning, if it wasn't for one round sausage I grilled right after finishing with all grilled Veggies. Used to hate radishes, now I salute them. Thank you, Epicurious. ----------------------------------------------------------- TRYSEXUAL I'll try any recipe (at least) once.
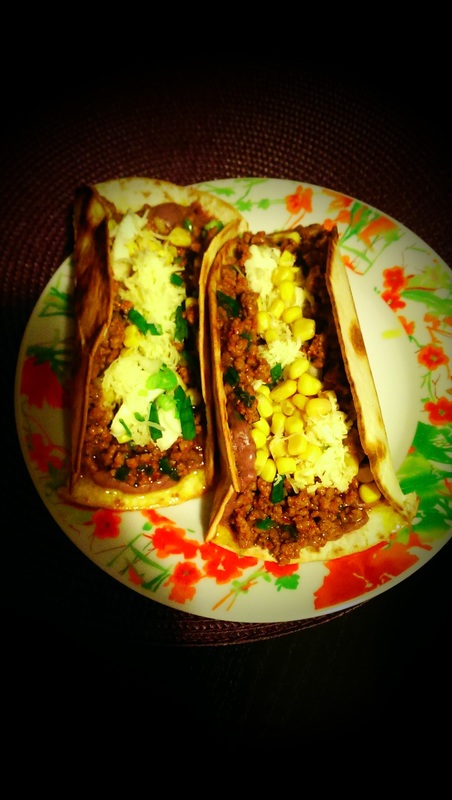
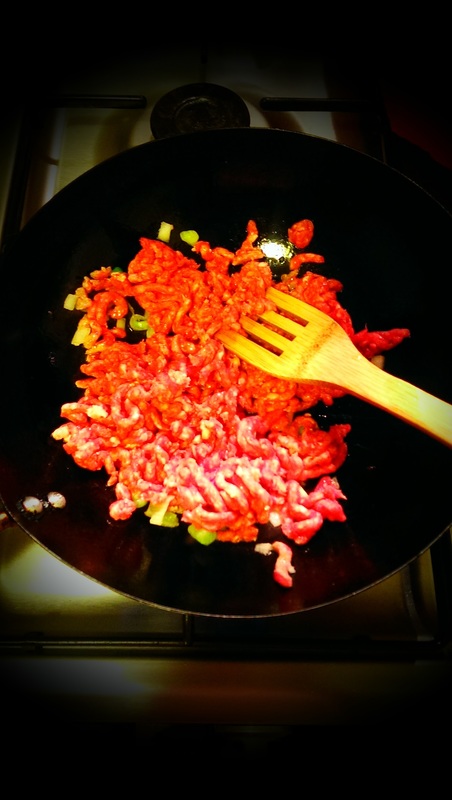
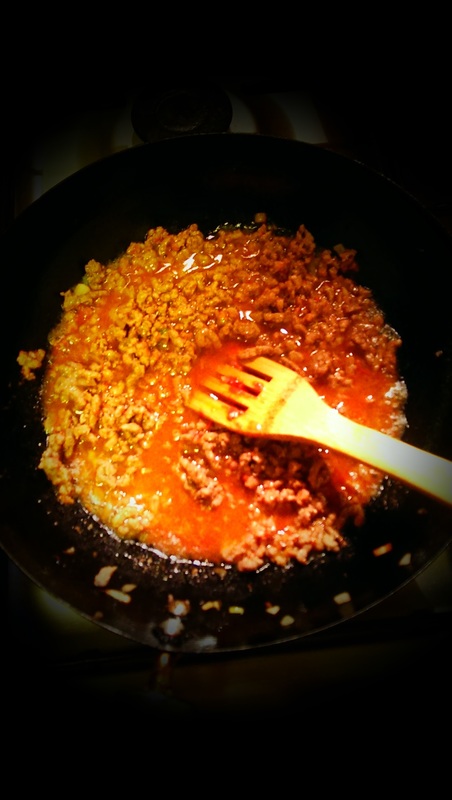
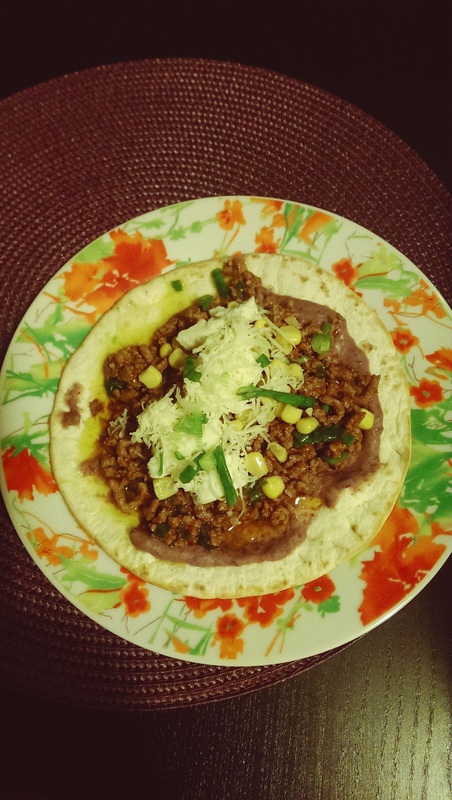
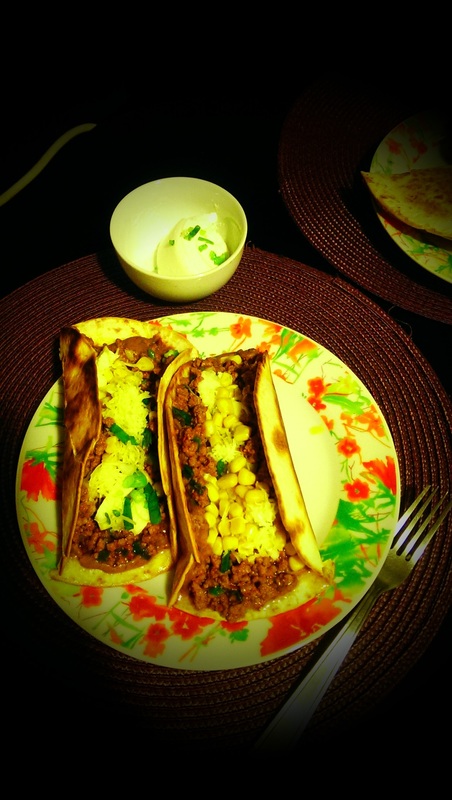
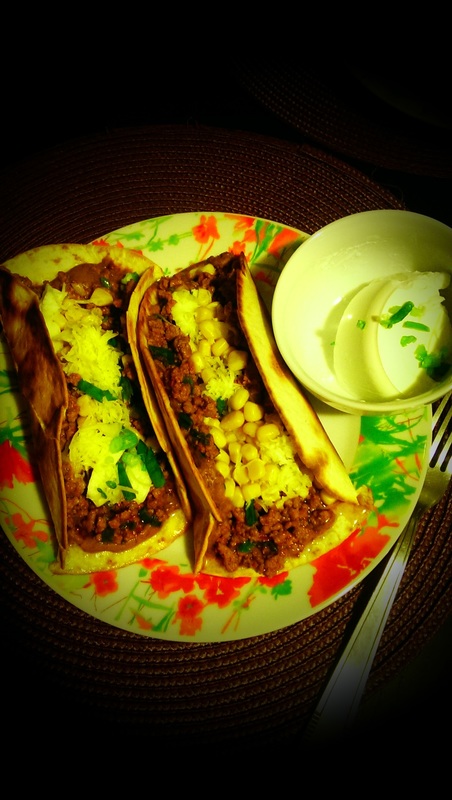
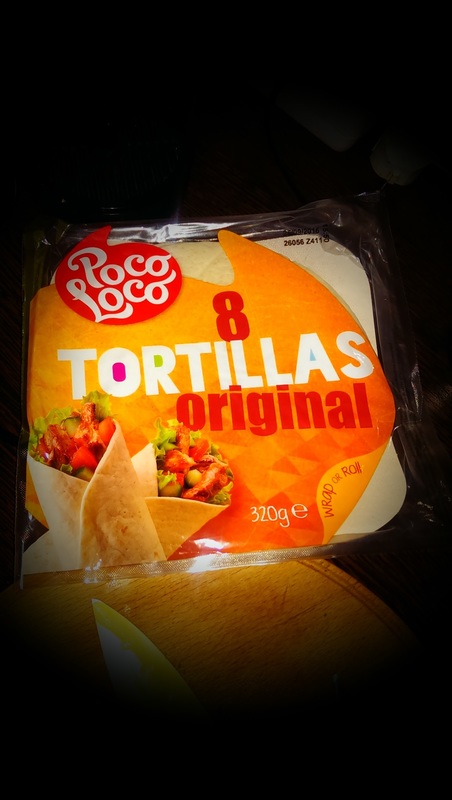
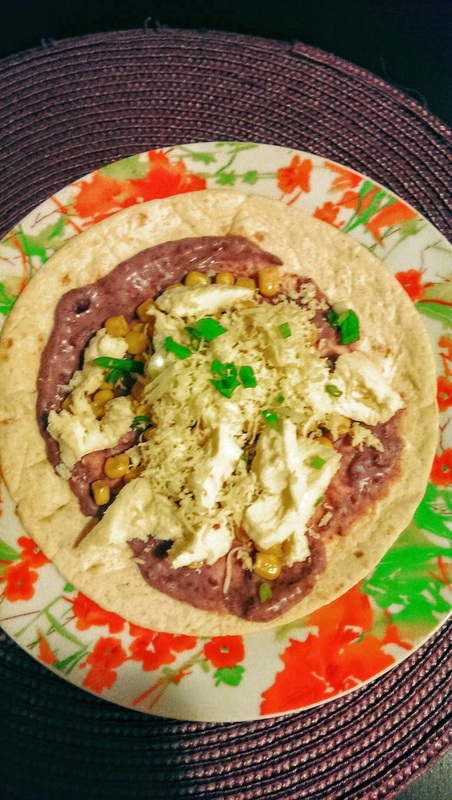
SUMAR: Ce am folosit pentru 2 nachosi giganti: 2 lipii de tortilla din comert cca. 200g carne tocata amestec (poc+vita) 1 ceapa vreo 2 linguri de suc de rosii dens 1/4 conserva de fasole rosie fiarta (cca. 3 linguri) 1/4 conserva de porumb dulce (la fel) 1 fir de ceapa verde vreo 2 felii de mozarella cam tot atata branza razuita Cheddar maturata sare, piper, ulei de masline Merg la fix cu reteta de guacamole, de aici Ce-am gresit: Am avut lipii mici, iar cantitatea de carne pare sa fi fost ceva mai multa decat era nevoie; de asta au iesit giganti :) Ce fac mai bun sau mai bine data viitoare: Ori nu mai pun asa multa carne, ori caut tortillas mai mari De unde am reteta: Dintr-o revista Mega Image. :) ----------------------------------------------------------------------------------------------------- SUMMARY What I used for 2 Nachos gigantes: 2 ready made tortillas about 200g ready mixed minced meat (beef and pork) 1 onion about 2 spoons of thick tomato juice 1/4 ready boiled red beans can (about 3 spoons) 1/4 sweet corn can (same) 1 Spring onion about 2 slices of mozarella about the same amount of grated matured Cheddar cheese salt, pepper, olive oil Works like a charm with my Guacamole recipe, which you can find here What I did wrong: The amount of meat seemed a bit excessive, especially since my tortillas were tiny; henz the name :) What I need to do better or tastier the next time: Either go for bigger tortillas or just put in less meat. How I came across this recipe: I got it from a hypermarket's magazine. 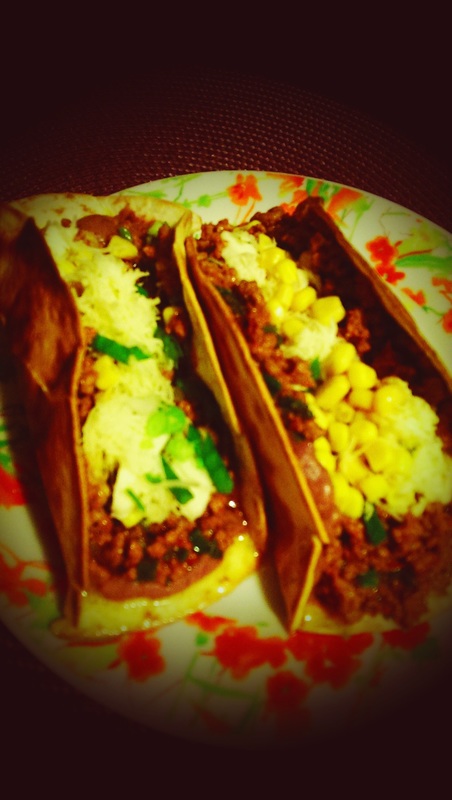 Am inceput simplu, cu o tigaie potrivita pentru sote, in care am facut sa se incalzeasca nitel ulei de masline; am pus ceapa sa se distreze pana ce a devenit nitel sticloasa si am adaugat carnea. ----------------------------------------------------------------------------------------------------- I started off embarrasingly easy, with a saute pan ready. Got some olive oil heated and added my onions; gave those a change to get slightly glassy and then I added the minced meat.
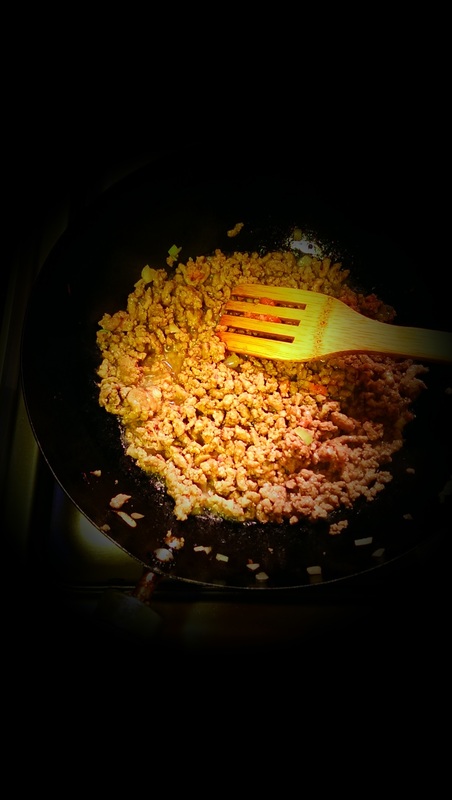
Pe cand carnea a inceput sa devina albicioasa, am pus vreo doua linguri zdravene de suc de rosii dens, facut in casa (nu la mine, evident). Am lasat povestea sa scada la foc mic, dupa ce am potrivit de sare si piper. ----------------------------------------------------------------------------------------------------- When the meat got slightly white, I added about 2 spoons of thick homemade tomato sauce (not made in my home, however). I left all of this to sit on a mild flame, after getting the taste right with salt and pepper.
Intre timp, am pus fasolea in blender si am invartit-o nitel pana ce s-a pierdut cu firea. Pasta e genial de buna, nu mai stiu daca am pus nici macar sare, cred ca nu. In orice caz, faceti bine si nu aruncati toata apa din conserva, ci puneti putin in blender (cca. 1 lingurita); nu numai ca va contribui la gust, ci va ajuta si textura sa devina cremoasa. ----------------------------------------------------------------------------------------------------- In the mean time, I added the beans in the blender and gave it a spin until creamy. This beans paste is so good, I'm not even sure I added any salt in it. Anyhow, you better pace yourselves and not throw away all of the juice in the beans can; add a little bit (about 1 tea spoon). It will not only improve the taste, but will also give it a nice creamy texture.
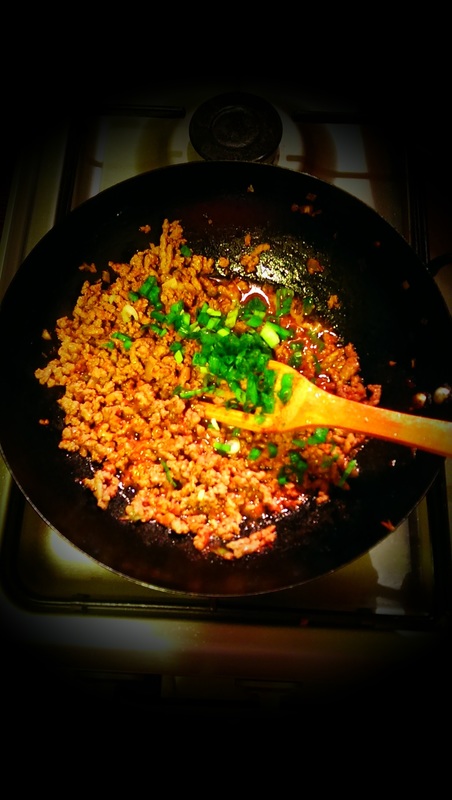
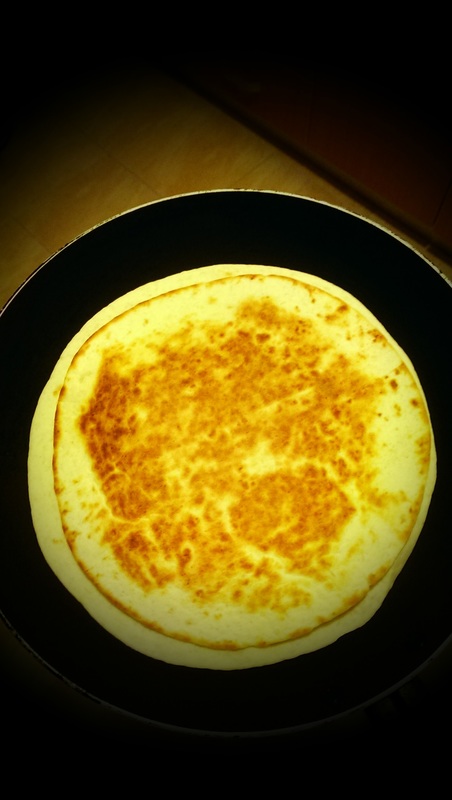
Pe cand carnea a fost aproape gata, am pus o mana de ceapa verde tocata si am pus lipia la incalzit, intr-o alta tigaie, mai potrivita pentru clatite decat pentru sote. Tortilla s-a rumenit frumusel pe ambele parti, moment in care am zis ca e vremea sa o amplasez confortabil pe o farfurie. Am pus jumatate din compozitia de pasta de fasole rosie, jumatate din cea de carne tocata, putina mozarella, branza Cheddar, porumb si ceapa rosie. Am procedat identic si cu fratele lui geaman si am inghesuit amandoi grasanii in aceeasi farfurie, putin indoiti. ----------------------------------------------------------------------------------------------------- When the meat was almost ready, I added some chopped Spring onions and separatedly placed the tortilla in another pan (it needs to be one more pancakes apropriate rather than saute pan) so that it gets nice and crispy. When the tortilla was crisp on both sides, I decided it was time to be placed on a plate. I added half the beans paste, spread it around, then added half the meat mix, some mozarella and Cheddar cheese, sweet corn and sprinkled some diced Spring onion. I did the exact same thing with the other twin and then I got them both chubby bothers on the same plate, slightly curved.
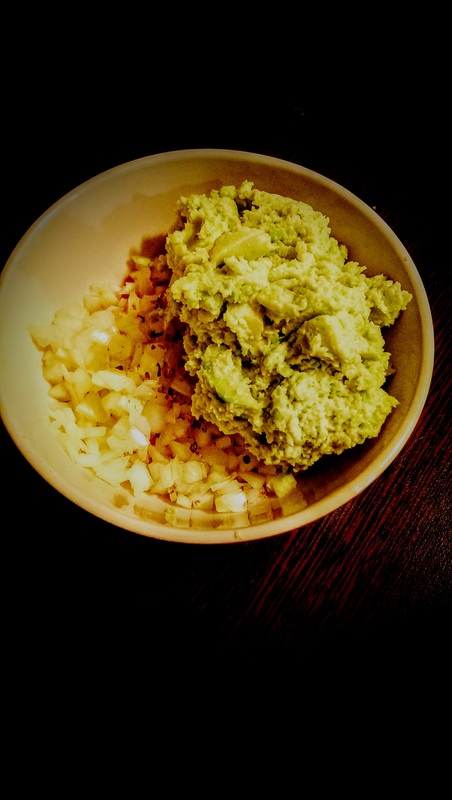
Am servit cu guacamole si samantana grasa.
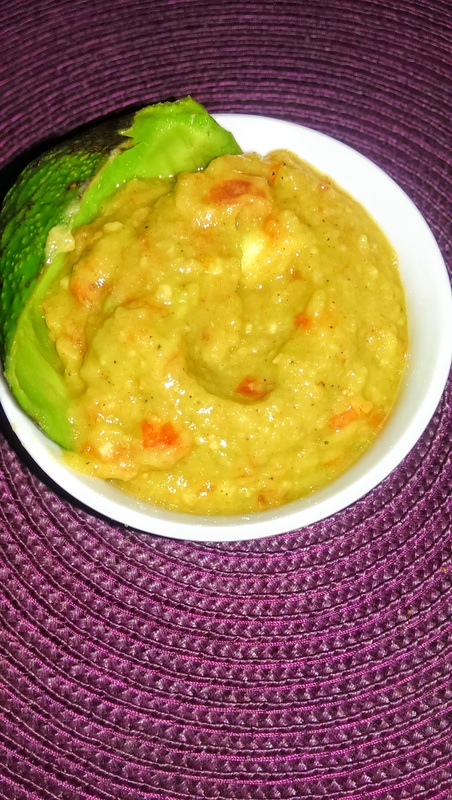
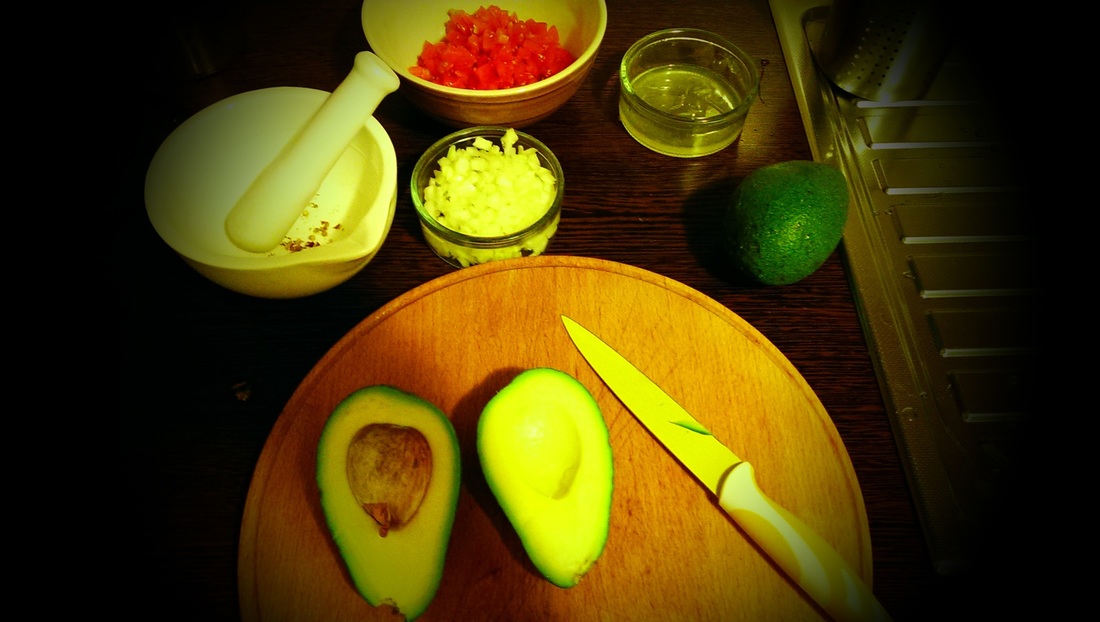
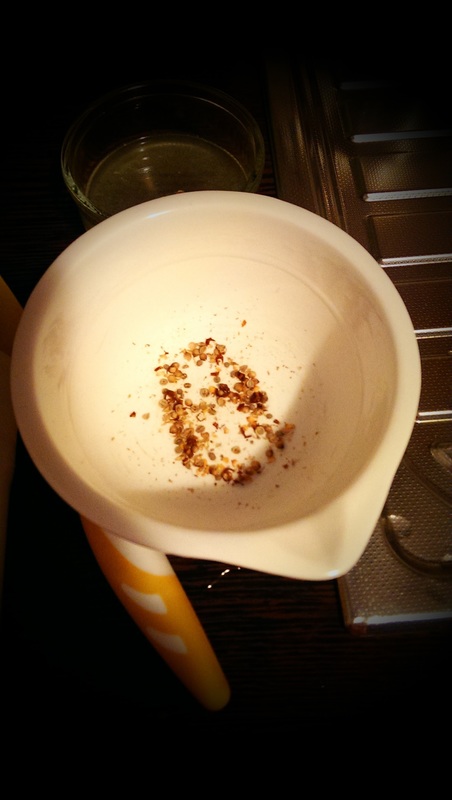
Din nefericire, nu pot sa descriu ce curcubeu frumos a fost pe cerul gurii. Pentru ca a fost pe cerul gurii Carnivorului :) ----------------------------------------------------------------------------------------------------- I served with guacamole and sour cream. Unfortunately, I cannot describe the great taste. Since this feast wasn't meant for my lips, but for those of the Meat Lover. ----------------------------------------------------------------------------- TRY SEXUAL I'LL TRY ANY RECIPE (AT LEAST) ONCE. SUMAR: Ce am folosit pentru 1 persoana: Pentru Quesadilla: 2 lipii de tortilla din comert 1/4 conserva de fasole rosie fiarta (cca. 3 linguri) 1/4 conserva de porumb dulce (la fel) 1 fir de ceapa verde 2-3 felii groase de mozarella cam tot atata branza Cheddar maturata Pentru Guacamole: 1 ceapa alba vreo 5-6 rosii cherry 2 avocado bine copti zeama de la o jumatate de lamaie (cca. 1 lingura mare) cateva boabe de coriandru (nu am gasit proaspat) 2 ardei mici, iuti si uscati (Pepperoncini) sare, piper, ulei de masline nitel ceapa verde, ramasa de la Quesadilla, doar pentru decor Ce-am gresit: Nu am gasit coriandru proaspat. Ce fac mai bun sau mai bine data viitoare: Caut mai diligent. Coriandru De unde am reteta: Cea de Quesadilla e combinatie intre ce am citit pe diverse bloguri de profil, plus ce imi place mie. Cea de Guacamole e de aici. Am pus in plus doar putin ulei de masline, ca sa il ajute sa creeze o emulsie/un sos. ----------------------------------------------------------------------------------------------------- SUMMARY What I used for 1 person: For the Quesadilla: 2 ready-made tortillas 1/4 pre-boiled read beans can (about 2-3 spoons) 1/4 sweet corn can (same) 1 Spring onion 2-3 thick slices of Mozarella about the same amount of matured Cheddar cheese Pentru Guacamole: 1 regular onion about 5-6 cherry tomatoes 2 avocados the zest of half a lemon (about 1 spoon) some coriander beans 2 small, hot and dry peppers (Pepperoncini) salt, pepper, some olive oil (it helps turn the paste into a sauce) some leftover Spring Onion from my Quesadilla What I did wrong: I couldn't find fresh coriander. What I need to do better or tastier the next time: I really should be more attentive at it. How I came across this recipe: The one for Quesadilla is more of a mix of various online recipes plus everything I like. The one for Guacamole is from here. 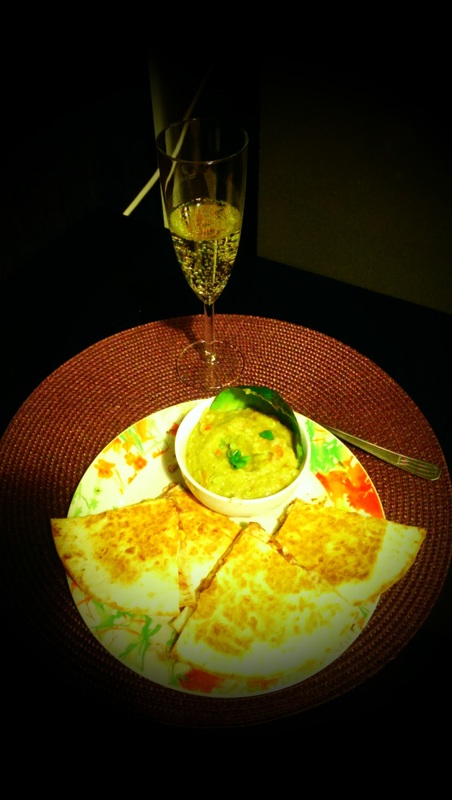 Am inceput cu Guacamole, ca sa ii dau ocazia sa mai zaboveasca nitel si la frigider. Am tocat fin ceapa si rosiile cherry; reteta recomanda rosii normale, fara seminte. Mie astea mici mi se par pline de gust si am scapat si de scos semintele. Bonus: coaja lor nici nu se simte. Intr-un mojar am taiat cu foarfeca ardeii iuti si am pisat impreuna cu boabele de coriandru. ----------------------------------------------------------------------------------------------------- I started off preparing the Guacamole first, so that it gets some time alone in the refrigerator. I finely diced the onion and cherry tomatoes; the recipe calls for regular tomatoes, without the seeds. I find that these little ones are flavour full and you can get away without removing seeds. And bonus: their peel is not even remarcable. I got out my mortar and pestle for this occasion and cut the small peperoncini with a scissors, then I mixed along with the coriander beans.
Am apreciat sfatul de a pregati mai intai sucul de lamaie, pentru ca in momentul in care avocado este gata, sa il impreunam cu sucul cat mai repede, caci tare oxideaza. Zis si facut. I really apreciated the advice of having first the lemon zest ready; at the moment the avocado is ready, it should meet the zest immediately, since it takes no time to go brown. So I did.
Eu am pasat avocado la blender; nu era chiar atat de copt incat sa se piseze usor cu furculita, si oricum il apreciez mai mult la stadiul de pasta. Am amestecat pasta de avocado cu sucul de lamaie, ceapa, rosiile, nitel ulei de masline si condimentele si am mai pulsat o data in blender. Cam jumatate din rosii s-au mai pierdut dupa operatiunea asta, restul au ramas vizibile. ----------------------------------------------------------------------------------------------------- I blended my avocado; for one thing, because it wasn't that moist so that it would just be pestled easily with a fork and second because I really like it best propperly blended. I then mixed the avocado paste with the lemon zest, the onions, tomatoes, spices and some olive oil and gave it one more spin on the blender. About half of the tomatoes were gone, but the other half staying was enough for me.
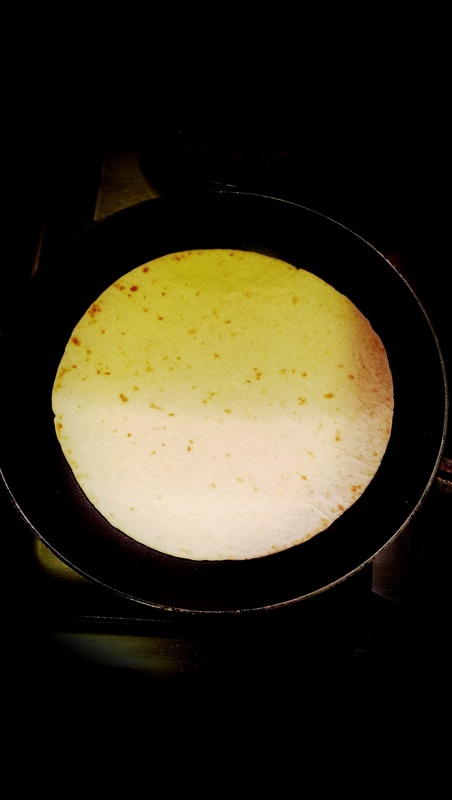
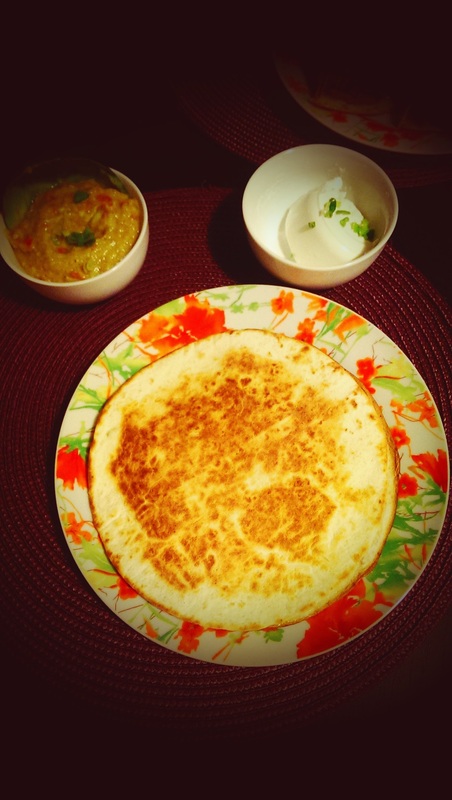
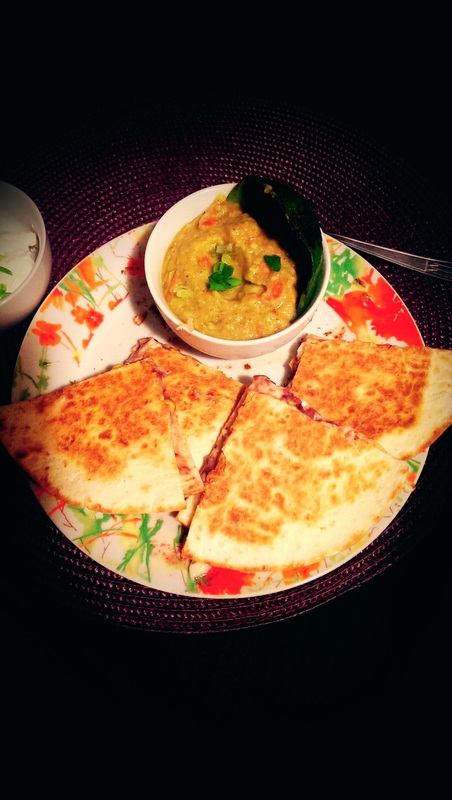
Odata terminata ingineria foarte complexa a Guacamole, l-am dat elegant la o parte la rece. Am scos o tigaie ca pentru clatite si am pus o foaie de tortilla la incalzit. Recomandarea ar fi sa se potriveasca, evident, marimea foii cu cea a tigaii. ----------------------------------------------------------------------------------------------------- Once the entire complex science of the Guacamole was finished, I placed it in the refrigerator. I got out one pan, similar to the ones for pancakes and placed a tortilla to warm up just a tiny bit. You should fit the tortilla size to the pan you use.
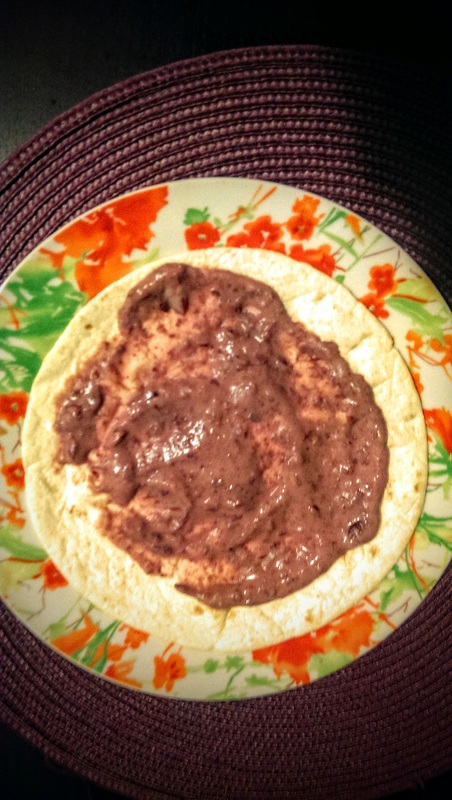
Am pasat boabele de fasole la blender, lasand nitel din apa din conserva. A iesit foarte gustos, iar avantajul este ca boabele nu mai ies, razlete, din lipie; si toate astea, in timp ce gustul se pastreaza :) Asadar am uns lipia incalzita putin cu pasta de fasole. Am adaugat porumb, mozarella, cheddar si ceapa verde, apoi am returnat in tigaie si pe foc. ----------------------------------------------------------------------------------------------------- I blended my red beans leaving them a bit of the juice they had in the can. It turned out to be very tasty and the huge advantage is you no longer have to worry about all beans coming out of the tortillas at the worst time; and all that while keeping the great taste. :) So once I had the tortilla warm, I placed it on a plate and added the red beans paste, the corn, mozarella, Cheddar cheese and Spring onion, then I returned it in the pan and on to the flame.
Dupa cateva minute (cca.5-10, in functie de flacara/aragaz), ar trebui sa fie bine rumenita. A mea a fost, dupa vreo 5, la foc mic. Am mai pus deasupra o foaie de tortilla si am rasturnat povestea, cu ajutorul unui capac. ----------------------------------------------------------------------------------------------------- After few minutes (about 5-10, considering your flame/stove), it should be well browned. Mine was after about 5, at a small flame. I placed another tortilla on top and reversed them so that the uncooked one reached the flame. I used a lid to help me out on this one.
Am lasat-o sa se rumeneasca si pe 'verso', dupa care am servit, taiata in 4 cu rotita de pizza.
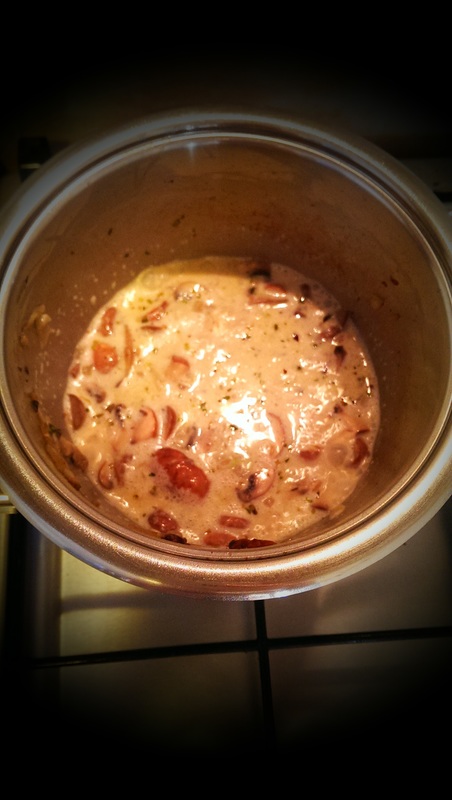
O nebunie, gata pana sa spui "Quesadilla". ----------------------------------------------------------------------------------------------------- I left it to start going slightly brown on this side as well, and then I served, cut in 4 with the help of a pizza wheel. Insanely delish and ready before you can get a chance to say "Quesadilla". ----------------------------------------------------------------------------- TRY SEXUAL I'LL TRY ANY RECIPE (AT LEAST) ONCE. SUMAR: Ce am folosit pentru 2 flamanzi: o ceapa alba 2-3 ciuperci mari si brune, daca se poate 1 catel de usturoi 1 cana (cca. 150 g) orez prefiert (Arborio e destul de inaccesibil) 1 ceasca (cca. 100ml) vin alb sec 1 fir ceapa verde 1 lingura mare de mascarpone 1 lingura parmezan proaspat razuit (eu am folosit Grana Padano) o jumatate de piept de pui dezosat, in versiunea pentru Carnivor; ulei de masline, unt (cat o nuca) o lingurita de zeama de lamaie sare, piper, oregano apa fierbinte (merge bine si supa de legume, dar eu nu am avut) Ce-am gresit: Mai nimic, de data asta; revin cu un update cand sau daca imi dau seama. A. Poate fi orezul, non-Arborio, ar spune italienii vero. Sau supa de legume in loc de apa. Ce fac mai bun sau mai bine data viitoare: Pun si dovlecel; acum nu mai aveam prin frigider. Si, desigur, orez Arborio. De unde am reteta: Combinatie intre ce am vazut pe net (mai multe retete) si ce am mancat (si mi-a placut) la restaurante cu specific Italian. ----------------------------------------------------------------------------------------------------- SUMMARY What I used for 2 hungry people: 1 white onion 2-3 big brown mushrooms, if possible 1 clove of garlic 1 cup (about 150 g) paraboiled rice (Arborio rice is pretty inaccesible) 1 teacup (about 100ml) dry white Whine 1 spring onion 1 big scoop of mascarpone 1 big tablespoon of freshly grated Parmigiano (i used Grana Padano) some olive oil and butter (about the size of a walnut) one half of boneless chicken breast, for my Meat-Lover. 1 teaspoon of lemon zest salt, pepper, oregano some hot water (or vegetables soup) What I did wrong: I can't quite tell this time; i'll be back with an update when I figure this out. Oh, might be the rice, which was not Arborio, Italians might argue. Or it can be the lack of vegetables soup, instead of water. What I need to do better or tastier the next time: I should add some zucchini; I didn't have this time. And sure, Arborio rice. How I came across this recipe: This is a mix of various recipes seen online and what I've eaten (and liked) in Italian restaurants.
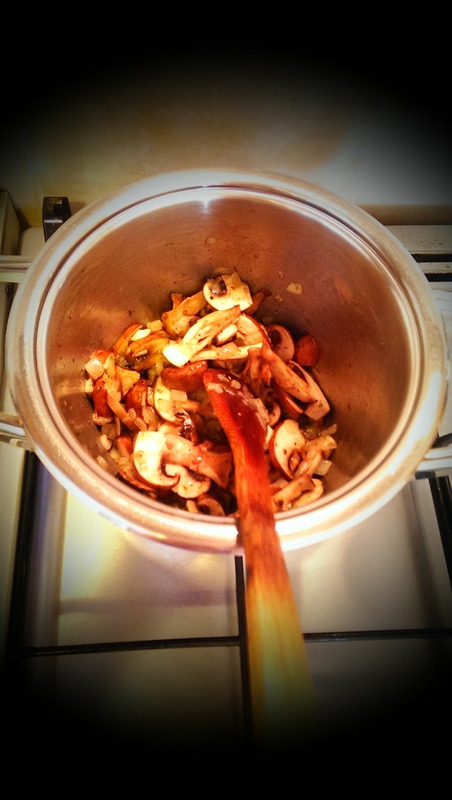
Totul a inceput cu o craticioara mica (sa fi avut capacitate de max.3 litri), in care am asezat o suvita de ulei de masline si nitel unt. fireste, dupa ce uleiul s-a incins si untul e aproape topit, am sotat acolo nitel ceapa tocata, pana ce a devenit usor sticloasa. ----------------------------------------------------------------------------------------------------- Everthing started with a small sized pot (mine was about 3 l), in which I added just a splash of olive oil and the butter; surely, after the oil was hot enough and the butter almost melted, I added the diced onion and left it to become glassy-looking.
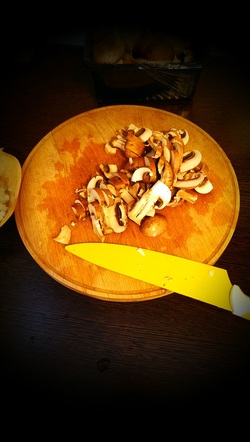
Am pus apoi ciupercile brune taiate grosier; le-am invartit pe toate cat sa se zapaceasca. Am pus usturoiul tocat fin si orezul si am potrivit de sare si piper; am invartit cu simt de raspundere, pana ce orezul s-a acoperit putin de 'unsoarea' din cratita. ----------------------------------------------------------------------------------------------------- I added my roughly chopped mushrooms and give that all a stir; then, I added the finely diced garlic clove and seasoned. Afterwards, I once again give it a steady stir up until the rice was slightly covered in the grease from the pan.
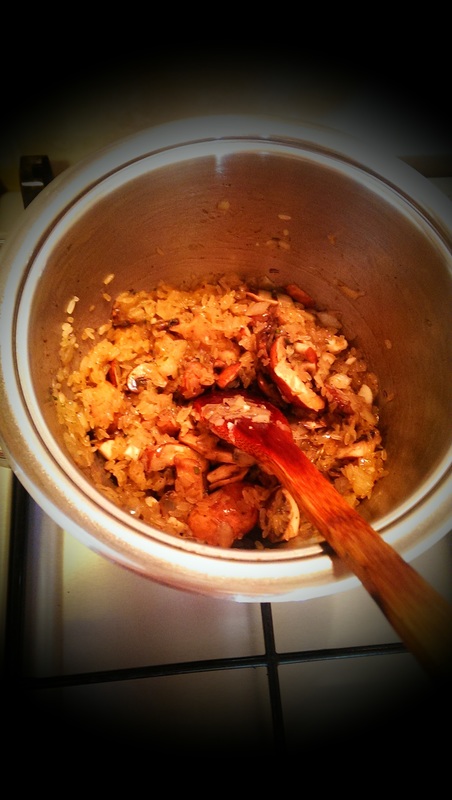
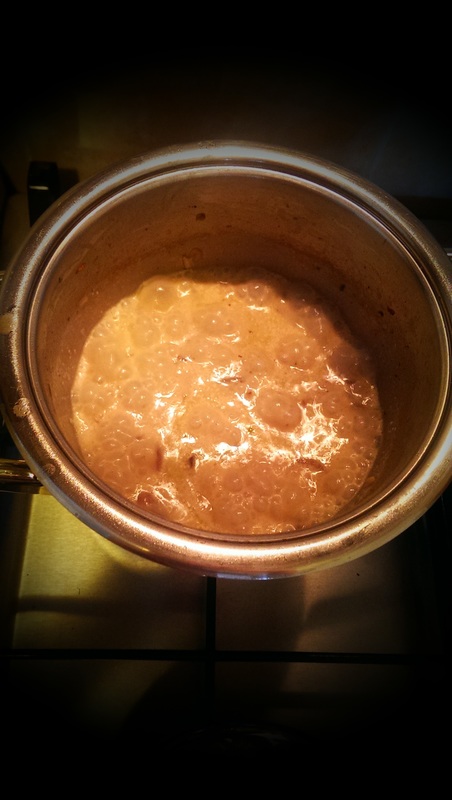
n faza aceasta, devenise limpede ca povestea avea nevoie disperata de ceva lichid; asa ca am adaugat vinul si am lasat sa bolboroseasca nitel, cat sa se evapore. Dupa ce lichidul a fost absorbit aproape in totalitate, am continuat sa adaug apa fierbinte, de fiecare data numai cat lichidul sa acopere orezul (exclus clasica balta generata de raportul 3-4 cani de apa la una de orez, adaugate toate deodata - aia merge la pilaful romanesc). Merge si mai bine supa de legume in loc de apa, dar eu nu am avut la indemana. ----------------------------------------------------------------------------------------------------- At this stage, it was clear this pot needed some liquid ASAP; so I added the wine and left it to simmer so that the alcohool aired out. Once the liquid was almost totally absorbed, I kept on adding hot water, little by little, so that each time the liquid would just merely cover the rice (don't pour all water at once). Vegetables soup works even better, but I had none.
Dupa ce am adaugat prima apa si ea a fost aborbita, am pus mascarponele si din nou apa fierbinte, potrivit aceleiasi reguli. Am verificat din nou sa fie potrivit de sare si piper. Am repetat operatiunea cu grija ca povestea sa nu se lipeasca de fundul vasului, deci amestecand periodic. ----------------------------------------------------------------------------------------------------- After adding the first dash of water and after the same being almost fully absorbed, I added the mascarpone and once again hot water, according to the same rule of merely covering it. I cheked the taste to be salty and peppery enough and repeated this task making sure the risotto doesn't stick to the bottom of my pot, so I kept on stiring cautiously from time to time.
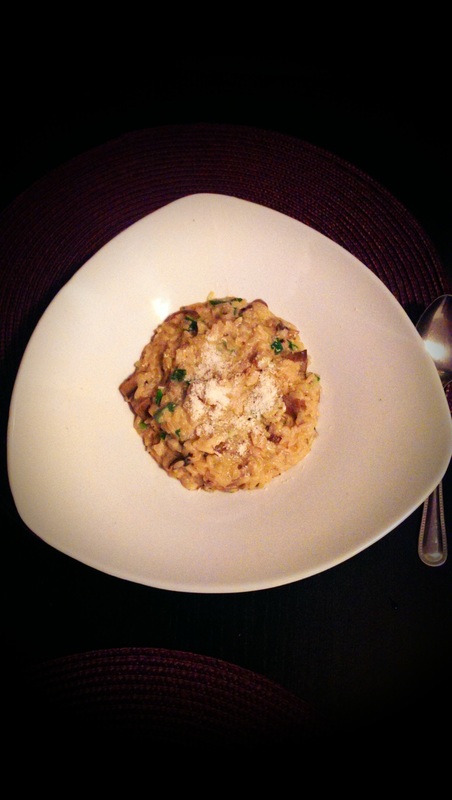
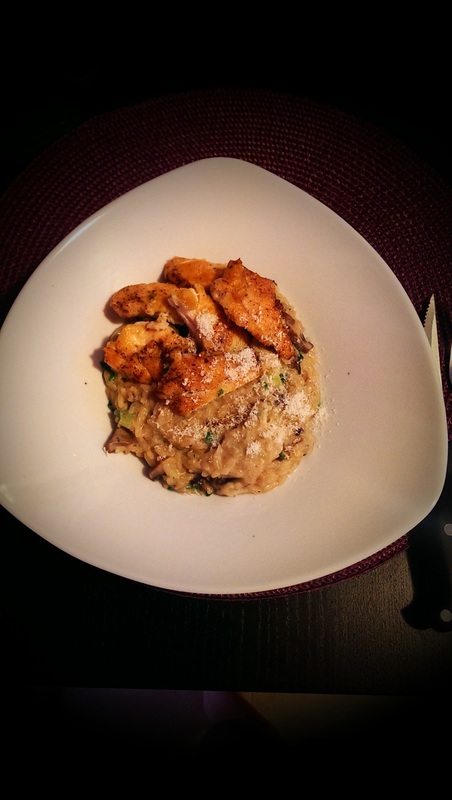
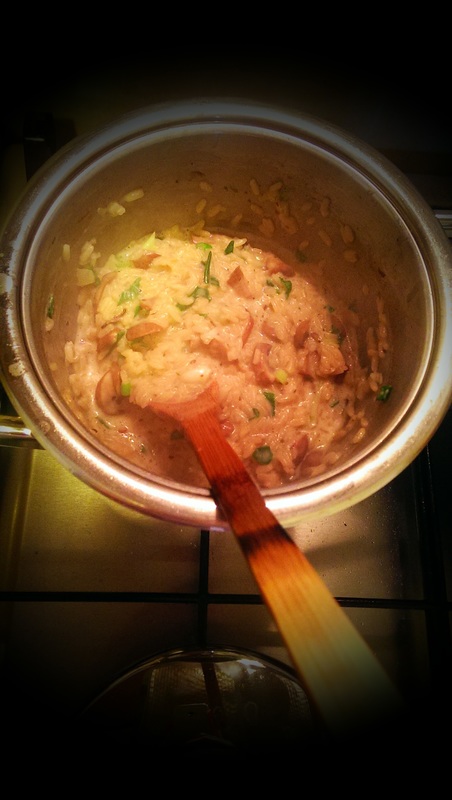
Cand a fost aproape gata, am pus parmezanul si ceapa verde; i-am dat ocazia sa se topeasca si am verificat consistenta; a fost gata cand risotto a devenit cremos si bobul de orez fiert, dar o idee al dente (asta pentru ca asa ne place noua). Am pus o ploaie de oregano uscat si l-am mai lasat cu capacul pus, sa se hodineasca nitel. ----------------------------------------------------------------------------------------------------- When the rizotto was almost ready and the rice grain almost fully cooked, I added the parmesan and diced Spring onion; I gave it some time in order for the parmesan to be melted and checked its consistency; the risotto was finally ready when creamy and the rice grain very slightly al dente (this is how we like it). I then added a splash of dry oregano and left it with the lid on to rest for another bit.
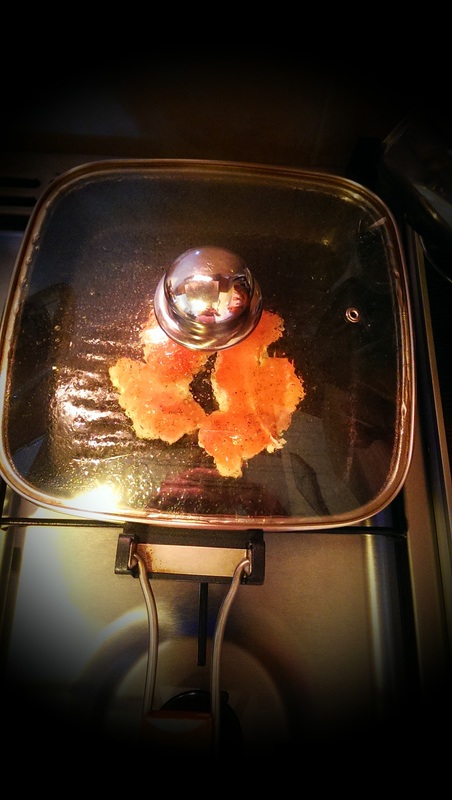
Intre timp, am incins si tigaia grill. Sigur ca i-am dat si lui putina atentie si l-am masat in prealabil cu un mix din ulei de masline, sare, piper, oregano si un strop de zeama de lamaie. L-am pus pe foc si, cand s-a rumenit destul, l-am taiat oblic si l-am asezat peste risotto, impreuna cu o (alta) ploaie de parmezan. ----------------------------------------------------------------------------------------------------- Sure, in the mean time I had a hot grill pan ready just waiting for me. And certainly I had to give it some attention and gave the chicken a quick Shiatsu massage with a mix made from some olive oil, salt, pepper, oregano and the lemon zest. I popped it on the grill and - when nice and brown - I cut it in diagonal and placed in over the risotto on the same plate, with a dash of some (more) parmesan.
Delicios. Sau, cum ar spune italianul, Delizioso.
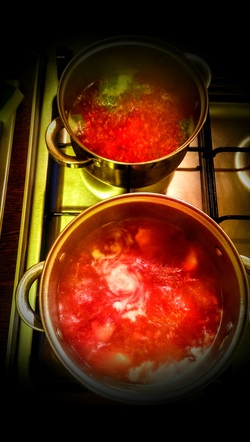
----------------------------------------------------------------------------------------------------- Delish. Or, as the Italian might say, Delizioso. ----------------------------------------------------------------------------- TRY SEXUAL I'LL TRY ANY RECIPE (AT LEAST) ONCE. SUMAR: Ce am folosit pentru varianta veggie si cea non-veggie: o jumatate de sfecla rosie mare 3 morcovi 3 cartofi 1 ardei rosu kapia 2 cepe albe 1 legatura leustean proaspat 1 legatura loboda o bucata de telina (radacina) 2 pastarnaci ceva oase de purcel (1-2 oase garf proaspete, de pilda) ceva carne macra de purcel (o bucata de pulpa de porc cam cat o palma de lunga si lata, de pilda) 1 litru bors proaspat nitel Bors Magic (se pare ca eu una nu pot trai fara monoglutamat de sodiu) Ce-am gresit: Loboda nu era in 'reteta originala'; am pus-o doar ca sa vad ce gust ii da ciorbei. Am constatat ca o legatura de loboda nu face primavara, ci ai nevoie de 4-5. Ce fac mai bun sau mai bine data viitoare: Las deoparte loboda; ea poate fi vedeta in alte supe/ciorbe. Aici, este despre borsul bolsevic, in care ar fi trebuit sa pun si varza rosie tocata fin. De unde am reteta: Are pe putin 145 de ani vechime, din alte vremuri demult apuse. Inventie originala si ne-brevetata a lipovenilor dobrogeni pentru zilele din timpul, de dinainte si de dupa post. ----------------------------------------------------------------------------------------------------- SUMMARY What I used for 2 soups (veggie and non-veggie): one half of a big beet 3 carrots 3 potatoes 1 red pepper 2 regular onions 1 batch of fresh lovage 1 batch of orach one piece of celery root 2 parsnip roots some kind of pork bones (1-2 small ones) some kind of pork lean meat (it can be a piece of pork leg roughly the size of one palm) 1 liter of fresh borsch What I did wrong: I added the too little orach for it to make a difference; it turns out you actually need 4-5 batches so that you feel the taste. What I need to do better or tastier the next time: I'll forget all about the orach and concentrate on this Russian style soup. The orach can be a star in their own soup, some other time. I need to return to the original version, where I add red cabbage finely chopped. How I came across this recipe: This is at least 145 years old, way back in the day. An original unpatented invention of Russian origine people living in Dobrogea for meals during, prior to and after the fast. 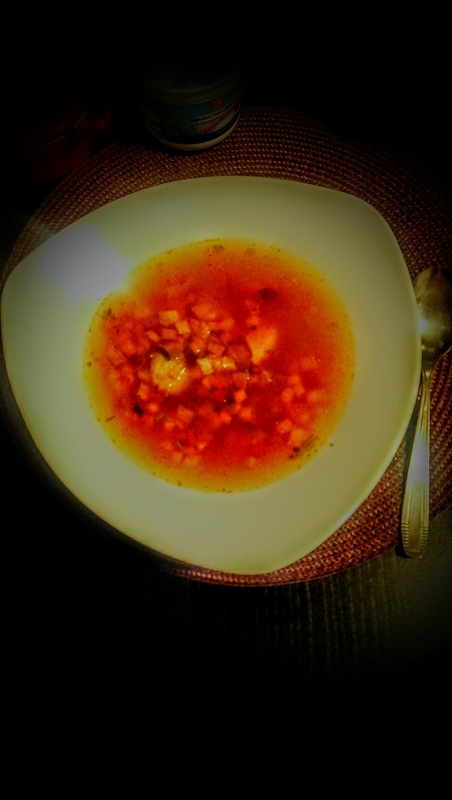 In dulcele stil clasic in care incepem orice supa/ciorba, am curatat toate legumele. Am pornit cu doua cratite mici; intr-una am pus doar apa cu sare la fiert, in cealalata am pus - in plus -oasele si carnea taiata cubulete la fiert. Avand in vedere adaosul de lichid de la bors, nu ar fi necesar mai mult de jumatate de cratita cu apa. Cat timp apa ajunge la punctul de fierbere si carnea incepe sa lase spuma, am taiat cubulete ceapa, morcovul, ardeiul, pastarnacii, telina, sfecla, cartofii. Nimic mai simplu. Cand apa a fiert (in versiunea Veggie) si carnea a lasat toata spuma (in versiunea cu purcel) am pus ceapa si am ignorat-o pret de ceva minute, ca oricum aveam treaba cu tocatul. ----------------------------------------------------------------------------- As any soup may start, I first of all peeled off all vegetables and started off with 2 small pots: one half filled with salted water, one having the same plus the gross-diced meat and bones. Considering the liquid addition coming from the borsch, I only fill the pots halfway with water. For while the water is yet to boil and the meat begins to leave its foam, I started to dice my onions, carrots, pepper, celery, beet, potatoes and parsnip. Ridiculously simple. When the water was finally boiled (in the Veggie version) and the meat has finished leaving all of its foam (for the pork version), I added the onion and ignore it for a while since I had still my hands full with all vegetables having to be diced.
Dupa asta, am continuat sa adaug legumele avand in vedere care fierbe cel mai greu; am inceput cu sfecla si loboda tocata cat mai fin (doar pentru ca eu nu o suport atarnand prin linguri/polonice) pentru ca ma interesa sa-si elibereze culoarea. Daca as fi adaugat varza rosie, asta ar fi fost momentul sa o adaug, pentru ca fierbe cel mai greu din toata gasca de legume. ----------------------------------------------------------------------------- Afterwards, I kept adding my veggies starting with the ones that take the longest to boil; so I started with the beet and finely chopped orach (since I cannot stand it haging from spoons) because I wanted it to start letting out all of its colour. If I were to use the red cabbage, this whould have been the right time to add it to the soups, since it takes the longest to cook out of the entire Veggie gang.
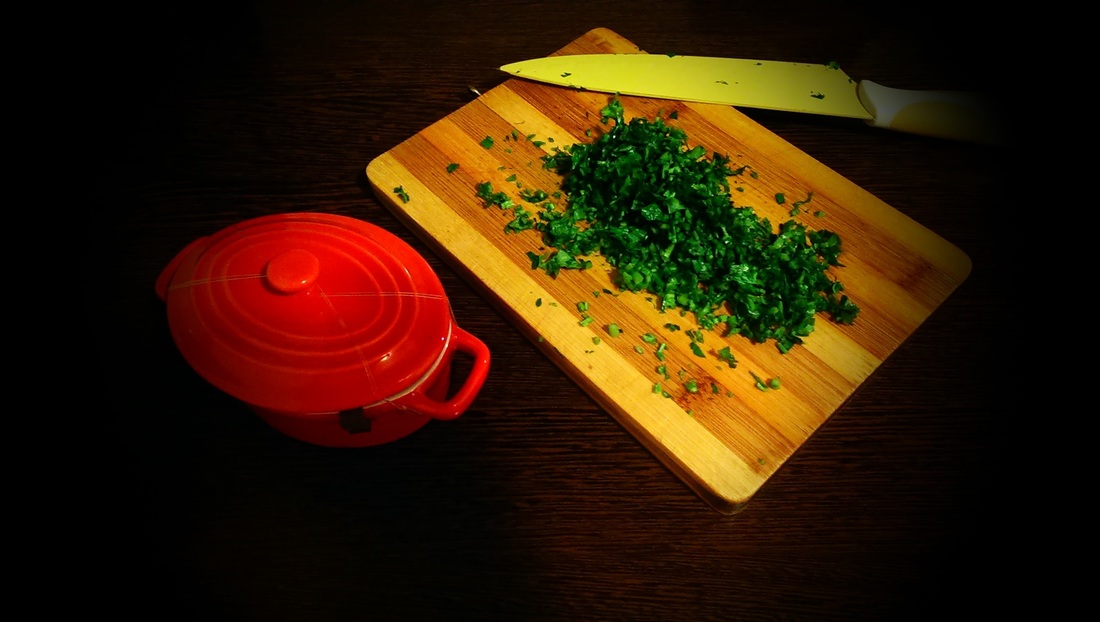
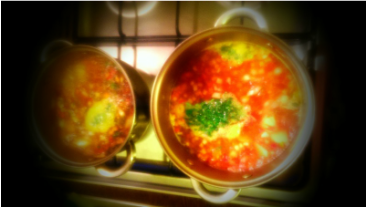
In runda a doua, au intrat la baie fierbinte telina, morcovul, pastrarnacii si ardeiul. Cand leguma cea mai incapatata a fiert sau e foarte aproape, decidem ca ar fi cazul sa intre si cartofii in hora asta cu iz rusesc. Sigur, intre timp am pus borsul la fiert intr-o cratita separata; eu nu folosesc chiar un litru, ci cel mult 700ml. Cand a bolborosit borsul nitel si cartofii sunt aproape gata fierti, era clar ca e vremea sa turnam si borsul in zeama cu iz rusesc, in mod mai mult sau mai putin egal in ambele cratite. Toata treaba a mai bolborosit o vreme laolata in semn de mare bucurie ce va sa vie si, la final, am adaugat o legatura de leustean tocata fin. ----------------------------------------------------------------------------- Round two of Veggies began with adding celery root, the carrots, parsnips and pepper. When the most stubborn Veggie was cooked or very close to it, I decided it was time to get the potatoes in this Russian-flavoured horah. Surely, in the mean time the fresh borsch should be added to a separate pot and leave it to a boil; I don't actually use one liter of a borsch, but rather 700ml. When the borsch got all bubbly with boiling and the potatoes were almost cooked, it became certain the two had to come together; so I added the borsch to the 2 pots, splitting it roughly equally between the 2. All of this needed to cook under a flame some more and finally I added the freshly chopped levage.
Eu nu-s defel fan patrunjel si nu pricep de ce-l adaugam in mancare, caci nu pare sa aduca cu sine mare aroma. Asa ca ma revolt si nu pun.
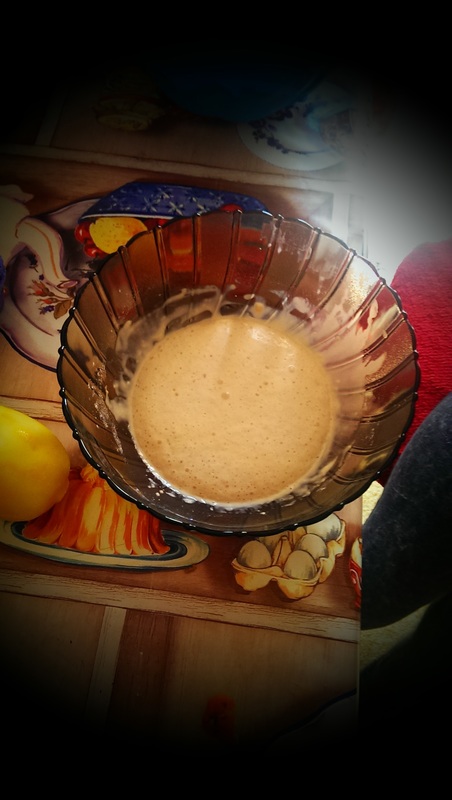
M-am cam grabit cu leusteanul si s-a oparit cam tare; ar fi trebuit sa opresc supa si sa adaug leusteanul cat mai tarziu si cat mai aproape de servire dar - de, foamea era mare si graba la fel. Ramane pe data viitoare. Un bors de suflet, rosu ca focul. ----------------------------------------------------------------------------- I don't quite get why we add parsley to our food, since it doesn't quite seem to add any flavour. So I don't add it, in an act of riot. It turns out I rushed a bit too much with adding the levage and it overcooked; I should've added it later on and more closely to the serving time, but you know - I was soooo hungry. I'll remember it next time. A true to soul Russian style borsch, red as a flame. ----------------------------------------------------------------------------- TRY SEXUAL I'LL TRY ANY RECIPE (AT LEAST) ONCE. SUMAR: Ce am folosit pentru 2 cozonaci grasuti: 25 g drojdie proaspata (Budafok) 500 g faina alba + alte 30 g pentru maia (eu folosesc Arpis) 60 ml lapte caldut (28 grade celsius) + alte 60 ml lapte rece de la frigider 150 g unt + putin unt pentru uns formele de cozonac 8 oua (2 oua medii si 3 galbenusuri pentru aluat + alte 3 oua medii pentru umplutura) 80 g zahar alb fin + alte 600 g zahar alb normal pentru sirop + alte 200 g zahar pudra coaja rasa de la o lamaie si o portocala mari 30 g Rom 10 g extract de vanilie 400 g nuca macinata 50 g cacao pudra 50 ml vinars+ alte 200 ml pentru sirop 200 ml apa 1 baton de vanilie un praf de sare pt aluat + altul pentru umplutura 2 forme de cozonac 20x10x10 cm. hartie de copt si folie alimentara putin ulei vegetal pentru uns formele Ce-am gresit: Am scapat 100g cacao in loc de 50 :) Nu s-a simtit diferenta prea tare, insa a avut un guist intens de ciocolata amaruie Ce fac mai bun sau mai bine data viitoare: Evident, am grija la cantitatea de cacao. De unde am reteta: De pe blogul lui Adi Hadean, un guest post genial by Mircea Banu, pe care il gasiti aici. ----------------------------------------------------------------------------------------------------- SUMMARY What I used for 2 sponge cakes: 25 g fresh east (Budafok) 500 g white flour + another 30 g for the leaven 60 ml warm fat milk (about 28 Celsius degrees) + another 60 ml cold milk, straight out of the fridge 150 g butter + some extra for greasing the baking trays 8 eggs (2 medium eggs and 3 egg yolks for the dough + another 3 medium eggs for the filling) 80 g fine white sugar for the dough + an extra 600 g plain white sugar for the syrup + another 200 g icing sugar the grated peel from one orange and one lemon 30 g Rum 10 g Vanilla extract 400 g grinded walnut 50 g Cocoa powder 50 ml Cognac+ another 200 ml for the syrup 200 ml water 1 Vanilla pod a dash of salt 2 special baking trays (20x10x10 cm) baking paper and food foil some vegetable oil for greasing What I did wrong: I dropped 100g cocoa powder instead of 50 g. Didn't make a whole lot of a difference, but it did gave a dark chocolate flavour What I need to do better or tastier the next time: I really need to watch out the quantities I add How I came across this recipe: This is a guest post from Mircea Banu on chef Adi Hadean's cooking blog. 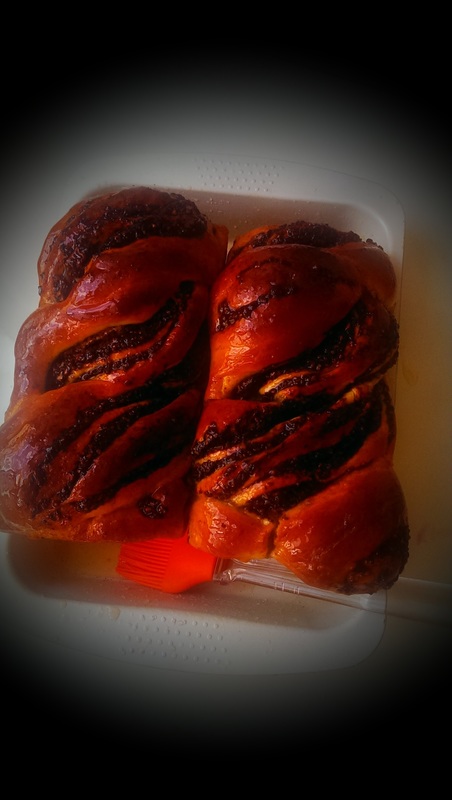 Pasul 1. Maiaua Am inceput, potrivit instructiunilor, cu un castron in care am asezat meticulos drojdia, cele 30 g faina si 60 ml lapte caldut. Ratiunea din spatele ideii de 'caldut' este aceea ca un mediu cald este propice pentru ca drojdia sa se activeze si aluatul sa inceapa sa creasca, in timp ce un mediu fierbinte 'ucide' enzimele din drojdie, facand-o inactiva. Am batut cu telul pana ce s-a omogenizat povestea si am abandonat deoparte pret de vreo 15 minute, intr-un loc caldut din camera. In imaginile de mai jos se vede maiaua mea inainte si dupa ce a crescut. ----------------------------------------------------------------------------------------------------- Step 1. The Leaven As instructed, I got a bowl and placed the east, the 30 g flour and 60 ml warm milk. The thing is you have to make sure your milk is warm and not hot because the warm liquid helps the east activate and so the dough rises, whilst hot liquid will boil the east and make it inactive. I gave this mix a whisk until it was even and leave it in a warm part of the room for about 15 minutes. The below pics show you how my leaven looked prior to and before its rise.
Pasul 2. Coca Am portionat cele 150 g de unt in bucati mai mici, de cca. 50 g, cam ca marimea unui cub de gheata. Intr-un alt bol (poate fi cel al mixerului planetar, eu am continuat manual) am pus 2 oua medii si 3 galbenusuri, 80 g zahar fin, un praf de sare, coaja rasa de lamaie si portocala, cele 30 g rom si extractul de vanilie. Am batut cu telul pana s-a topit tot zaharul. Am adaugat maiaua, cele 500 g faina si 60 ml lapte rece de la frigider. In aceasta faza, aluatul este foarte lipicios; am framantat pana cand s-a putut desprinde de pe peretii vasului, ceea ce s-a intamplat in cca. 15 min. Dupa aceea, am adaugat untul portionat putin cate putin si am framantat numai pana cand s-a incorporat. A iesit o coca pe care am transferat-o intr-un alt bol uns in prealabil cu ulei. Am acoperit cu folie de plastic si am abandonat-o in frigider 2 ore, timp in care si-a dublat volumul. Dupa ce timpul s-a scurs si volumul s-a dublat, am scos coca de la frigider, am taiat-o in 2 bucati egale; le-am dat o forma sferica, le-am pus pe fiecare in boluri unse cu ulei si am acoperit cu folie alimentara. Le-am returnat in frigider pentru alte 3 ore. ----------------------------------------------------------------------------------------------------- Step 2. The dough I portioned the 150 g butter into smaller pieces, of about 50 g each, which is kind of the size of an ice cube. In another bowl (it can be your mixer's bowl, but I did it all by hand) I placed 2 medium eggs and 3 egg yolks together with 80g fine sugar, one dash of salt, the grated peel of the orange and lemon, the 30g Rum and the vanilla extract. I whisk it all until all sugar was melted. I then added the leaven, the 500g flour and 60ml cold milk. At this stage, the dough will be really sticky; I firmly mixed until the dough got less sticky and could come off the bowl' edges easily, which took about 15 min. Then, I added the butter one piece at a time and mixed until it was all incorporated in the dough. What came out was a firm dough which I placed into another bowl greased with oil; I covered it with foil and placed it in the fridge for about 2 hours, during which time it volume doubled. After the 2 hours passed and the dough doubled its volume, I removed it from the fridge and cut it in 2 equal pieces; I gave the pieces a rather sphere shape and placed them in 2 bowls which I previously greased with oil and covered them with foil. then, I returned them back into the fridge for another 3 hours.
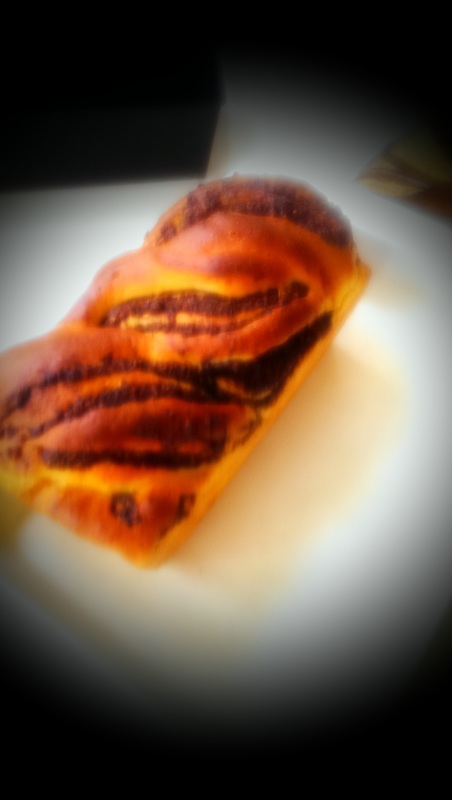
Pasul 3. Umplutura Am macinat nuca la robotul de bucatarie; desi reteta ne instruieste sa fie pana la stadiul de pasta, eu nu am facut-o chiar praf, pentru ca ne place textura ei si nu am vrut sa se piarda. Am amestecat nuca cu 2 oua, cacao, zaharul pudra (200g), 50 ml vinars si un praf de sare. ----------------------------------------------------------------------------------------------------- Step 3. The filling I grinded the walnuts using the food processor; although the recipe tells us to make it into a paste, I didn't quite do it, since we enjoy its texture and did not want to miss it. I mixed the grinded walnuts with the 2 eggs, cocoa, icing sugar, the 50ml Cognac and a dash of salt. 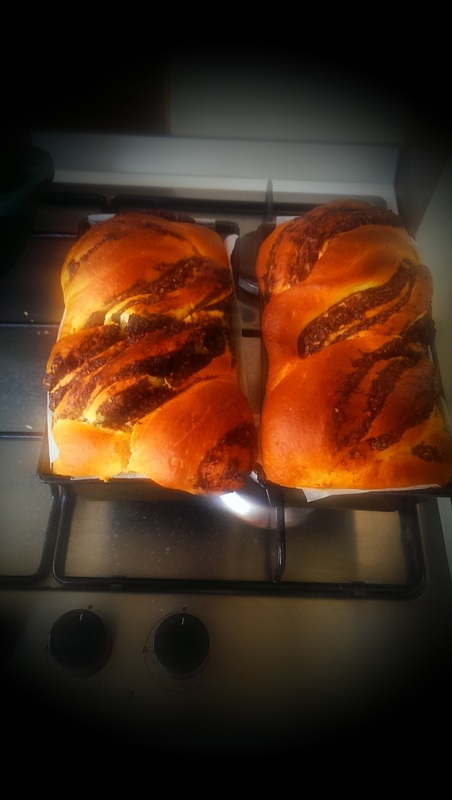 Pasul 4. Siropul Zaharul ramas (600g) si apa (200ml) s-au fiert impreuna pana cand tot zaharul s-a topit, fara a amesteca. Dupa ce s-a racit, am adaugat 200ml vinars; am sectionat pe lung batonul de vanilie, i-am scos interiorul si l-am adaugat in sirop, impreuna cu pastaia. ----------------------------------------------------------------------------------------------------- Step 4. The syrup The leftover plain white sugar (600g) and water (200ml) were boiled together until all sugar melted, without mixing it. After it was cooled down, I added 200 ml Cognac; I cut the Vanilla pod on the long side, removed its content and added the latter and the leftover empty pod in the syrup.  Pasul 5. Modelarea Dupa cele 3 ore, am scos pe rand sferele de coca de la frigider; am intins foi dreptunghiulare pe verticala de cca. 30x40 cm, cu ajutorul unui strat fin de faina; am scuturat excesul de faina, am intors foaia pe partea opusa si am intins jumatate din umplutura pe foaie, lasand marginea scurta de sus libera (cca. 4 cm), pentru ca umplutura sa nu iasa din foaie atunci cand va fi rulata. Desigur, am rulat foaia cat mai strans, iar marginea ramasa libera am uns-o cu putina apa pentru a facilita 'lipirea' ei. Am taiat cca. 5 cm din fiecare capat al ruloului si am mutat ruloul si bucatelele taiate pe o tava unsa cu ulei; am acoperit cu foile alimentara si am lasat rulourile si bucatile taiate de la capete in congelator, pret de 15 minute. Aceeasi procedura pentru ambele bucati de coca. Dupa ce s-au scurs cele 15 minute, am luat pe rand cate un rulou din congelator si le-am taiat pe lungime; bucatile se suprapun intr-o forma de cruce initial, apoi se impletesc si se aseaza in forma tapetata cu unt si 'asigurata' cu bucati de hartie de copt asezate strategic. Alaturi de cozonacel, in tava, am asezat si bucatile de coca, cat mai estetic. Am acoperit formele cu folie alimentara si le-am abandonat in frigider peste noapte. ----------------------------------------------------------------------------------------------------- Step 5. Shaping After the 3 hours passed, I removed each dough sphere one at a time; I spread them in rectangular vertical sheets of about 30x40 cm, using as little flour as possible; I shaken all flour excess and turned the sheet the other side, then spread half of the filling on top, leaving the shorter upper edge empty of any filling (about 4 cm.) so as the filling won't come out when sheet witll be rolled out. Of course, I then rolled over the sheet as tight as possible and annoited the left 4 cm edge with some water in order to help it stick better. I cut out about 5 cm. of each end of the rolled sheet and placed the rolled sheet and the cut pieces on to a greased tray, then covered it all with a foil and placed it in the freezer for 15 minutes. Same goes for the 2nd sheet. After the 15 minutes have passed, I took one rolled sheet at a time out of the freezer and cut them out long; the two pieces are placed one on top of the other and then braided; afterwards, the two baking trays need to be greased with melted butter and covered with some baking paper for extra insurance, and then the two braided pieces can be placed in the trays. Together with the braided pieces you can place the cut out dough pieces as well, as pretty as you can. Then cover the baking trays with some more foil and leave that in the fridge over night.
Pasul 6. Coacerea
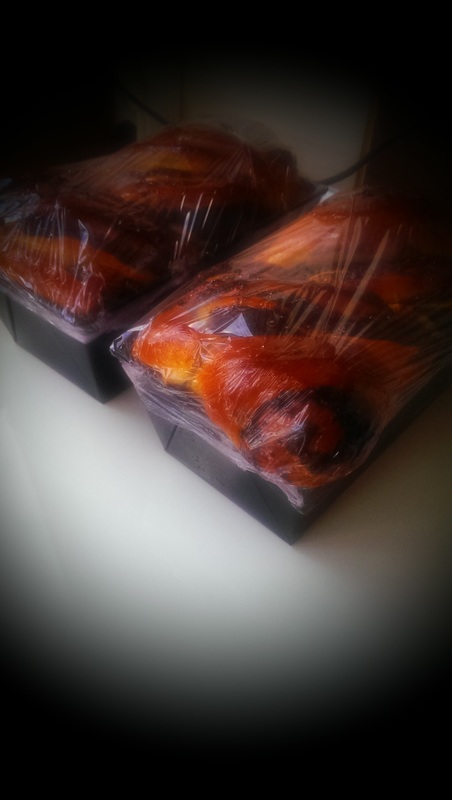
Am pus in cuptor o oala cu apa fiarta; am inchis usa, am scos formele de cozonac din frigider, am indeparta folia si le-am pus in cuptorul aburind pret de 30 de minute. Dupa acest timp, am scos formele din cuptor si oala cu apa, am incins cuptorul la treapta medie (cca. 160 grade celsius) si am copt cozonacii timp de 45 de minute, cand au fost rumeni si tare aratosi. Dupa ce i-am scos din cuptor si formele s-au racit nitel, i-am scos intr-o tava adanca si i-am lasat sa se raceasca cca. 5 minute; i-am imbaiat cu siropul (rece), folosindu-ma de o pensula de bucatarie. I-am abandonat asa vreo 10-15 minute pana cand au absorbit cat sirop au considerat de cuviinta. Ideea este sa existe o diferenta de temperatura intre lichid (siropul rece, chiar de la frigider) si coca (cozonacul scos din cuptor), pentru ca lichidul sa fie absorbit in totalitate. Excesul l-am scurs si am returnat cozonacii in forme; i-am acoperit cu folie alimentara si i-am mancat cu maaare placere dupa inca o zi. Unii carcotasi au declarat ca prefera mai multa coca si mai putina umplutura, insa eu ma numar printre cei care apreciaza cu adevarat umplutura bogata la un cozonac. Si reteta asta ne onoreaza pe noi, cei din a doua categorie. ----------------------------------------------------------------------------------------------------- Step 6. Baking I placed a pot of boiled water in the oven; i closed the door and removed the baking trays from the refrigerator, removed the foil and placed them in the steamed oven for about 30 minutes. Afterwards, I removed the baking trays and pot form the oven and turn on the heat at about 160 Celsius degrees (medium heat) and baked for cca. 45 minutes, when nice and brown. After removing from the oven and when I could touch the baking trays, I placed the two baked in one deep tray and leaved them to cool outside their baking tray for about 5 minutes; then, I gave them a bath using a kitchen brush and the syrup I made and cooled in the fridge. I abandoned them for cca. 10-15 minutes for until they got all the liquid they liked. The point here is that you need to have a temperature difference between the liquid (the cold syrup, in this case) and the dough (the hot baked sponge cake), so that the liquid can be fully absorbed. I drained the excess syrup and returned the sponge cakes in the baking trays; I then covered them with (some more) foil and ate them the next day. Some grumpies argued that they prefer a sponge cake with less filling, but I am the kind that truly apreciates a rich filling. And this recipe honours us, folks. ------------------------------------------------------------------------------ TRY SEXUAL I'LL TRY ANY RECIPE (AT LEAST) ONCE. |
Author"I'm a TRYsexual. I'll try anything once!" (Sam Jones, SATC) Archives
February 2017
Categories
All
|


 RSS Feed
